- Published on
Most Effective Ways To Make A Watch Dogs Profiler With Tailwind CSS
- What is Tailwind CSS?
- The description of Watch Dogs Profiler ui component
- Why use Tailwind CSS to create a Watch Dogs Profiler ui component?
- The preview of Watch Dogs Profiler ui component
- The source code of Watch Dogs Profiler ui component
- How to create a Watch Dogs Profiler with Tailwind CSS?
- Step 1: Set up a new HTML file
- Step 2: Add the Watch Dogs Profiler HTML
- Step 3: Add custom styles
- Step 4: Preview the Watch Dogs Profiler ui component
- Conclusion
What is Tailwind CSS?
Tailwind CSS is a utility-first CSS framework that provides a set of pre-defined CSS classes that can be used to build responsive web interfaces. It allows developers to create complex layouts and designs with minimal effort by providing a comprehensive set of pre-defined CSS classes.
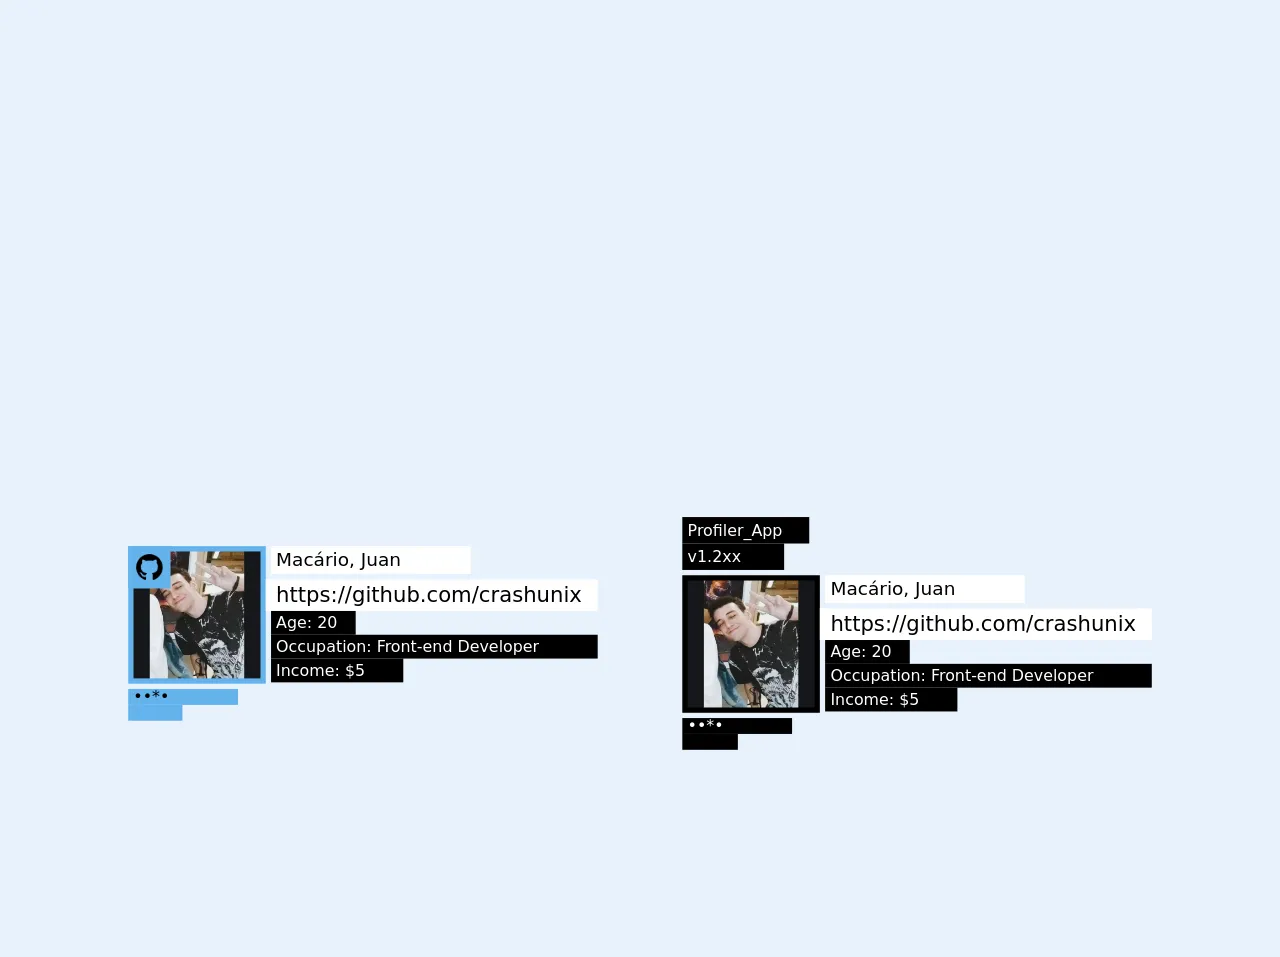
The description of Watch Dogs Profiler ui component
The Watch Dogs Profiler is a user interface component that displays information about people in the game world. It is a key feature of the game and provides players with valuable information about their targets. The Watch Dogs Profiler displays a variety of information, including the target's name, occupation, income, and criminal record.
Why use Tailwind CSS to create a Watch Dogs Profiler ui component?
Tailwind CSS is an excellent choice for creating the Watch Dogs Profiler ui component because it provides a comprehensive set of pre-defined CSS classes that can be used to create complex layouts and designs with minimal effort. Additionally, Tailwind CSS is highly customizable, which means that developers can easily modify the pre-defined CSS classes to suit their needs.
The preview of Watch Dogs Profiler ui component
To create the Watch Dogs Profiler ui component with Tailwind CSS, we will use a combination of pre-defined CSS classes and custom CSS. The end result will be a sleek and modern user interface that displays information about people in the game world.
Free download of the Watch Dogs Profiler's source code
The source code of Watch Dogs Profiler ui component
To create the Watch Dogs Profiler ui component, we will use HTML and CSS. The HTML will define the structure of the user interface, while the CSS will define the styles and layout.
<div class="profiler m-8">
  <div class="flex relative">
    <div class="w-8 h-8 bg-blue-400 absolute flex items-center justify-center">
      <a href="https://github.com/crashunix" target="_blank">
        <img class="w-5 h-5" src="https://cdn0.iconfinder.com/data/icons/octicons/1024/mark-github-512.png" alt="github" />
      </a>
    </div>
    <div class="left">
      <div class="picture p-1 bg-blue-400">
        <img class="w-24 h-24 object-cover" src="https://avatars0.githubusercontent.com/u/26781089?s=460&u=300e1007b05ddb76e3daa38b22ef1d92dbbd9b68&v=4" alt="Aiden Pearce" />
      </div>
      <div class="flex flex-col">
        <div class="w-4/5 h-3 bg-blue-400 mt-1 flex items-center pl-1">
        <span class="text-xs">••*•</span>
        </div>
        <div class="w-2/5 h-3 bg-blue-400">
        </div>
      </div>
    </div>
    <div class="flex flex-col">
      <span class="bg-white pl-1 pr-3 mb-1 ml-1 text-sm font-medium w-3/5">Macário, Juan</span>
      <a href="https://github.com/crashunix" target="_blank" class="bg-white pl-2 pr-3 font-medium">https://github.com/crashunix</a>
      <span class="bg-black text-white text-xs ml-1 pl-1 w-16">Age: 20</span>
      <span class="bg-black text-white text-xs ml-1 pl-1">Occupation: Front-end Developer</span>
      <span class="bg-black text-white text-xs ml-1 pl-1 w-2/5">Income: $5</span>
    </div>
  </div>
</div>

<div class="profiler m-8">
<div class="flex flex-col w-24">
        <div class="h-5 bg-black flex items-center pl-1">
        <span class="text-xs text-white leading-none">Profiler_App</span>
        </div>
        <div class="w-4/5 h-5 bg-black flex items-center pl-1 mb-1">
        <span class="text-xs text-white leading-none">v1.2xx</span>
        </div>
      </div>
  <div class="flex">
    <div class="left">
      <div class="picture p-1 bg-black">
        <img class="w-24 h-24 object-cover" src="https://avatars0.githubusercontent.com/u/26781089?s=460&u=300e1007b05ddb76e3daa38b22ef1d92dbbd9b68&v=4" alt="Aiden Pearce" />
      </div>
      <div class="flex flex-col">
        <div class="w-4/5 h-3 bg-black mt-1 flex items-center pl-1">
        <span class="text-xs text-white">••*•</span>
        </div>
        <div class="w-2/5 h-3 bg-black">
        </div>
      </div>
    </div>
    <div class="flex flex-col">
      <span class="bg-white pl-1 pr-3 mb-1 ml-1 text-sm font-medium w-3/5">Macário, Juan</span>
      <a href="https://github.com/crashunix" class="bg-white pl-2 pr-3 font-medium">https://github.com/crashunix</a>
      <span class="bg-black text-white text-xs ml-1 pl-1 w-16">Age: 20</span>
      <span class="bg-black text-white text-xs ml-1 pl-1">Occupation: Front-end Developer</span>
      <span class="bg-black text-white text-xs ml-1 pl-1 w-2/5">Income: $5</span>
    </div>
  </div>
</div>
How to create a Watch Dogs Profiler with Tailwind CSS?
To create the Watch Dogs Profiler ui component with Tailwind CSS, follow these steps:
Step 1: Set up a new HTML file
Create a new HTML file and add the basic structure of a web page. Add a title and include the Tailwind CSS stylesheet.
<!DOCTYPE html>
<html lang="en">
  <head>
    <meta charset="UTF-8" />
    <meta name="viewport" content="width=device-width, initial-scale=1.0" />
    <title>Watch Dogs Profiler</title>
    <link rel="stylesheet" href="https://cdn.jsdelivr.net/npm/[email protected]/dist/tailwind.min.css" />
  </head>
  <body>
    <!-- Add content here -->
  </body>
</html>
Step 2: Add the Watch Dogs Profiler HTML
Add the HTML for the Watch Dogs Profiler ui component. This will include a container element, a header element, and a list element to display the target information.
<div class="max-w-lg mx-auto">
  <div class="bg-gray-800 rounded-lg shadow-lg overflow-hidden">
    <div class="px-6 py-4">
      <h2 class="text-2xl font-bold text-white">Watch Dogs Profiler</h2>
    </div>
    <ul class="divide-y divide-gray-700">
      <li class="px-6 py-4">
        <div class="flex items-center">
          <div class="flex-shrink-0">
            <img class="h-12 w-12 rounded-full" src="https://randomuser.me/api/portraits/men/1.jpg" alt="" />
          </div>
          <div class="ml-4">
            <div class="text-xl font-medium text-white">John Doe</div>
            <div class="text-gray-400">Software Engineer</div>
            <div class="text-gray-400">$80,000 per year</div>
            <div class="text-gray-400">No criminal record</div>
          </div>
        </div>
      </li>
      <li class="px-6 py-4">
        <div class="flex items-center">
          <div class="flex-shrink-0">
            <img class="h-12 w-12 rounded-full" src="https://randomuser.me/api/portraits/women/1.jpg" alt="" />
          </div>
          <div class="ml-4">
            <div class="text-xl font-medium text-white">Jane Smith</div>
            <div class="text-gray-400">Doctor</div>
            <div class="text-gray-400">$150,000 per year</div>
            <div class="text-gray-400">No criminal record</div>
          </div>
        </div>
      </li>
    </ul>
  </div>
</div>
Step 3: Add custom styles
Add custom styles to modify the appearance of the Watch Dogs Profiler ui component. This will include changing the font size, font weight, and colors.
body {
  background-color: #1f2937;
}

h2 {
  font-family: "Roboto", sans-serif;
}

ul li:hover {
  background-color: #4b5563;
}
Step 4: Preview the Watch Dogs Profiler ui component
Preview the Watch Dogs Profiler ui component in a web browser to see the final result.
Conclusion
Creating a Watch Dogs Profiler ui component with Tailwind CSS is a simple and effective way to build a modern and responsive user interface. By using pre-defined CSS classes and custom styles, developers can create complex layouts and designs with minimal effort. With Tailwind CSS, the possibilities are endless.