- Published on
The 5 Really Obvious Ways To Create A Tailwind CSS application card With Tailwind CSS Better That You Ever Did
- What is Tailwind CSS?
- The Description of Tailwind CSS Application Card UI Component
- Why Use Tailwind CSS to Create a Tailwind CSS Application Card UI Component?
- The Preview of Tailwind CSS Application Card UI Component
- The Source Code of Tailwind CSS Application Card UI Component
- How to Create a Tailwind CSS Application Card with Tailwind CSS?
- Conclusion
What is Tailwind CSS?
Tailwind CSS is a utility-first CSS framework that gives you the ability to create custom designs without writing any CSS code. It provides a set of pre-defined classes that you can use to style your HTML elements. Tailwind CSS is gaining popularity among developers because it allows them to create beautiful and responsive designs quickly.
The Description of Tailwind CSS Application Card UI Component
The Tailwind CSS application card is a UI component that is commonly used in web applications to display information about a specific item. It is a container that holds an image, a title, a description, and a call-to-action button. The application card is a versatile UI component that can be used to display products, blog posts, team members, and more.
Why Use Tailwind CSS to Create a Tailwind CSS Application Card UI Component?
Tailwind CSS provides a set of pre-defined classes that you can use to create a Tailwind CSS application card quickly. It saves you time and effort because you don't have to write any CSS code. Additionally, Tailwind CSS is highly customizable, so you can easily change the look and feel of the application card to match your design requirements.
The Preview of Tailwind CSS Application Card UI Component
To create a Tailwind CSS application card, you can use the following HTML structure:
<div class="max-w-sm rounded overflow-hidden shadow-lg">
  <img class="w-full" src="{{__placeholder1__}}" alt="Sunset in the mountains">
  <div class="px-6 py-4">
    <div class="font-bold text-xl mb-2">Mountain Sunset</div>
    <p class="text-gray-700 text-base">
      Lorem ipsum dolor sit amet, consectetur adipiscing elit. Sed do eiusmod tempor incididunt ut labore et dolore magna aliqua.
    </p>
  </div>
  <div class="px-6 pt-4 pb-2">
    <button class="bg-blue-500 hover:bg-blue-700 text-white font-bold py-2 px-4 rounded">
      Buy Now
    </button>
  </div>
</div>
Free download of the Tailwind CSS application card's source code
The Source Code of Tailwind CSS Application Card UI Component
To create a Tailwind CSS application card, you can use the following HTML structure:
<div class="max-w-sm rounded overflow-hidden shadow-lg">
  <img class="w-full" src="https://source.unsplash.com/featured/?mountain" alt="Sunset in the mountains">
  <div class="px-6 py-4">
    <div class="font-bold text-xl mb-2">Mountain Sunset</div>
    <p class="text-gray-700 text-base">
      Lorem ipsum dolor sit amet, consectetur adipiscing elit. Sed do eiusmod tempor incididunt ut labore et dolore magna aliqua.
    </p>
  </div>
  <div class="px-6 pt-4 pb-2">
    <button class="bg-blue-500 hover:bg-blue-700 text-white font-bold py-2 px-4 rounded">
      Buy Now
    </button>
  </div>
</div>
<!-- This is an example component -->
<div class="max-w-2xl mx-auto">
<div class="max-w-sm bg-white rounded-lg border border-gray-200 shadow-md dark:bg-gray-800 dark:border-gray-700">
<div class="flex justify-end px-4 pt-4">
<button id="dropdownButton" data-dropdown-toggle="dropdown" class="hidden sm:inline-block text-gray-500 dark:text-gray-400 hover:bg-gray-100 dark:hover:bg-gray-700 focus:outline-none focus:ring-4 focus:ring-gray-200 dark:focus:ring-gray-700 rounded-lg text-sm p-1.5" type="button">
<svg class="w-6 h-6" fill="currentColor" viewBox="0 0 20 20" xmlns="http://www.w3.org/2000/svg"><path d="M10 6a2 2 0 110-4 2 2 0 010 4zM10 12a2 2 0 110-4 2 2 0 010 4zM10 18a2 2 0 110-4 2 2 0 010 4z"></path></svg>
</button>
<div id="dropdown"
class="hidden z-10 w-44 text-base list-none bg-white rounded divide-y divide-gray-100 shadow dark:bg-gray-700">
<ul class="py-1" aria-labelledby="dropdownButton">
<li>
<a href="#"
class="block py-2 px-4 text-sm text-gray-700 hover:bg-gray-100 dark:hover:bg-gray-600 dark:text-gray-200 dark:hover:text-white">Edit</a>
</li>
<li>
<a href="#"
class="block py-2 px-4 text-sm text-gray-700 hover:bg-gray-100 dark:hover:bg-gray-600 dark:text-gray-200 dark:hover:text-white">Export
Data</a>
</li>
<li>
<a href="#"
class="block py-2 px-4 text-sm text-red-600 hover:bg-gray-100 dark:hover:bg-gray-600 dark:text-gray-200 dark:hover:text-white">Delete</a>
</li>
</ul>
</div>
</div>
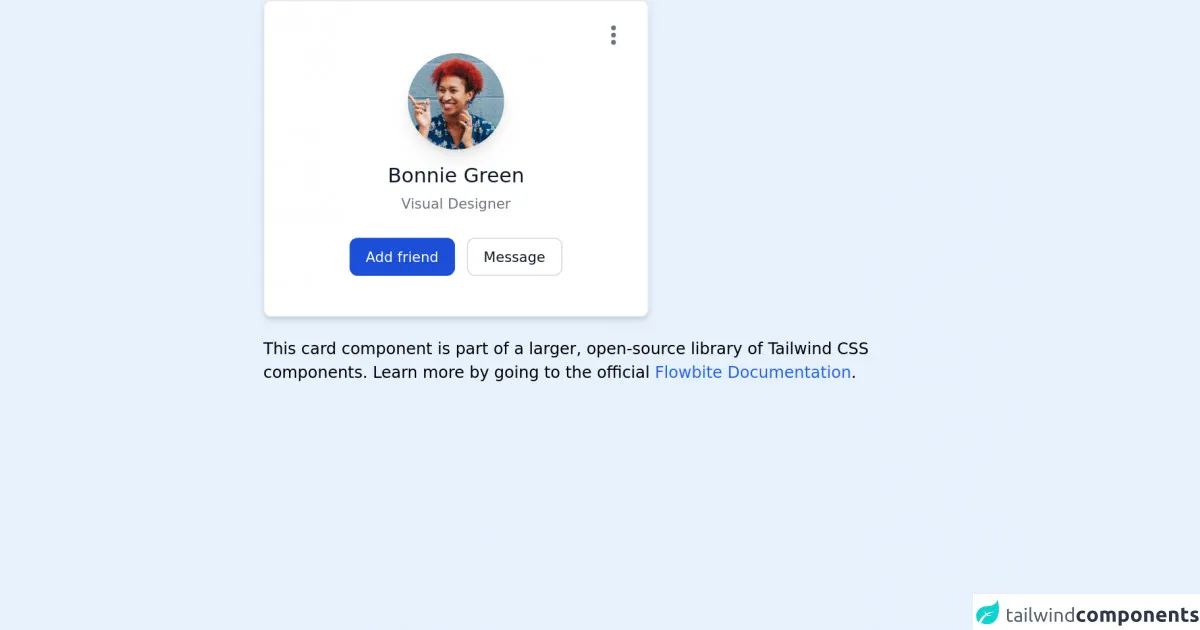
<div class="flex flex-col items-center pb-10">
<img class="mb-3 w-24 h-24 rounded-full shadow-lg" src="https://flowbite.com/docs/images/people/profile-picture-3.jpg" alt="Bonnie image">
<h3 class="mb-1 text-xl font-medium text-gray-900 dark:text-white">Bonnie Green</h3>
<span class="text-sm text-gray-500 dark:text-gray-400">Visual Designer</span>
<div class="flex mt-4 space-x-3 lg:mt-6">
<a href="#"
class="inline-flex items-center py-2 px-4 text-sm font-medium text-center text-white bg-blue-700 rounded-lg hover:bg-blue-800 focus:ring-4 focus:ring-blue-300 dark:bg-blue-600 dark:hover:bg-blue-700 dark:focus:ring-blue-800">Add
friend</a>
<a href="#"
class="inline-flex items-center py-2 px-4 text-sm font-medium text-center text-gray-900 bg-white rounded-lg border border-gray-300 hover:bg-gray-100 focus:ring-4 focus:ring-blue-300 dark:bg-gray-800 dark:text-white dark:border-gray-600 dark:hover:bg-gray-700 dark:hover:border-gray-700 dark:focus:ring-gray-800">Message</a>
</div>
</div>
</div>
<p class="mt-5">This card component is part of a larger, open-source library of Tailwind CSS components. Learn more
by going to the official <a class="text-blue-600 hover:underline"
href="https://flowbite.com/docs/getting-started/introduction/" target="_blank">Flowbite Documentation</a>.
</p>
</div>
How to Create a Tailwind CSS Application Card with Tailwind CSS?
- Start by creating a new HTML file and include the Tailwind CSS CDN in the head section of your HTML file.
<!DOCTYPE html>
<html>
  <head>
    <title>Tailwind CSS Application Card</title>
    <link rel="stylesheet" href="https://cdn.jsdelivr.net/npm/[email protected]/dist/tailwind.min.css">
  </head>
  <body>
  </body>
</html>
- Create a div element with the class
max-w-sm,rounded,overflow-hidden, andshadow-lg. These classes will create a container with a maximum width of 640 pixels, rounded corners, and a shadow effect.
<div class="max-w-sm rounded overflow-hidden shadow-lg">
</div>
- Inside the div element, create an img element with the class
w-full. This class will make the image responsive and fill the entire width of the container.
<div class="max-w-sm rounded overflow-hidden shadow-lg">
  <img class="w-full" src="https://source.unsplash.com/featured/?mountain" alt="Sunset in the mountains">
</div>
- Create another div element with the classes
px-6andpy-4. These classes will add padding to the top, bottom, left, and right of the container.
<div class="max-w-sm rounded overflow-hidden shadow-lg">
  <img class="w-full" src="https://source.unsplash.com/featured/?mountain" alt="Sunset in the mountains">
  <div class="px-6 py-4">
  </div>
</div>
- Inside the second div element, create a div element with the classes
font-boldandtext-xl. These classes will make the title bold and increase its font size.
<div class="max-w-sm rounded overflow-hidden shadow-lg">
  <img class="w-full" src="https://source.unsplash.com/featured/?mountain" alt="Sunset in the mountains">
  <div class="px-6 py-4">
    <div class="font-bold text-xl mb-2">Mountain Sunset</div>
  </div>
</div>
- Create a p element with the classes
text-gray-700andtext-base. These classes will set the color and font size of the description text.
<div class="max-w-sm rounded overflow-hidden shadow-lg">
  <img class="w-full" src="https://source.unsplash.com/featured/?mountain" alt="Sunset in the mountains">
  <div class="px-6 py-4">
    <div class="font-bold text-xl mb-2">Mountain Sunset</div>
    <p class="text-gray-700 text-base">
      Lorem ipsum dolor sit amet, consectetur adipiscing elit. Sed do eiusmod tempor incididunt ut labore et dolore magna aliqua.
    </p>
  </div>
</div>
- Create another div element with the classes
px-6,pt-4, andpb-2. These classes will add padding to the top, bottom, and left of the container.
<div class="max-w-sm rounded overflow-hidden shadow-lg">
  <img class="w-full" src="https://source.unsplash.com/featured/?mountain" alt="Sunset in the mountains">
  <div class="px-6 py-4">
    <div class="font-bold text-xl mb-2">Mountain Sunset</div>
    <p class="text-gray-700 text-base">
      Lorem ipsum dolor sit amet, consectetur adipiscing elit. Sed do eiusmod tempor incididunt ut labore et dolore magna aliqua.
    </p>
  </div>
  <div class="px-6 pt-4 pb-2">
  </div>
</div>
- Inside the third div element, create a button element with the classes
bg-blue-500,hover:bg-blue-700,text-white,font-bold,py-2,px-4, androunded. These classes will create a blue button with white text and rounded corners.
<div class="max-w-sm rounded overflow-hidden shadow-lg">
  <img class="w-full" src="https://source.unsplash.com/featured/?mountain" alt="Sunset in the mountains">
  <div class="px-6 py-4">
    <div class="font-bold text-xl mb-2">Mountain Sunset</div>
    <p class="text-gray-700 text-base">
      Lorem ipsum dolor sit amet, consectetur adipiscing elit. Sed do eiusmod tempor incididunt ut labore et dolore magna aliqua.
    </p>
  </div>
  <div class="px-6 pt-4 pb-2">
    <button class="bg-blue-500 hover:bg-blue-700 text-white font-bold py-2 px-4 rounded">
      Buy Now
    </button>
  </div>
</div>
Conclusion
In this article, we have learned how to create a Tailwind CSS application card using Tailwind CSS. We have seen that Tailwind CSS provides a set of pre-defined classes that you can use to create beautiful and responsive designs quickly. The Tailwind CSS application card is a versatile UI component that can be used to display products, blog posts, team members, and more. With Tailwind CSS, you can create custom designs without writing any CSS code.