- Published on
6 Ideas To Help You Make A Pricing Table With JS Toggle With Tailwind CSS Like A Pro
- What is Tailwind CSS?
- The description of Pricing Table with JS Toggle ui component
- Why use Tailwind CSS to create a Pricing Table with JS Toggle ui component?
- The preview of Pricing Table with JS Toggle ui component.
- The source code of Pricing Table with JS Toggle ui component.
- How to create a Pricing Table with JS Toggle with Tailwind CSS?
- Step 1: Create the HTML structure
- Step 2: Add JavaScript to toggle the pricing plans
- Step 3: Add Tailwind CSS classes to style the pricing table
- Conclusion
What is Tailwind CSS?
Tailwind CSS is a popular utility-first CSS framework that makes it easy to create responsive and customizable user interfaces. It provides a set of pre-defined classes that you can use to style your HTML elements without writing any custom CSS.
The description of Pricing Table with JS Toggle ui component
A pricing table is a common UI component used on websites to display different pricing plans for a product or service. A pricing table with JS toggle allows users to switch between different pricing plans without having to reload the page.
Why use Tailwind CSS to create a Pricing Table with JS Toggle ui component?
Tailwind CSS provides a set of pre-defined classes that you can use to create a pricing table with JS toggle without having to write any custom CSS. This makes it easy to create a responsive and customizable pricing table that looks great on any device.
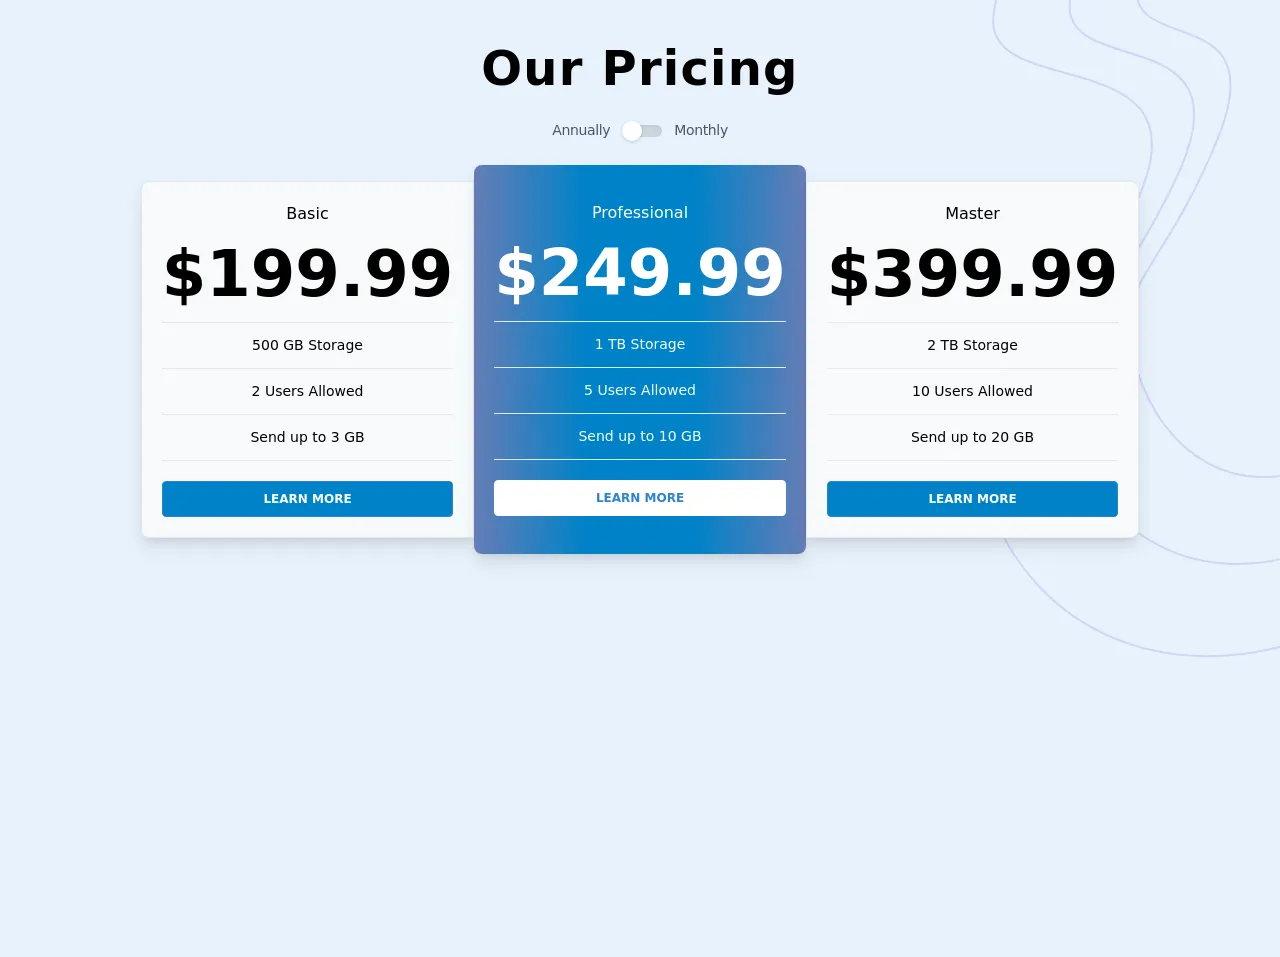
The preview of Pricing Table with JS Toggle ui component.
To create a pricing table with JS toggle, we will use Tailwind CSS to style our HTML elements. Here is a preview of what our pricing table will look like:
Free download of the Pricing Table with JS Toggle's source code
The source code of Pricing Table with JS Toggle ui component.
Here is the source code for our pricing table with JS toggle:
<head>
<meta charset="UTF-8">
<meta name="viewport" content="width=device-width, initial-scale=1.0">
<link href="https://fonts.googleapis.com/css2?family=Work+Sans:wght@500;700&display=swap" rel="stylesheet">
<title>Tailwind CSS Pricing Table with Toggle</title>
<style>
@media (min-width: 640px) {
.sm\:bg-svg-bottom {
background-image: url("data:image/svg+xml,%3Csvg xmlns='http://www.w3.org/2000/svg' width='353' height='304'%3E%3Cg fill='none' fill-rule='evenodd' stroke='%23D0D5F6' stroke-width='2'%3E%3Cpath d='M180.29 759c102.087-21.62 155.232-61.312 159.437-119.074 6.307-86.643-231.598-17.186-136.358-198 95.241-180.813 181.318-185.29 136.358-298C294.767 31.216 174.04-27.954 33.79 16.8c-93.501 29.836-144.652 140.545-153.453 332.126'/%3E%3Cpath d='M138.3 759c80.083-18.988 121.774-53.846 125.072-104.575 4.948-76.093-181.679-15.094-106.966-173.89C231.118 321.738 298.64 317.808 263.372 218.82c-35.269-98.986-129.974-150.95-239.995-111.646C-49.97 133.378-90.096 230.605-97 398.859'/%3E%3Cpath d='M102.065 761c60.604-16.56 92.153-46.963 94.65-91.208 3.743-66.367-137.488-13.165-80.949-151.664 56.54-138.5 107.638-141.927 80.948-228.261-26.69-86.335-98.359-131.656-181.618-97.376C-40.41 215.345-70.775 300.145-76 446.892'/%3E%3C/g%3E%3C/svg%3E");
}
}
.toggle_dot {
top: -.25rem;
transition: all 0.3s ease-in-out;
}
input:checked~.toggle_dot {
transform: translateX(100%);
background-color: #0082c8;
}
.bg-gradient {
background: #667db6;
/* fallback for old browsers */
background: -webkit-linear-gradient(to right, #667db6, #0082c8, #0082c8, #667db6);
/* Chrome 10-25, Safari 5.1-6 */
background: linear-gradient(to right, #667db6, #0082c8, #0082c8, #667db6);
/* W3C, IE 10+/ Edge, Firefox 16+, Chrome 26+, Opera 12+, Safari 7+ */
}
.bg-gradient-base {
background-color: #0082c8;
}
.font-work-sans {
font-family: 'Work Sans', sans-serif;
}
</style>
</head>
<body class="text-gray-900 font-work-sans h-screen bg-no-repeat bg-left-bottom sm:bg-svg-bottom">
<svg class="absolute top-0 right-0 h-full" xmlns="http://www.w3.org/2000/svg" width"375" height"658">
<g fill="none" fill-rule="evenodd" stroke="#D0D5F6" stroke-width="2">
<path d="M172.71-101C70.623-79.38 17.478-39.688 13.273 18.074c-6.307 86.643 231.598 17.186 136.358 198-95.241 180.813-181.318 185.29-136.358 298C58.233 626.784 178.96 685.954 319.21 641.2c93.501-29.836 144.652-140.545 153.453-332.126" />
<path d="M214.7-101C134.617-82.012 92.926-47.154 89.628 3.575c-4.948 76.093 181.679 15.094 106.966 173.89C121.882 336.262 54.36 340.192 89.628 439.18c35.269 98.986 129.974 150.95 239.995 111.646C402.97 524.622 443.096 427.395 450 259.141" />
<path d="M250.935-103c-60.604 16.56-92.153 46.963-94.65 91.208-3.743 66.367 137.488 13.165 80.949 151.664-56.54 138.5-107.638 141.927-80.948 228.261 26.69 86.335 98.359 131.656 181.618 97.376C393.41 442.655 423.775 357.855 429 211.108" />
</g>
</svg>
<h1 class="text-center font-bold text-5xl mt-8 tracking-wide relative">Our Pricing</h1>
<div class="flex flex-row justify-center my-4 text-sm tracking-tight font-medium text-gray-700">
<p class="mx-3">Annually</p>
<!-- Toggle Button -->
<label for="toggle" class="flex items-center cursor-pointer">
<!-- toggle -->
<div class="relative">
<!-- hidden input -->
<input id="toggle" type="checkbox" class="hidden" onclick="myFunction()" />
<!-- line -->
<div class="w-10 h-3 bg-gray-400 rounded-full shadow-inner"></div>
<!-- dot -->
<div class="toggle_dot absolute w-5 h-5 bg-white rounded-full shadow inset-y-0 left-0"></div>
</div>
</label>
<p class="mx-3">Monthly</p>
</div>
<div class="flex flex-col md:flex-row md:transform md:scale-75 lg:scale-100 justify-center">
<div class="border rounded-lg md:rounded-r-none text-center p-5 mx-auto md:mx-0 my-2 md:my-6 bg-gray-100 font-medium z-10 shadow-lg">
<div class="">Basic</div>
<div id="month" class="font-bold text-6xl month hidden">$19.99</div>
<div id="annual" class="font-bold text-6xl annual">$199.99</div>
<hr>
<div class="text-sm my-3">500 GB Storage</div>
<hr>
<div class="text-sm my-3">2 Users Allowed</div>
<hr>
<div class="text-sm my-3">Send up to 3 GB</div>
<hr>
<a href="#" target="_blank">
<div class="bg-gradient-base border border-blue-600 hover:bg-white text-white hover:text-blue-600 font-bold uppercase text-xs mt-5 py-2 px-4 rounded cursor-pointer">Learn More</div>
</a>
</div>
<div class="border-transparent rounded-lg text-center p-5 mx-auto md:mx-0 my-2 bg-gradient text-white font-medium z-10 shadow-lg">
<div class="py-4">Professional
<div id="month" class="font-bold text-6xl month hidden">$24.99</div>
<div id="annual" class="font-bold text-6xl annual">$249.99</div>
<hr>
<div class="text-sm my-3">1 TB Storage</div>
<hr>
<div class="text-sm my-3">5 Users Allowed</div>
<hr>
<div class="text-sm my-3">Send up to 10 GB</div>
<hr>
<a href="#" target="_blank">
<div class="bg-white border border-white hover:bg-transparent text-blue-600 hover:text-white font-bold uppercase text-xs mt-5 py-2 mpx-4 rounded cursor-pointer">Learn More</div>
</a>
</div>
</div>
<div class="border rounded-lg md:rounded-l-none text-center p-5 mx-auto md:mx-0 my-2 md:my-6 bg-gray-100 font-medium z-10 shadow-lg">
<div class="">Master</div>
<div id="month" class="font-bold text-6xl month hidden">$39.99</div>
<div id="annual" class="font-bold text-6xl annual">$399.99</div>
<hr>
<div class="text-sm my-3">2 TB Storage</div>
<hr>
<div class="text-sm my-3">10 Users Allowed</div>
<hr>
<div class="text-sm my-3">Send up to 20 GB</div>
<hr>
<a href="#" target="_blank">
<div class="bg-gradient-base border border-blue-600 hover:bg-transparent text-white hover:text-blue-600 font-bold uppercase text-xs mt-5 py-2 px-4 rounded cursor-pointer">Learn More</div>
</a>
</div>
</div>
<!--JS for toggle-->
<script>
function myFunction() {
var x = document.querySelectorAll('.annual');
var y = document.querySelectorAll('.month');
for (var i = 0; i < x.length; i++) {
if (document.getElementById("toggle").checked == true) {
x[i].classList.add('hidden');
y[i].classList.remove('hidden');
} else {
x[i].classList.remove('hidden');
y[i].classList.add('hidden');
}
}
}
</script>
</body>
</html>
How to create a Pricing Table with JS Toggle with Tailwind CSS?
Now that we have seen a preview of our pricing table and the source code, let's take a look at how to create a pricing table with JS toggle using Tailwind CSS.
Step 1: Create the HTML structure
The first step is to create the HTML structure for our pricing table. We will use a table element to display our pricing plans. Here is the HTML code:
<div class="max-w-7xl mx-auto px-4 sm:px-6 lg:px-8">
  <div class="max-w-3xl mx-auto">
    <table class="table-auto">
      <thead>
        <tr>
          <th class="px-4 py-2"></th>
          <<th class="text-center px-4 py-2">
            <span class="text-lg font-medium text-gray-900">Basic</span>
          </th>
          <th class="text-center px-4 py-2">
            <span class="text-lg font-medium text-gray-900">Pro</span>
          </th>
          <th class="text-center px-4 py-2">
            <span class="text-lg font-medium text-gray-900">Enterprise</span>
          </th>
        </tr>
      </thead>
      <tbody>
        <tr>
          <td class="border px-4 py-2">
            <span class="text-lg font-medium text-gray-900">Price</span>
          </td>
          <td class="border text-center px-4 py-2">
            <span class="text-lg font-medium text-gray-900">$9.99</span>
            <span class="text-gray-600">/month</span>
          </td>
          <td class="border text-center px-4 py-2">
            <span class="text-lg font-medium text-gray-900">$19.99</span>
            <span class="text-gray-600">/month</span>
          </td>
          <td class="border text-center px-4 py-2">
            <span class="text-lg font-medium text-gray-900">$99.99</span>
            <span class="text-gray-600">/month</span>
          </td>
        </tr>
        <tr>
          <td class="border px-4 py-2">
            <span class="text-lg font-medium text-gray-900">Users</span>
          </td>
          <td class="border text-center px-4 py-2">1</td>
          <td class="border text-center px-4 py-2">5</td>
          <td class="border text-center px-4 py-2">Unlimited</td>
        </tr>
        <tr>
          <td class="border px-4 py-2">
            <span class="text-lg font-medium text-gray-900">Storage</span>
          </td>
          <td class="border text-center px-4 py-2">10 GB</td>
          <td class="border text-center px-4 py-2">50 GB</td>
          <td class="border text-center px-4 py-2">Unlimited</td>
        </tr>
        <tr>
          <td class="border px-4 py-2">
            <span class="text-lg font-medium text-gray-900">Support</span>
          </td>
          <td class="border text-center px-4 py-2">Email</td>
          <td class="border text-center px-4 py-2">Email + Phone</td>
          <td class="border text-center px-4 py-2">24/7</td>
        </tr>
        <tr>
          <td class="border px-4 py-2"></td>
          <td class="border text-center px-4 py-2">
            <button class="bg-blue-500 hover:bg-blue-700 text-white font-bold py-2 px-4 rounded-full" id="basic-toggle">Select</button>
          </td>
          <td class="border text-center px-4 py-2">
            <button class="bg-blue-500 hover:bg-blue-700 text-white font-bold py-2 px-4 rounded-full" id="pro-toggle">Select</button>
          </td>
          <td class="border text-center px-4 py-2">
            <button class="bg-blue-500 hover:bg-blue-700 text-white font-bold py-2 px-4 rounded-full" id="enterprise-toggle">Select</button>
          </td>
        </tr>
      </tbody>
    </table>
  </div>
</div>
In this HTML code, we have created a table with four columns: Basic, Pro, Enterprise, and a button to select each pricing plan. We have also added some basic styling using Tailwind CSS classes.
Step 2: Add JavaScript to toggle the pricing plans
The next step is to add JavaScript code to toggle the pricing plans when the user clicks on the select button. Here is the JavaScript code:
const basicToggle = document.getElementById('basic-toggle');
const proToggle = document.getElementById('pro-toggle');
const enterpriseToggle = document.getElementById('enterprise-toggle');

const basicPlan = document.querySelectorAll('tr')[1];
const proPlan = document.querySelectorAll('tr')[2];
const enterprisePlan = document.querySelectorAll('tr')[3];

basicToggle.addEventListener('click', () => {
  basicPlan.classList.remove('hidden');
  proPlan.classList.add('hidden');
  enterprisePlan.classList.add('hidden');
});

proToggle.addEventListener('click', () => {
  basicPlan.classList.add('hidden');
  proPlan.classList.remove('hidden');
  enterprisePlan.classList.add('hidden');
});

enterpriseToggle.addEventListener('click', () => {
  basicPlan.classList.add('hidden');
  proPlan.classList.add('hidden');
  enterprisePlan.classList.remove('hidden');
});
In this JavaScript code, we have added event listeners to each select button that toggle the visibility of the corresponding pricing plan. When the user clicks on a select button, the JavaScript code removes the hidden class from the corresponding pricing plan and adds the hidden class to the other pricing plans.
Step 3: Add Tailwind CSS classes to style the pricing table
The final step is to add Tailwind CSS classes to style our pricing table. Here is the CSS code:
.hidden {
  display: none;
}
In this CSS code, we have defined a hidden class that sets the display property to none. We will use this class to hide the pricing plans that are not currently selected.
Conclusion
In this article, we have seen how to create a pricing table with JS toggle using Tailwind CSS. We have learned how to create the HTML structure, add JavaScript code to toggle the pricing plans, and add Tailwind CSS classes to style the pricing table. With these techniques, you can create a responsive and customizable pricing table that looks great on any device.