- Published on
Advanced Guide: Create A Form With Tailwind CSS
- What is Tailwind CSS?
- The description of Form ui component
- Why use Tailwind CSS to create a Form ui component?
- The preview of Form ui component
- The source code of Form ui component
- How to create a Form with Tailwind CSS?
- Step 1: Create the HTML structure
- Step 2: Style the form with Tailwind CSS
- Conclusion
Forms are an essential part of any website or application. They allow users to submit information, make purchases, and interact with the website or application. Creating a form that is both functional and visually appealing can be a challenging task. In this article, we will explore how to create a form using Tailwind CSS, a utility-first CSS framework.
What is Tailwind CSS?
Tailwind CSS is a utility-first CSS framework that allows developers to rapidly build custom user interfaces. It provides a set of pre-defined classes that can be used to style HTML elements. Tailwind CSS is highly customizable, and developers can easily create their own classes to suit their needs.
The description of Form ui component
A form is a UI component that allows users to input data and submit it to a server. Forms typically consist of input fields, labels, buttons, and other elements that allow users to interact with the form. Forms can be used for a variety of purposes, including user registration, contact forms, and surveys.
Why use Tailwind CSS to create a Form ui component?
Tailwind CSS makes it easy to create forms that are both functional and visually appealing. It provides a set of pre-defined classes that can be used to style form elements, such as input fields, labels, and buttons. Tailwind CSS also allows developers to easily customize the look and feel of their forms by creating their own classes.
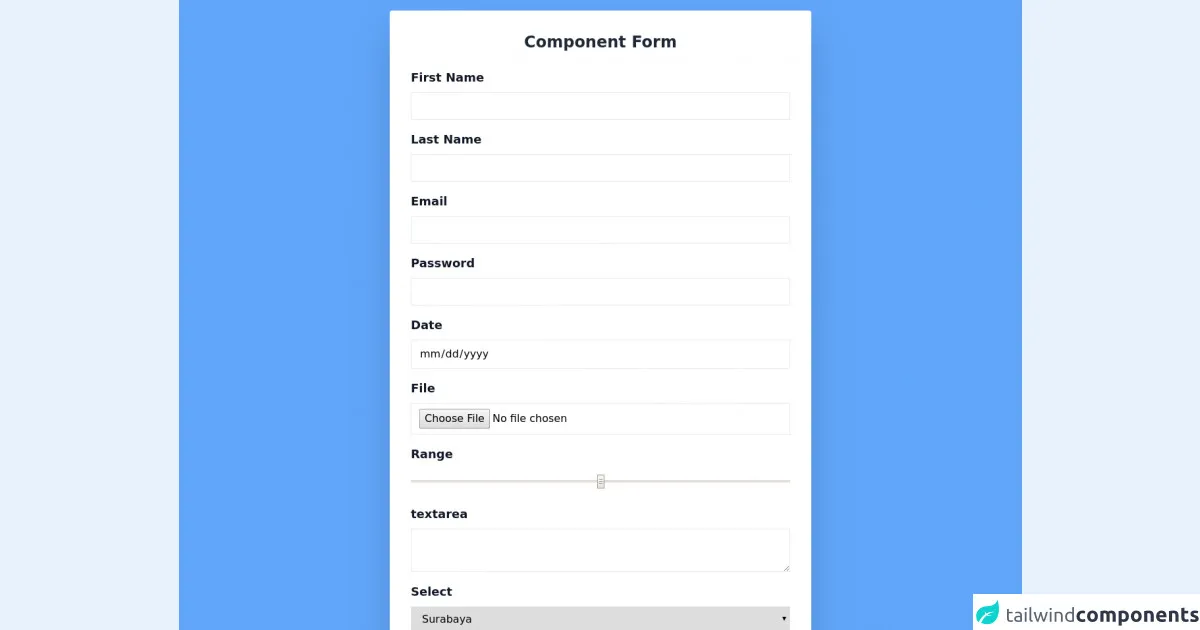
The preview of Form ui component
Creating a form with Tailwind CSS is a straightforward process. We will begin by creating a basic form that includes a text input field, a checkbox, and a submit button.
Free download of the Form's source code
The source code of Form ui component
To create a form with Tailwind CSS, we will need to use a combination of HTML and CSS. The HTML will define the structure of the form, while the CSS will be used to style the form elements.
<div class="flex justify-center items-center w-full bg-blue-400">
    <div class="w-1/2 bg-white rounded shadow-2xl p-8 m-4">
        <h1 class="block w-full text-center text-gray-800 text-2xl font-bold mb-6">Component Form</h1>
        <form action="/" method="post">
            <div class="flex flex-col mb-4">
                <label class="mb-2 font-bold text-lg text-gray-900" for="first_name">First Name</label>
                <input class="border py-2 px-3 text-grey-800" type="text" name="first_name" id="first_name">
            </div>
            <div class="flex flex-col mb-4">
                <label class="mb-2 font-bold text-lg text-gray-900" for="last_name">Last Name</label>
                <input class="border py-2 px-3 text-grey-800" type="text" name="last_name" id="last_name">
            </div>
            <div class="flex flex-col mb-4">
                <label class="mb-2 font-bold text-lg text-gray-900" for="email">Email</label>
                <input class="border py-2 px-3 text-grey-800" type="email" name="email" id="email">
            </div>
            <div class="flex flex-col mb-4">
                <label class="mb-2 font-bold text-lg text-gray-900" for="password">Password</label>
                <input class="border py-2 px-3 text-grey-800" type="password" name="password" id="password">
            </div>
            <div class="flex flex-col mb-4">
                <label class="mb-2 font-bold text-lg text-gray-900" for="Date">Date</label>
                <input class="border py-2 px-3 text-grey-800" type="date" name="date" id="date">
            </div>
            <div class="flex flex-col mb-4">
                <label class="mb-2 font-bold text-lg text-gray-900" for="File">File</label>
                <input class="border py-2 px-3 text-grey-800" type="file" name="file" id="file">
            </div>
            <div class="flex flex-col mb-4">
                <label class="mb-2 font-bold text-lg text-gray-900" for="color">Range</label>
                <input class="border py-2 text-grey-800" type="range" name="range" id="range">
            </div>
            <div class="flex flex-col mb-4">
                <label class="mb-2 font-bold text-lg text-gray-900" for="textarea">textarea</label>
                <textarea class="border py-2 px-3 text-grey-800" name="textarea" id="textarea"></textarea>
            </div>
            <div class="flex flex-col mb-4">
                <label class="mb-2 font-bold text-lg text-gray-900" for="Select">Select</label>
                <select class="border py-2 px-3 text-grey-800">
                    <option>Surabaya</option>
                    <option>Jakarta</option>
                    <option>Bandung</option>
                    <option>Mojokerto</option>
                </select>
            </div>
            <button class="block bg-green-400 hover:bg-green-600 text-white uppercase text-lg mx-auto p-4 rounded" type="submit">Save</button>
        </form>
    </div>
</div>
How to create a Form with Tailwind CSS?
To create a form with Tailwind CSS, follow these steps:
Step 1: Create the HTML structure
The first step is to create the HTML structure of the form. We will begin by creating a basic form that includes a text input field, a checkbox, and a submit button.
<form class="bg-white p-6 rounded shadow-md">
  <div class="mb-4">
    <label class="block text-gray-700 font-bold mb-2" for="username">
      Username
    </label>
    <input
      class="shadow appearance-none border rounded w-full py-2 px-3 text-gray-700 leading-tight focus:outline-none focus:shadow-outline"
      id="username"
      type="text"
      placeholder="Username"
    />
  </div>
  <div class="mb-4">
    <input
      class="mr-2 leading-tight"
      id="checkbox"
      type="checkbox"
    />
    <label class="text-gray-700 font-bold" for="checkbox">
      Remember me
    </label>
  </div>
  <div class="flex items-center justify-between">
    <button
      class="bg-blue-500 hover:bg-blue-700 text-white font-bold py-2 px-4 rounded focus:outline-none focus:shadow-outline"
      type="button"
    >
      Sign In
    </button>
  </div>
</form>
In this HTML code, we have created a form element that has a class of "bg-white p-6 rounded shadow-md". This class adds a white background, padding, rounded corners, and a shadow to the form. Inside the form, we have created two input fields, one for the username and one for the remember me checkbox. We have also created a submit button.
Step 2: Style the form with Tailwind CSS
Now that we have created the HTML structure of the form, we can use Tailwind CSS to style the form elements. We will begin by adding some basic styles to the form element.
.bg-white {
  background-color: #fff;
}

.p-6 {
  padding: 1.5rem;
}

.rounded {
  border-radius: 0.25rem;
}

.shadow-md {
  box-shadow: 0 4px 6px -1px rgba(0, 0, 0, 0.1),
    0 2px 4px -1px rgba(0, 0, 0, 0.06);
}
In this CSS code, we have added styles to the form element that match the classes we used in the HTML code. We have also added some additional styles to create a shadow effect.
Next, we will style the input fields.
.appearance-none {
  -webkit-appearance: none;
  -moz-appearance: none;
  appearance: none;
}

.border {
  border-width: 1px;
}

.rounded {
  border-radius: 0.25rem;
}

.py-2 {
  padding-top: 0.5rem;
  padding-bottom: 0.5rem;
}

.px-3 {
  padding-left: 0.75rem;
  padding-right: 0.75rem;
}

.text-gray-700 {
  --text-opacity: 1;
  color: #4a5568;
  color: rgba(74, 85, 104, var(--text-opacity));
}

.leading-tight {
  line-height: 1.25;
}
In this CSS code, we have added styles to the input fields that match the classes we used in the HTML code. We have also added some additional styles to control the appearance of the input fields.
Finally, we will style the submit button.
.bg-blue-500 {
  --bg-opacity: 1;
  background-color: #4299e1;
  background-color: rgba(66, 153, 225, var(--bg-opacity));
}

.hover\:bg-blue-700:hover {
  --bg-opacity: 1;
  background-color: #2b6cb0;
  background-color: rgba(43, 108, 176, var(--bg-opacity));
}

.text-white {
  --text-opacity: 1;
  color: #fff;
  color: rgba(255, 255, 255, var(--text-opacity));
}

.font-bold {
  font-weight: 700;
}

.py-2 {
  padding-top: 0.5rem;
  padding-bottom: 0.5rem;
}

.px-4 {
  padding-left: 1rem;
  padding-right: 1rem;
}

.rounded {
  border-radius: 0.25rem;
}

.focus\:outline-none:focus {
  outline: none;
}

.focus\:shadow-outline:focus {
  box-shadow: 0 0 0 3px rgba(66, 153, 225, 0.5);
}
In this CSS code, we have added styles to the submit button that match the classes we used in the HTML code. We have also added some additional styles to control the appearance of the submit button.
Conclusion
Creating a form with Tailwind CSS is a straightforward process. By using pre-defined classes and customizing them with CSS, developers can create forms that are both functional and visually appealing. With Tailwind CSS, developers can focus on building great user interfaces without having to worry about the details of styling.