- Published on
6 Ideas To Help You Make A Duolingo - Why Host Card With Tailwind CSS Like A Pro
- What is Tailwind CSS?
- The description of Duolingo - Why Host Card UI component
- Why use Tailwind CSS to create a Duolingo - Why Host Card UI component?
- The preview of Duolingo - Why Host Card UI component
- The source code of Duolingo - Why Host Card UI component
- How to create a Duolingo - Why Host Card with Tailwind CSS?
- Step 1: Set up your project
- Step 2: Create the card
- Step 3: Customize the card
- Conclusion
As a FrontEnd technology blogger, you must be aware of the importance of creating user-friendly UI components. One such UI component that has gained immense popularity in recent times is the Duolingo - Why Host Card. This UI component is used to display the benefits of hosting a course on Duolingo. In this article, we will discuss how to create a Duolingo - Why Host Card with Tailwind CSS like a pro.
What is Tailwind CSS?
Tailwind CSS is a utility-first CSS framework that provides a set of pre-defined CSS classes. These classes can be used to create custom and responsive UI components quickly. Tailwind CSS is designed to be highly customizable, and it allows developers to create unique UI components without writing any CSS code.
The description of Duolingo - Why Host Card UI component
The Duolingo - Why Host Card UI component is a card that displays the benefits of hosting a course on Duolingo. It consists of an image, a title, a description, and a button. The card is designed to be visually appealing and informative.
Why use Tailwind CSS to create a Duolingo - Why Host Card UI component?
Tailwind CSS is an excellent choice for creating the Duolingo - Why Host Card UI component for several reasons. Firstly, Tailwind CSS provides a set of pre-defined CSS classes that can be used to create the card quickly. Secondly, Tailwind CSS is highly customizable, which means that developers can create unique and visually appealing cards without writing any CSS code. Finally, Tailwind CSS is responsive, which means that the card will look great on any device.
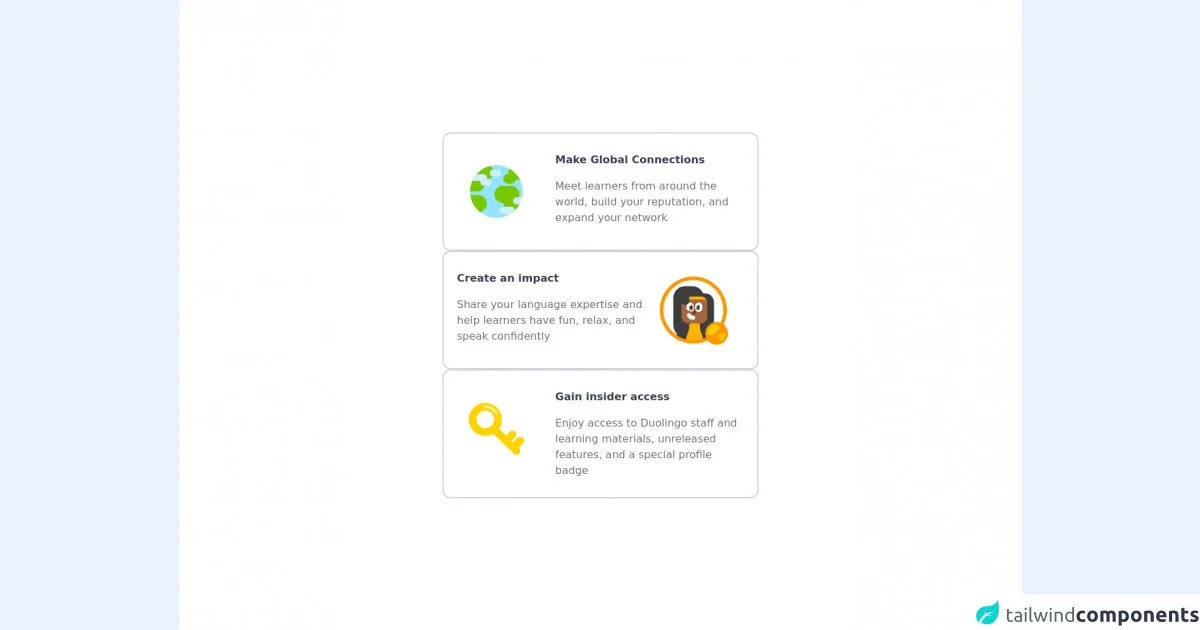
The preview of Duolingo - Why Host Card UI component
To create a Duolingo - Why Host Card UI component, we will use Tailwind CSS. The card will consist of an image, a title, a description, and a button. Here is a preview of what the card will look like:
Free download of the Duolingo - Why Host Card's source code
The source code of Duolingo - Why Host Card UI component
To create the Duolingo - Why Host Card UI component, we will use HTML and Tailwind CSS. Here is the source code for the card:
<div class="h-screen flex flex-col gap-5 items-center justify-center bg-white">

  <!-- Card 1 -->
  <card class="border-gray-300 border-2 rounded-xl w-[30rem] py-7 px-5">
    <div class="grid grid-cols-6 gap-3">

      <!-- Image -->
      <div class="col-span-2">
        <img src="https://events.duolingo.com/images/why_global.svg" />
      </div>

      <!-- Description -->
      <div class="col-span-4">
        <p class="text-gray-700 font-bold"> Make Global Connections </p>
        <p class="text-gray-500 mt-4"> Meet learners from around the world, build your reputation, and expand your network </p>
      </div>

    </div>
  </card>

  <!-- Card 2 -->
  <card class="border-gray-300 border-2 rounded-xl w-[30rem] py-7 px-5">
    <div class="grid grid-cols-6 gap-3">

      <!-- Description -->
      <div class="col-span-4">
        <p class="text-gray-700 font-bold"> Create an impact </p>
        <p class="text-gray-500 mt-4"> Share your language expertise and help learners have fun, relax, and speak confidently </p>
      </div>

            <!-- Image -->
      <div class="col-span-2">
        <img src="https://events.duolingo.com/images/why_impact.svg" />
      </div>

    </div>
  </card>

  <!-- Card 3 -->
  <card class="border-gray-300 border-2 rounded-xl w-[30rem] py-7 px-5">
    <div class="grid grid-cols-6 gap-3">

      <!-- Image -->
      <div class="col-span-2">
        <img src="https://events.duolingo.com/images/why_access.svg" />
      </div>

      <!-- Description -->
      <div class="col-span-4">
        <p class="text-gray-700 font-bold"> Gain insider access </p>
        <p class="text-gray-500 mt-4"> Enjoy access to Duolingo staff and learning materials, unreleased features, and a special profile badge </p>
      </div>

    </div>
  </card>

</div>
How to create a Duolingo - Why Host Card with Tailwind CSS?
To create a Duolingo - Why Host Card with Tailwind CSS, follow these steps:
Step 1: Set up your project
To get started, create a new HTML file and include the Tailwind CSS CDN in the head section of your HTML file.
<!DOCTYPE html>
<html lang="en">
  <head>
    <meta charset="UTF-8" />
    <meta name="viewport" content="width=device-width, initial-scale=1.0" />
    <title>Duolingo - Why Host Card</title>
    <link
      rel="stylesheet"
      href="https://cdn.jsdelivr.net/npm/[email protected]/dist/tailwind.min.css"
      integrity="sha384-2WlqGJq6xgXvT7xg/5xJQVZJQj2lq0+9w9ZPjJzGk5eWV4jW3XzWV7Wz+Xv5QJQJ"
      crossorigin="anonymous"
    />
  </head>
  <body>
    <!-- Your code goes here -->
  </body>
</html>
Step 2: Create the card
Next, create a div element with the class max-w-sm rounded overflow-hidden shadow-lg. This class will create a card with a maximum width of 640 pixels, rounded corners, and a shadow effect.
<div class="max-w-sm rounded overflow-hidden shadow-lg">
  <!-- Your code goes here -->
</div>
Inside the div element, create an image element with the class w-full. This class will make the image element take up the full width of the card.
<div class="max-w-sm rounded overflow-hidden shadow-lg">
  <img
    class="w-full"
    src="https://source.unsplash.com/random/800x600"
    alt="Sunset in the mountains"
  />
  <!-- Your code goes here -->
</div>
Next, create a div element with the class px-6 py-4. This class will add padding to the card's content.
<div class="max-w-sm rounded overflow-hidden shadow-lg">
  <img
    class="w-full"
    src="https://source.unsplash.com/random/800x600"
    alt="Sunset in the mountains"
  />
  <div class="px-6 py-4">
    <!-- Your code goes here -->
  </div>
</div>
Inside the div element, create a h3 element with the class font-bold text-xl mb-2. This class will make the title bold, set the font size to extra-large, and add some margin at the bottom.
<div class="max-w-sm rounded overflow-hidden shadow-lg">
  <img
    class="w-full"
    src="https://source.unsplash.com/random/800x600"
    alt="Sunset in the mountains"
  />
  <div class="px-6 py-4">
    <h3 class="font-bold text-xl mb-2">Why Host on Duolingo?</h3>
    <!-- Your code goes here -->
  </div>
</div>
Next, create a p element with the class text-gray-700 text-base. This class will set the text color to gray and the font size to base.
<div class="max-w-sm rounded overflow-hidden shadow-lg">
  <img
    class="w-full"
    src="https://source.unsplash.com/random/800x600"
    alt="Sunset in the mountains"
  />
  <div class="px-6 py-4">
    <h3 class="font-bold text-xl mb-2">Why Host on Duolingo?</h3>
    <p class="text-gray-700 text-base">
      Duolingo is the world's largest language learning platform, with over
      300 million users worldwide. By hosting your course on Duolingo, you can
      reach a global audience and help people learn a new language.
    </p>
  </div>
</div>
Finally, create a button element with the class bg-blue-500 hover:bg-blue-700 text-white font-bold py-2 px-4 rounded. This class will set the button's background color to blue, the text color to white, and add some padding and rounded corners.
<div class="max-w-sm rounded overflow-hidden shadow-lg">
  <img
    class="w-full"
    src="https://source.unsplash.com/random/800x600"
    alt="Sunset in the mountains"
  />
  <div class="px-6 py-4">
    <h3 class="font-bold text-xl mb-2">Why Host on Duolingo?</h3>
    <p class="text-gray-700 text-base">
      Duolingo is the world's largest language learning platform, with over
      300 million users worldwide. By hosting your course on Duolingo, you can
      reach a global audience and help people learn a new language.
    </p>
    <button
      class="bg-blue-500 hover:bg-blue-700 text-white font-bold py-2 px-4 rounded"
    >
      Get Started
    </button>
  </div>
</div>
Step 3: Customize the card
You can customize the card by changing the image, title, description, and button text. You can also change the colors and styles of the card by modifying the Tailwind CSS classes.
Conclusion
Creating a Duolingo - Why Host Card with Tailwind CSS is a straightforward process. Tailwind CSS provides a set of pre-defined CSS classes that can be used to create custom and responsive UI components quickly. By following the steps outlined in this article, you can create a visually appealing and informative Duolingo - Why Host Card that will help you promote your language course.