- Published on
3 Things You Must Know To Create A Weather Card with Weatherapi.com, TailwindCSS and Alpine.js With Tailwind CSS
- What is Tailwind CSS?
- The description of Weather Card with Weatherapi.com, TailwindCSS and Alpine.js ui component
- Why use Tailwind CSS to create a Weather Card with Weatherapi.com, TailwindCSS and Alpine.js ui component?
- The preview of Weather Card with Weatherapi.com, TailwindCSS and Alpine.js ui component
- The source code of Weather Card with Weatherapi.com, TailwindCSS and Alpine.js ui component
- How to create a Weather Card with Weatherapi.com, TailwindCSS and Alpine.js with Tailwind CSS?
- Step 1: Set up the project
- Step 2: Fetch weather data using Weatherapi.com
- Step 3: Display weather data in the weather card
- Step 4: Style the weather card with Tailwind CSS
- Conclusion
As a FrontEnd technology blogger, you must be aware of the importance of creating user-friendly and visually appealing UI components. One such component is the weather card, which displays the current weather conditions of a particular location. In this article, we will discuss how to create a weather card using Weatherapi.com, Tailwind CSS, and Alpine.js.
What is Tailwind CSS?
Tailwind CSS is a utility-first CSS framework that allows developers to create custom designs quickly. It provides a set of pre-defined CSS classes that can be used to style HTML elements. With Tailwind CSS, developers can focus on the functionality of their application rather than spending time on designing the UI.
The description of Weather Card with Weatherapi.com, TailwindCSS and Alpine.js ui component
The weather card is a UI component that displays the current weather conditions of a particular location. It usually includes information such as temperature, humidity, wind speed, and weather condition. In this tutorial, we will create a weather card using Weatherapi.com to fetch weather data, Tailwind CSS to style the UI, and Alpine.js to add interactivity to the component.
Why use Tailwind CSS to create a Weather Card with Weatherapi.com, TailwindCSS and Alpine.js ui component?
Tailwind CSS provides a set of pre-defined CSS classes that can be used to style HTML elements. This makes it easy to create a visually appealing UI without spending too much time on designing the UI. Additionally, Tailwind CSS is highly customizable, which means that developers can create custom designs quickly.
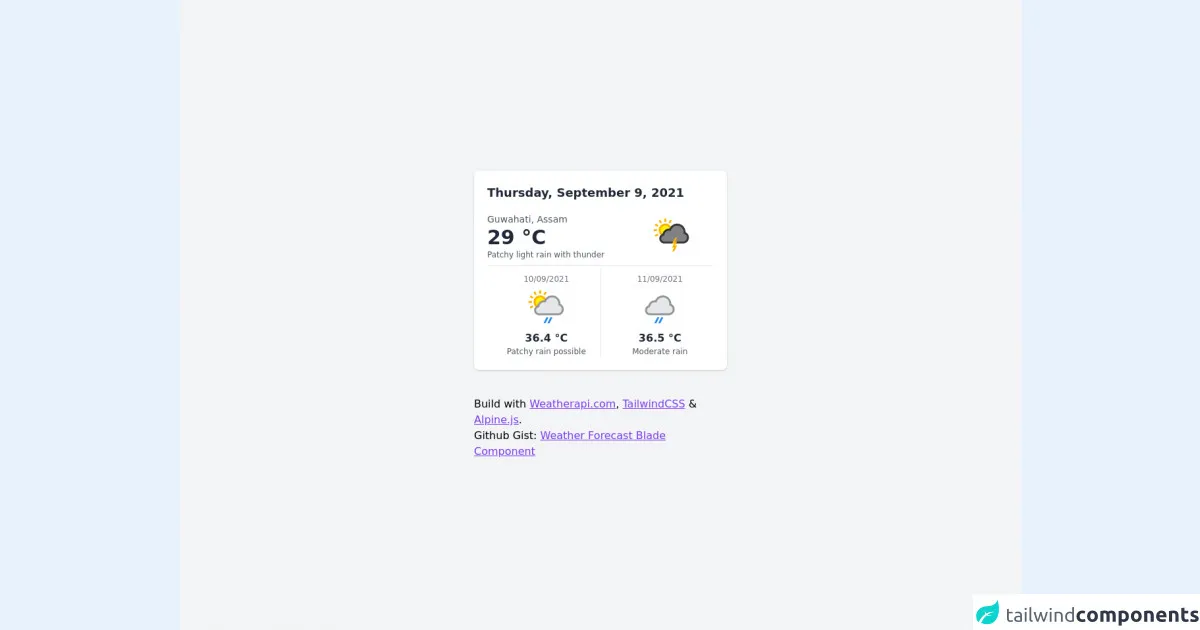
The preview of Weather Card with Weatherapi.com, TailwindCSS and Alpine.js ui component
To create a weather card, we will use Weatherapi.com to fetch weather data, Tailwind CSS to style the UI, and Alpine.js to add interactivity to the component. Here's a preview of what the weather card will look like:
Free download of the Weather Card with Weatherapi.com, TailwindCSS and Alpine.js's source code
The source code of Weather Card with Weatherapi.com, TailwindCSS and Alpine.js ui component
Here's the source code for the weather card component:
<!-- This is an example component -->
<div>
<!DOCTYPE html>
<html lang="en" >
<head>
<meta charset="UTF-8">
<title>Weather Card with Weatherapi, TailwindCSS and AlpineJS</title>
<link rel='stylesheet' href='https://cdnjs.cloudflare.com/ajax/libs/tailwindcss/2.2.11/tailwind.min.css'>
<script src='https://cdnjs.cloudflare.com/ajax/libs/alpinejs/3.3.2/cdn.js'></script>
</head>
<body>
<div class="antialiased min-h-screen bg-gray-100 flex items-center">
<div class="w-full max-w-sm mx-auto">
<div class="bg-white shadow rounded-lg p-5 dark:bg-gray-800 w-full"
x-data="{
weatherData: null,
fetchWeatherData() {
fetch('https://api.weatherapi.com/v1/forecast.json?key=ff9b41622f994b1287a73535210809&q=Guwahati&days=3')
.then(response => response.json())
.then(json => this.weatherData = json)
},
formattedDateDisplay(date) {
const options = {
weekday: 'long',
year: 'numeric',
month: 'long',
day: 'numeric'
};
return (new Date(date)).toLocaleDateString('en-US', options);
}
}"
x-init="fetchWeatherData()"
x-cloak
>
<h2 class="font-bold text-gray-800 text-lg dark:text-gray-400" x-text="formattedDateDisplay(new Date())"></h2>
<template x-if="weatherData != null">
<div>
<div class="flex mt-4 mb-2">
<div class="flex-1">
<div class="text-gray-600 text-sm dark:text-gray-400" x-text="weatherData.location.name +', '+ weatherData.location.region"></div>
<div class="text-3xl font-bold text-gray-800 dark:text-gray-300" x-html="`${weatherData.current.temp_c} °C`"></div>
<div x-text="weatherData.current.condition.text" class="text-xs text-gray-600 dark:text-gray-400"></div>
</div>
<div class="w-24">
<img :src="`https:${weatherData.current.condition.icon}`" :alt="weatherData.current.condition.text" loading="lazy">
</div>
</div>
<div class="flex space-x-2 justify-between border-t dark:border-gray-500">
<template x-for="(forecast, key) in weatherData.forecast.forecastday.splice(1)">
<div class="flex-1 text-center pt-3" :class="{'border-r dark:border-gray-500': key==0}">
<div x-text="`${forecast.date.split('-')[2]}/${forecast.date.split('-')[1]}/${forecast.date.split('-')[0]}`" class="text-xs text-gray-500 dark:text-gray-400"></div>
<img :src="`https:${forecast.day.condition.icon}`" :alt="forecast.day.condition.text" loading="lazy" class="mx-auto">
<div x-html="`${forecast.day.maxtemp_c} °C`" class="font-semibold text-gray-800 mt-1.5 dark:text-gray-300"></div>
<div x-text="forecast.day.condition.text" class="text-xs text-gray-600 dark:text-gray-400"></div>
</div>
</template>
</div>
</div>
</template>
<template x-if="weatherData == null">
<div class="animate-pulse">
<div class="flex mt-4 mb-5">
<div class="flex-1">
<div class="rounded h-2 mb-1.5 bg-gray-200 w-1/2"></div>
<div class="bg-gray-200 rounded h-4"></div>
<div class="rounded h-2 mt-1.5 bg-gray-200 w-1/2"></div>
</div>
<div class="w-24">
<div class="w-12 h-12 rounded-full bg-gray-100 mx-auto"></div>
</div>
</div>
<div class="flex space-x-2 justify-between border-t h-32 dark:border-gray-500">
<div class="flex-1 text-center pt-4 border-r px-5 dark:border-gray-500">
<div class="rounded h-2 mb-2 bg-gray-200 w-1/2 mx-auto"></div>
<div class="w-12 h-12 rounded-full bg-gray-100 mx-auto mb-2"></div>
<div class="rounded h-3 mt-1 bg-gray-200 mt-1.5 mx-auto"></div>
<div class="rounded h-2 mt-1 bg-gray-200 w-1/2 mx-auto"></div>
</div>
<div class="flex-1 text-center pt-4 px-5">
<div class="rounded h-2 mb-2 bg-gray-200 w-1/2 mx-auto"></div>
<div class="w-12 h-12 rounded-full bg-gray-100 mx-auto mb-2"></div>
<div class="rounded h-3 mt-1 bg-gray-200 mt-1.5 mx-auto"></div>
<div class="rounded h-2 mt-1 bg-gray-200 w-1/2 mx-auto"></div>
</div>
</div>
</div>
</template>
</div>
<div class="mt-10">
Build with <a class="underline text-purple-600" href="weatherapi.com">Weatherapi.com</a>, <a class="underline text-purple-600" href="https://tailwindcss.com/">TailwindCSS</a> & <a class="underline text-purple-600" href="https://alpinejs.dev/">Alpine.js</a>.
<br>
Github Gist: <a class="underline text-purple-600" href="https://gist.github.com/mithicher/70647625163c3d217c742dfc4a0b84c0">Weather Forecast Blade Component</a>
</div>
</div>
</div
</body>
</html>
</div>
How to create a Weather Card with Weatherapi.com, TailwindCSS and Alpine.js with Tailwind CSS?
Now that we have an understanding of the weather card component and why we should use Tailwind CSS, let's dive into the steps to create a weather card with Weatherapi.com, Tailwind CSS, and Alpine.js.
Step 1: Set up the project
To get started, create a new HTML file and add the following code:
<!DOCTYPE html>
<html lang="en">
<head>
  <meta charset="UTF-8">
  <meta name="viewport" content="width=device-width, initial-scale=1.0">
  <title>Weather Card</title>
  <link rel="stylesheet" href="https://cdn.jsdelivr.net/npm/[email protected]/dist/tailwind.min.css">
  <script src="https://cdn.jsdelivr.net/npm/[email protected]/dist/alpine.js"></script>
</head>
<body>
  <div class="container mx-auto">
    <div class="flex justify-center items-center h-screen">
      <div class="bg-white rounded-lg shadow-lg p-5">
        <h1 class="text-3xl font-bold mb-5">Weather Card</h1>
        <!-- Weather data will be displayed here -->
      </div>
    </div>
  </div>
</body>
</html>
In this code, we have included the Tailwind CSS and Alpine.js libraries. We have also created a basic HTML structure for our weather card component.
Step 2: Fetch weather data using Weatherapi.com
To fetch weather data, we will use the Weatherapi.com API. You will need to sign up for an API key to use the service. Once you have the API key, add the following code to your HTML file:
<script>
  const API_KEY = 'YOUR_API_KEY';
  const API_URL = `https://api.weatherapi.com/v1/current.json?key=${API_KEY}&q=London`;

  fetch(API_URL)
    .then(response => response.json())
    .then(data => {
      console.log(data);
    });
</script>
In this code, we have defined the API key and API URL. We then use the fetch() method to make a request to the API and retrieve the weather data. Finally, we log the weather data to the console.
Step 3: Display weather data in the weather card
Now that we have fetched the weather data, we can display it in the weather card. Add the following code to your HTML file:
<div class="container mx-auto">
  <div class="flex justify-center items-center h-screen">
    <div class="bg-white rounded-lg shadow-lg p-5">
      <h1 class="text-3xl font-bold mb-5">Weather Card</h1>
      <div x-data="{ weather: {} }" x-init="
        fetch(`${API_URL}`)
          .then(response => response.json())
          .then(data => {
            weather = data.current;
          })
      ">
        <div class="flex items-center">
          <img :src="`https:${weather.condition.icon}`" alt="Weather Icon" class="w-16 h-16 mr-5">
          <div>
            <h2 class="text-xl font-bold">{{ weather.temp_c }}°C</h2>
            <p>{{ weather.condition.text }}</p>
          </div>
        </div>
        <div class="mt-5">
          <p>Humidity: {{ weather.humidity }}%</p>
          <p>Wind Speed: {{ weather.wind_kph }} km/h</p>
        </div>
      </div>
    </div>
  </div>
</div>
In this code, we have added an x-data attribute to the div element that contains the weather data. This attribute defines a JavaScript object that contains the weather data. We have also added an x-init attribute that fetches the weather data from the API and updates the weather object.
We then use the weather object to display the weather data in the weather card. We display the temperature, weather condition, humidity, and wind speed.
Step 4: Style the weather card with Tailwind CSS
Finally, we can style the weather card using Tailwind CSS. Add the following CSS classes to your HTML file:
<style>
  .bg-gradient {
    background: linear-gradient(to bottom, #4a4e69, #2b2d42);
  }

  .text-gradient {
    background: linear-gradient(to right, #4a4e69, #2b2d42);
    -webkit-background-clip: text;
    -webkit-text-fill-color: transparent;
  }
</style>
In this code, we have defined two CSS classes that add a gradient background and text color to the weather card.
Conclusion
In this tutorial, we have discussed how to create a weather card using Weatherapi.com, Tailwind CSS, and Alpine.js. We have also discussed why Tailwind CSS is a great choice for creating UI components and how to fetch weather data from the API. By following these steps, you can create a visually appealing and interactive weather card for your application.