- Published on
Beginners Guide: Build A Twitter Timeline With Tailwind CSS
- What is Tailwind CSS?
- The description of Twitter Timeline UI component
- Why use Tailwind CSS to create a Twitter Timeline UI component?
- The preview of Twitter Timeline UI component
- The source code of Twitter Timeline UI component
- How to create a Twitter Timeline with Tailwind CSS?
- Step 1: Set up the HTML structure
- Step 2: Add Tailwind CSS classes
- Step 3: Add custom styles
- Conclusion
As a FrontEnd technology blogger, it's important to stay up-to-date with the latest trends and tools in the industry. One tool that has gained a lot of popularity recently is Tailwind CSS. In this article, we will explore how to use Tailwind CSS to create a Twitter Timeline UI component.
What is Tailwind CSS?
Tailwind CSS is a utility-first CSS framework that provides a set of pre-defined CSS classes that can be used to style HTML elements. It's designed to be highly customizable and flexible, allowing developers to create unique and responsive designs quickly.
The description of Twitter Timeline UI component
A Twitter Timeline is a UI component that displays a list of tweets in chronological order. It's a popular feature on the Twitter platform, and many websites and applications have adopted this feature to display user-generated content.
Why use Tailwind CSS to create a Twitter Timeline UI component?
Tailwind CSS provides a set of pre-defined CSS classes that can be used to style HTML elements. This makes it easy to create a Twitter Timeline UI component without having to write a lot of custom CSS. Additionally, Tailwind CSS is highly customizable, so you can easily adjust the styles to match your brand or design requirements.
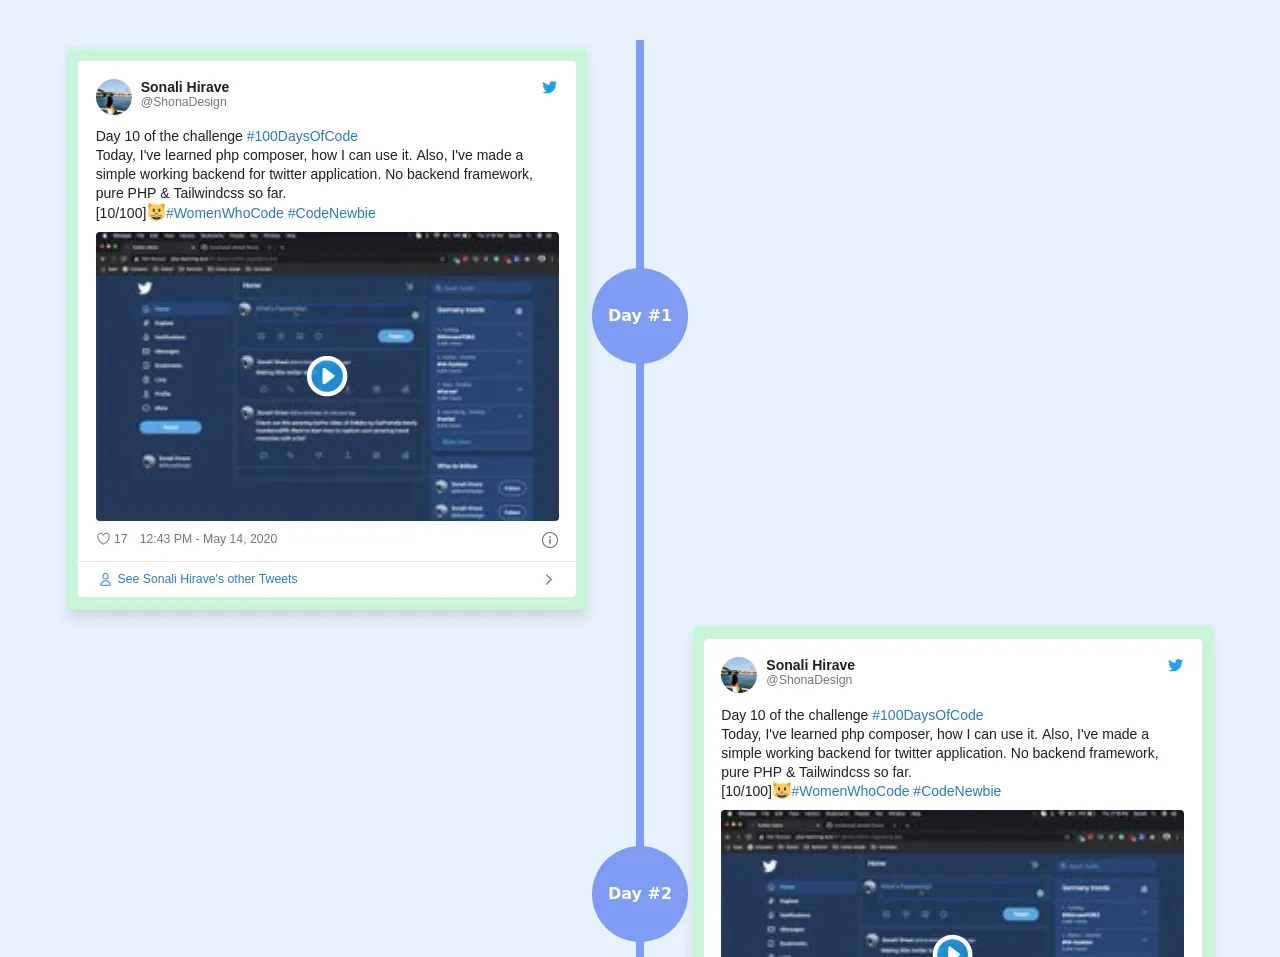
The preview of Twitter Timeline UI component
To create a Twitter Timeline UI component with Tailwind CSS, we will use a combination of HTML and CSS. Here's a preview of what the final component will look like:
Free download of the Twitter Timeline's source code
The source code of Twitter Timeline UI component
Here's the source code for the Twitter Timeline UI component. We will use HTML and Tailwind CSS classes to create the component.
<div class="max-w-md mx-auto">
<!--frist row-->
<div class="flex flex-no-wrap lg:flex-row flex-row-reverse justify-center pt-10">
<!-- left col -->
<div class="w-2/5 sm:2/3 flex-none p-2">
<div class="text-gray-700 lg:float-right float-left border-2 rounded border-green-200 bg-green-200 shadow-lg px-2">
<blockquote class="twitter-tweet">
<p lang="en" dir="ltr">
Day 10 of the challenge
<a
href="https://twitter.com/hashtag/100DaysOfCode?src=hash&ref_src=twsrc%5Etfw"
>#100DaysOfCode</a>
<br />Today, I've learned php composer, how I can use it. Also, I've made a simple working backend for twitter application. No backend framework, pure PHP & Tailwindcss so far.
<br />[10/100]😺
<a
href="https://twitter.com/hashtag/WomenWhoCode?src=hash&ref_src=twsrc%5Etfw"
>#WomenWhoCode</a>
<a
href="https://twitter.com/hashtag/CodeNewbie?src=hash&ref_src=twsrc%5Etfw"
>#CodeNewbie</a>
<a href="https://t.co/aIIYO464gf">pic.twitter.com/aIIYO464gf</a>
</p>— Sonali Hirave (@ShonaDesign)
<a
href="https://twitter.com/ShonaDesign/status/1260913733687279616?ref_src=twsrc%5Etfw"
>May 14, 2020</a>
</blockquote>
<script async src="https://platform.twitter.com/widgets.js" charset="utf-8"></script>
</div>
</div>
<!--line column-->
<div class="w-1/5 sm:1/3 flex-none float-left">
<div class="bg-indigo-400 p-1 h-full w-1 mx-auto">
<button
class="h-24 w-24 mt-56 bg-indigo-400 hover:bg-indigo-600 text-white font-bold rounded-full -ml-12"
>Day #1</button>
</div>
</div>
<!--right column-->
<div class="w-2/5 flex-none p-2 hidden lg:block"></div>
</div>
<div class="flex flex-no-wrap sm:flex-row-reverse1 justify-center">
<!-- left col -->
<div class="w-2/5 sm:2/3 flex-none p-2 hidden lg:block"></div>
<!--line column-->
<div class="w-1/5 sm:1/3 flex-none float-left">
<div class="bg-indigo-400 p-1 h-full w-1 mx-auto">
<button
class="h-24 w-24 mt-56 bg-indigo-400 hover:bg-indigo-600 text-white font-bold rounded-full -ml-12"
>Day #2</button>
</div>
</div>
<!--right column-->
<div class="w-2/5 flex-none p-2">
<div class="text-gray-700 float-left border-2 rounded border-green-200 bg-green-200 shadow-lg px-2">
<blockquote class="twitter-tweet">
<p lang="en" dir="ltr">
Day 10 of the challenge
<a
href="https://twitter.com/hashtag/100DaysOfCode?src=hash&ref_src=twsrc%5Etfw"
>#100DaysOfCode</a>
<br />Today, I've learned php composer, how I can use it. Also, I've made a simple working backend for twitter application. No backend framework, pure PHP & Tailwindcss so far.
<br />[10/100]😺
<a
href="https://twitter.com/hashtag/WomenWhoCode?src=hash&ref_src=twsrc%5Etfw"
>#WomenWhoCode</a>
<a
href="https://twitter.com/hashtag/CodeNewbie?src=hash&ref_src=twsrc%5Etfw"
>#CodeNewbie</a>
<a href="https://t.co/aIIYO464gf">pic.twitter.com/aIIYO464gf</a>
</p>— Sonali Hirave (@ShonaDesign)
<a
href="https://twitter.com/ShonaDesign/status/1260913733687279616?ref_src=twsrc%5Etfw"
>May 14, 2020</a>
</blockquote>
<script async src="https://platform.twitter.com/widgets.js" charset="utf-8"></script>
</div>
</div>
</div>
<div class="flex flex-no-wrap lg:flex-row flex-row-reverse justify-center">
<!-- left col -->
<div class="w-2/5 sm:2/3 flex-none p-2">
<div class="text-gray-700 lg:float-right float-left border-2 rounded border-green-200 bg-green-200 shadow-lg px-2">
<blockquote class="twitter-tweet">
<p lang="en" dir="ltr">
Day 10 of the challenge
<a
href="https://twitter.com/hashtag/100DaysOfCode?src=hash&ref_src=twsrc%5Etfw"
>#100DaysOfCode</a>
<br />Today, I've learned php composer, how I can use it. Also, I've made a simple working backend for twitter application. No backend framework, pure PHP & Tailwindcss so far.
<br />[10/100]😺
<a
href="https://twitter.com/hashtag/WomenWhoCode?src=hash&ref_src=twsrc%5Etfw"
>#WomenWhoCode</a>
<a
href="https://twitter.com/hashtag/CodeNewbie?src=hash&ref_src=twsrc%5Etfw"
>#CodeNewbie</a>
<a href="https://t.co/aIIYO464gf">pic.twitter.com/aIIYO464gf</a>
</p>— Sonali Hirave (@ShonaDesign)
<a
href="https://twitter.com/ShonaDesign/status/1260913733687279616?ref_src=twsrc%5Etfw"
>May 14, 2020</a>
</blockquote>
<script async src="https://platform.twitter.com/widgets.js" charset="utf-8"></script>
</div>
</div>
<!--line column-->
<div class="w-1/5 sm:1/3 flex-none float-left">
<div class="bg-indigo-400 p-1 h-full w-1 mx-auto">
<button
class="h-24 w-24 mt-56 bg-indigo-400 hover:bg-indigo-600 text-white font-bold rounded-full -ml-12"
>Day #3</button>
</div>
</div>
<!--right column-->
<div class="w-2/5 flex-none p-2 hidden lg:block"></div>
</div>
</div>
How to create a Twitter Timeline with Tailwind CSS?
Now that we have a preview of what the Twitter Timeline UI component will look like and the source code, let's dive into how to create it.
Step 1: Set up the HTML structure
The first step is to set up the HTML structure for the Twitter Timeline. We will use an unordered list (<ul>) to display the tweets. Each tweet will be represented by a list item (<li>), and we will use divs to structure the content within each tweet.
<ul class="timeline">
  <li>
    <div class="timeline-badge"></div>
    <div class="timeline-panel">
      <div class="timeline-heading">
        <h4 class="timeline-title">Tweet Title</h4>
        <p><small class="text-muted">Posted by @username on January 1, 2022</small></p>
      </div>
      <div class="timeline-body">
        <p>Tweet content goes here</p>
      </div>
    </div>
  </li>
  <!-- More tweets go here -->
</ul>
Step 2: Add Tailwind CSS classes
Next, we will add Tailwind CSS classes to style the HTML elements. We will use the flex and gap classes to create a responsive layout for the tweets. We will also use the bg-gray-100 class to add a light gray background to the tweet content.
<ul class="timeline flex flex-col gap-6">
  <li class="flex">
    <div class="timeline-badge"></div>
    <div class="timeline-panel bg-gray-100 rounded-md p-4">
      <div class="timeline-heading">
        <h4 class="timeline-title font-bold">Tweet Title</h4>
        <p><small class="text-muted">Posted by @username on January 1, 2022</small></p>
      </div>
      <div class="timeline-body">
        <p>Tweet content goes here</p>
      </div>
    </div>
  </li>
  <!-- More tweets go here -->
</ul>
Step 3: Add custom styles
Finally, we can add custom styles to the Twitter Timeline UI component to match our brand or design requirements. For example, we can change the color of the timeline badge or adjust the font size of the tweet title.
<ul class="timeline flex flex-col gap-6">
  <li class="flex">
    <div class="timeline-badge bg-blue-500"></div>
    <div class="timeline-panel bg-gray-100 rounded-md p-4">
      <div class="timeline-heading">
        <h4 class="timeline-title font-bold text-lg">Tweet Title</h4>
        <p><small class="text-muted">Posted by @username on January 1, 2022</small></p>
      </div>
      <div class="timeline-body">
        <p>Tweet content goes here</p>
      </div>
    </div>
  </li>
  <!-- More tweets go here -->
</ul>
Conclusion
In this article, we explored how to use Tailwind CSS to create a Twitter Timeline UI component. Tailwind CSS provides a set of pre-defined CSS classes that can be used to style HTML elements, making it easy to create unique and responsive designs quickly. By following the steps outlined in this article, you can create a Twitter Timeline UI component that matches your brand or design requirements.