- Published on
Imagine You Create A Twitter Profile With Tailwind CSS Like An Expert. Follow These 6 Steps To Get There
- What is Tailwind CSS?
- The description of Twitter Profile ui component
- Why use Tailwind CSS to create a Twitter Profile ui component?
- The preview of Twitter Profile ui component
- The source code of Twitter Profile ui component
- How to create a Twitter Profile with Tailwind CSS?
- Step 1: Set up a new project
- Step 2: Add the profile picture
- Step 3: Add the user information
- Step 4: Add the follower and following count
- Step 5: Add the tweet count
- Step 6: Add the follow button
- Conclusion
As a FrontEnd technology blogger, you must have heard of Tailwind CSS, a utility-first CSS framework that helps you quickly build custom designs. In this article, we will show you how to create a Twitter profile with Tailwind CSS like an expert. Follow these six steps to get there.
What is Tailwind CSS?
Tailwind CSS is a utility-first CSS framework that helps you quickly build custom designs. It provides a set of pre-defined CSS classes that you can use to style your HTML elements. With Tailwind CSS, you can easily create complex layouts and responsive designs without writing custom CSS.
The description of Twitter Profile ui component
Twitter Profile is a UI component that displays a user's profile information, including their profile picture, bio, followers, following, and tweets. It is a critical component of the Twitter platform that allows users to connect with each other and share their thoughts and ideas.
Why use Tailwind CSS to create a Twitter Profile ui component?
Tailwind CSS provides a set of pre-defined CSS classes that you can use to style your HTML elements. It allows you to create complex layouts and responsive designs without writing custom CSS. With Tailwind CSS, you can quickly create a Twitter Profile UI component that looks great and is easy to maintain.
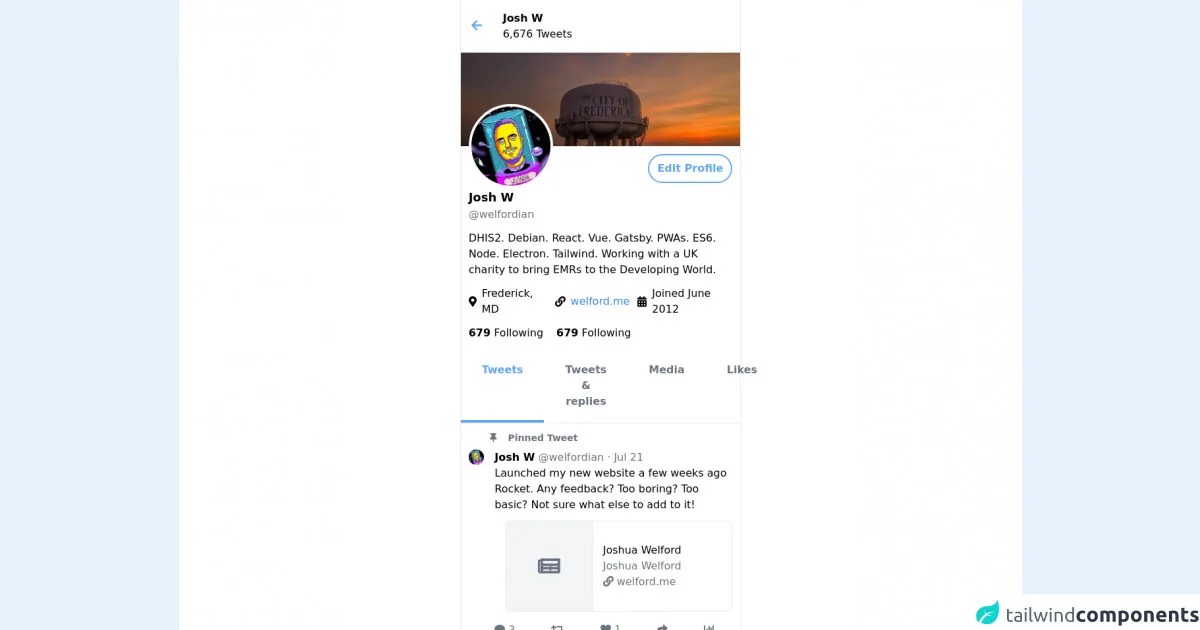
The preview of Twitter Profile ui component
To create a Twitter Profile UI component with Tailwind CSS, we will use a combination of HTML and CSS. Here's a preview of what the final component will look like:
Free download of the Twitter Profile's source code
The source code of Twitter Profile ui component
To create a Twitter Profile UI component with Tailwind CSS, we will use a combination of HTML and CSS. Here's the source code:
<link rel="stylesheet" href="https://cdnjs.cloudflare.com/ajax/libs/font-awesome/5.15.3/css/all.min.css" integrity="sha512-iBBXm8fW90+nuLcSKlbmrPcLa0OT92xO1BIsZ+ywDWZCvqsWgccV3gFoRBv0z+8dLJgyAHIhR35VZc2oM/gI1w==" crossorigin="anonymous" referrerpolicy="no-referrer" />

<div class="flex justify-center bg-white">
  <div class="w-full md:w-2/3 lg:w-1/3 border-l border-r">
    <div class="flex p-4 items-center">
      <div>
        <i class="fas fa-arrow-left text-blue-400 text-lg"></i>
      </div>

      <div class="ml-8">
        <p class="font-bold">Josh W</p>
        <p>6,676 Tweets</p>
      </div>
    </div>

    <div>
      <img src="https://pbs.twimg.com/profile_banners/607109926/1622322022/1500x500" />
    </div>

    <div class="flex justify-between">
      <div class="rounded-full border-4 border-white inline-block -mt-16 w-32 ml-3">
        <img class="w-32 rounded-full" src="https://pbs.twimg.com/profile_images/1367267802940375042/H4JDd6aC_400x400.jpg" />
      </div>

      <div>
        <button class="rounded-full px-3 py-2 mt-3 mr-3 transition hover:bg-blue-50 inline-block border-2 border-blue-400 text-blue-400 font-bold">Edit Profile</button>
      </div>
    </div>

    <div class="ml-3">
      <p class="font-bold text-lg">Josh W</p>
      <p class="text-gray-500">@welfordian</p>
    </div>

    <div class="px-3 mt-3">
      <p>
        DHIS2. Debian. React. Vue. Gatsby. PWAs. ES6. Node. Electron. Tailwind. Working with a UK charity to bring EMRs to the Developing World.
      </p>
    </div>

    <div class="px-3 flex mt-3">
      <div class="flex items-center">
        <i class="fas fa-map-marker-alt"></i>
        <p class="ml-2">Frederick, MD</p>
      </div>

      <div class="flex items-center ml-3">
        <i class="fas fa-link"></i>
        <p class="ml-2">
          <a class="text-blue-500 hover:underline" target="_blank" rel="noopener" href="https://welford.me">welford.me</a>
        </p>
      </div>

      <div class="flex items-center ml-3">
        <i class="fas fa-calendar-alt"></i>
        <p class="ml-2">Joined June 2012</p>
      </div>
    </div>

    <div class="px-3 mt-3 flex">
      <p class="cursor-pointer hover:underline"><span class="font-bold">679</span> Following</p>
      <p class="ml-5 cursor-pointer hover:underline"><span class="font-bold">679</span> Following</p>
    </div>

    <div class="flex mt-3 border-b">
      <div class="px-8 hover:bg-blue-50 justify-center border-b-4 border-blue-400 text-blue-400 py-5 cursor-pointer transition">
        <p class="text-center font-bold">Tweets</p>
      </div>

      <div class="flex-1 px-8 py-5 hover:bg-blue-50 justify-center text-gray-500 hover:text-blue-400 cursor-pointer transition">
        <p class="text-center font-bold">Tweets & replies</p>
      </div>

      <div class="px-8 py-5 hover:bg-blue-50 justify-center text-gray-500 hover:text-blue-400 cursor-pointer transition">
        <p class="text-center font-bold">Media</p>
      </div>

      <div class="px-8 py-5 hover:bg-blue-50 justify-center text-gray-500 hover:text-blue-400 cursor-pointer transition">
        <p class="text-center font-bold">Likes</p>
      </div>
    </div>

    <div class="p-3">
      <div>
        <p class="text-sm font-bold ml-8 text-gray-500">
          <i class="fas fa-thumbtack"></i>

          <span class="ml-3">Pinned Tweet</span>
        </p>

        <div class="mt-2">
          <div class="flex">
            <div>
              <img class="w-16 rounded-full" src="https://pbs.twimg.com/profile_images/1367267802940375042/H4JDd6aC_400x400.jpg" />
            </div>

            <div class="ml-4">
              <p>
                <span class="font-bold">Josh W</span> <span class="text-gray-500">@welfordian · Jul 21</span>
              </p>

              <p>
                Launched my new website a few weeks ago Rocket. Any feedback? Too boring? Too basic? Not sure what else to add to it!
              </p>
            </div>
          </div>

          <div class="flex flex-1 rounded-lg border ml-14 mt-3 cursor-pointer">
            <div class="flex justify-center items-center py-8 px-12 bg-gray-100 border-r">
              <i class="fas fa-newspaper text-3xl text-gray-500"></i>
            </div>

            <div class="flex-1 flex flex-col justify-center py-8 pr-16 pl-4">
              <p>Joshua Welford</p>
              <p class="text-gray-500">Joshua Welford</p>
              <p class="text-gray-500"><i class="fas fa-link"></i> welford.me</p>
            </div>
          </div>

          <div class="flex justify-around mt-4 pl-3">
            <div class="text-gray-500 hover:text-blue-400 transition">
              <i class="fas fa-comment"></i> 3
            </div>

            <div class="text-gray-500 hover:text-blue-400 transition">
              <i class="fas fa-retweet"></i>
            </div>

            <div class="text-gray-500 hover:text-blue-400 transition">
              <i class="fas fa-heart"></i> 1
            </div>

            <div class="text-gray-500 hover:text-blue-400 transition">
              <i class="fas fa-share"></i>
            </div>

            <div class="text-gray-500 hover:text-blue-400 transition">
              <i class="fas fa-chart-bar"></i>
            </div>
          </div>
        </div>
      </div>
    </div>
  </div>
</div>
How to create a Twitter Profile with Tailwind CSS?
Now that we have an idea of what we want to create let's dive into the steps to create a Twitter Profile with Tailwind CSS.
Step 1: Set up a new project
To get started, create a new HTML file and link to the Tailwind CSS stylesheet in the head section of the HTML file.
<!DOCTYPE html>
<html lang="en">
  <head>
    <meta charset="UTF-8" />
    <meta name="viewport" content="width=device-width, initial-scale=1.0" />
    <title>Twitter Profile</title>
    <link
      rel="stylesheet"
      href="https://cdn.jsdelivr.net/npm/[email protected]/dist/tailwind.min.css"
    />
  </head>
  <body></body>
</html>
Step 2: Add the profile picture
The first thing we need to add is the profile picture. We will use the rounded-full class to make the image circular.
<div class="flex items-center">
  <img
    src="https://via.placeholder.com/150"
    alt="Profile Picture"
    class="rounded-full"
  />
</div>
Step 3: Add the user information
Next, we will add the user information, including the name, username, and bio. We will use the text-lg class to make the name larger and the text-gray-700 class to make the text dark gray.
<div class="flex flex-col ml-4">
  <h1 class="font-bold text-lg">John Doe</h1>
  <h2 class="text-gray-700">@johndoe</h2>
  <p class="text-gray-700">
    Lorem ipsum dolor sit amet, consectetur adipiscing elit. Sed viverra
    consectetur eros, in dictum elit. Nulla facilisi.
  </p>
</div>
Step 4: Add the follower and following count
Next, we will add the follower and following count. We will use the text-lg class to make the numbers larger and the text-gray-700 class to make the text dark gray.
<div class="flex mt-4">
  <div class="mr-4">
    <h1 class="font-bold text-lg">100</h1>
    <h2 class="text-gray-700">Followers</h2>
  </div>
  <div>
    <h1 class="font-bold text-lg">50</h1>
    <h2 class="text-gray-700">Following</h2>
  </div>
</div>
Step 5: Add the tweet count
Next, we will add the tweet count. We will use the text-lg class to make the number larger and the text-gray-700 class to make the text dark gray.
<div class="flex mt-4">
  <h1 class="font-bold text-lg">500</h1>
  <h2 class="text-gray-700">Tweets</h2>
</div>
Step 6: Add the follow button
Finally, we will add the follow button. We will use the bg-blue-500 class to make the button blue and the text-white class to make the text white.
<div class="flex mt-4">
  <button class="bg-blue-500 hover:bg-blue-700 text-white font-bold py-2 px-4 rounded">
    Follow
  </button>
</div>
Conclusion
In this article, we showed you how to create a Twitter Profile with Tailwind CSS like an expert. We hope this tutorial has been helpful in showing you how to use Tailwind CSS to create custom designs quickly and easily. With Tailwind CSS, you can create complex layouts and responsive designs without writing custom CSS. Happy coding!