- Published on
The Ninja Guide To How To Make A Dispatch Listing With Tailwind CSS Better
- What is Tailwind CSS?
- The description of Dispatch Listing UI component
- Why use Tailwind CSS to create a Dispatch Listing UI component?
- The preview of Dispatch Listing UI component
- The source code of Dispatch Listing UI component
- How to create a Dispatch Listing with Tailwind CSS?
- Step 1: Set up the HTML structure
- Step 2: Add Tailwind CSS classes
- Step 3: Customize the styles
- Conclusion
As a FrontEnd technology blogger, I am always on the lookout for ways to improve my UI components. One tool that has been gaining popularity in recent years is Tailwind CSS. In this article, we will explore how to create a Dispatch Listing UI component with Tailwind CSS and make it better.
What is Tailwind CSS?
Tailwind CSS is a utility-first CSS framework that provides a set of pre-defined classes for common styles and layout. It allows developers to quickly build UI components without writing custom CSS. Tailwind CSS is highly customizable, and developers can easily add or remove styles to suit their needs.
The description of Dispatch Listing UI component
A Dispatch Listing UI component is a list of dispatches that are assigned to a particular user or team. It is commonly used in project management applications to track the progress of tasks. The Dispatch Listing UI component typically includes information such as the dispatch name, the assigned team member, the due date, and the status of the dispatch.
Why use Tailwind CSS to create a Dispatch Listing UI component?
Tailwind CSS provides a set of pre-defined classes that can be used to quickly style the Dispatch Listing UI component. This saves developers time and effort, as they do not have to write custom CSS for each component. Additionally, Tailwind CSS is highly customizable, which allows developers to easily modify the styles to match their application's branding.
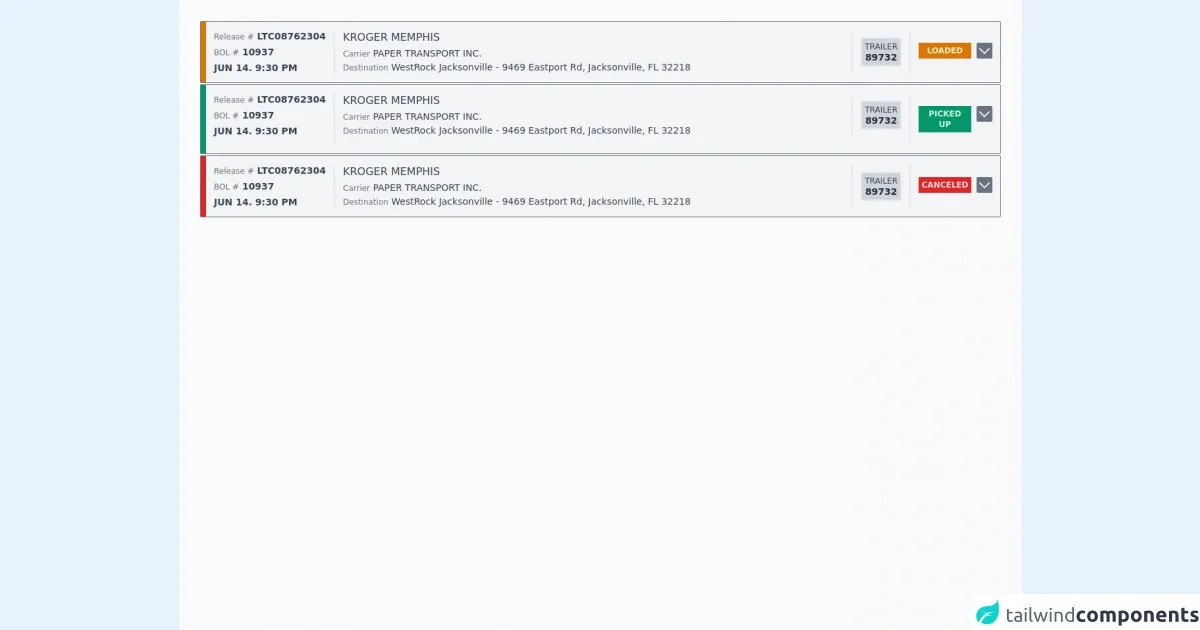
The preview of Dispatch Listing UI component
Free download of the Dispatch Listing's source code
The source code of Dispatch Listing UI component
<div class="container mx-auto bg-gray-50 min-h-screen p-8 antialiased">
   <div>
      <!-- start  -->
      <div class="bg-gray-100 mx-auto border-gray-500 border rounded-sm text-gray-700 mb-0.5 h-30">
         <div class="flex p-3 border-l-8 border-yellow-600">
            <div class="space-y-1 border-r-2 pr-3">
               <div class="text-sm leading-5 font-semibold"><span class="text-xs leading-4 font-normal text-gray-500"> Release #</span> LTC08762304</div>
               <div class="text-sm leading-5 font-semibold"><span class="text-xs leading-4 font-normal text-gray-500 pr"> BOL #</span> 10937</div>
               <div class="text-sm leading-5 font-semibold">JUN 14. 9:30 PM</div>
            </div>
            <div class="flex-1">
               <div class="ml-3 space-y-1 border-r-2 pr-3">
                  <div class="text-base leading-6 font-normal">KROGER MEMPHIS</div>
                  <div class="text-sm leading-4 font-normal"><span class="text-xs leading-4 font-normal text-gray-500"> Carrier</span> PAPER TRANSPORT INC.</div>
                  <div class="text-sm leading-4 font-normal"><span class="text-xs leading-4 font-normal text-gray-500"> Destination</span> WestRock Jacksonville - 9469 Eastport Rd, Jacksonville, FL 32218</div>
               </div>
            </div>
            <div class="border-r-2 pr-3">
               <div >
                  <div class="ml-3 my-3 border-gray-200 border-2 bg-gray-300 p-1">
                     <div class="uppercase text-xs leading-4 font-medium">Trailer</div>
                     <div class="text-center text-sm leading-4 font-semibold text-gray-800">89732</div>
                  </div>
               </div>
            </div>
            <div>
               <div class="ml-3 my-5 bg-yellow-600 p-1 w-20">
                  <div class="uppercase text-xs leading-4 font-semibold text-center text-yellow-100">Loaded</div>
               </div>
            </div>
            <div>
               <button class="text-gray-100 rounded-sm my-5 ml-2 focus:outline-none bg-gray-500">
                  <svg xmlns="http://www.w3.org/2000/svg" class="h-6 w-6" fill="none" viewBox="0 0 24 24" stroke="currentColor">
                     <path stroke-linecap="round" stroke-linejoin="round" stroke-width="2" d="M19 9l-7 7-7-7" />
                  </svg>
               </button>
            </div>
         </div>
      </div>
      <!-- end -->
      <!-- start  -->
      <div class="bg-gray-100 mx-auto border-gray-500 border rounded-sm  text-gray-700 mb-0.5">
         <div class="flex p-3  border-l-8 border-green-600">
            <div class="space-y-1 border-r-2 pr-3">
               <div class="text-sm leading-5 font-semibold"><span class="text-xs leading-4 font-normal text-gray-500"> Release #</span> LTC08762304</div>
               <div class="text-sm leading-5 font-semibold"><span class="text-xs leading-4 font-normal text-gray-500 pr"> BOL #</span> 10937</div>
               <div class="text-sm leading-5 font-semibold">JUN 14. 9:30 PM</div>
            </div>
            <div class="flex-1">
               <div class="ml-3 space-y-1 border-r-2 pr-3">
                  <div class="text-base leading-6 font-normal">KROGER MEMPHIS</div>
                  <div class="text-sm leading-4 font-normal"><span class="text-xs leading-4 font-normal text-gray-500"> Carrier</span> PAPER TRANSPORT INC.</div>
                  <div class="text-sm leading-4 font-normal"><span class="text-xs leading-4 font-normal text-gray-500"> Destination</span> WestRock Jacksonville - 9469 Eastport Rd, Jacksonville, FL 32218</div>
               </div>
            </div>
            <div class="border-r-2 pr-3">
               <div >
                  <div class="ml-3 my-3 border-gray-200 border-2 bg-gray-300 p-1">
                     <div class="uppercase text-xs leading-4 font-medium">Trailer</div>
                     <div class="text-center text-sm leading-4 font-semibold text-gray-800">89732</div>
                  </div>
               </div>
            </div>
            <div>
               <div class="ml-3 my-5 bg-green-600 p-1 w-20">
                  <div class="uppercase text-xs leading-4 font-semibold text-center text-green-100">Picked UP</div>
               </div>
            </div>
            <div>
               <button class="text-gray-100 rounded-sm my-5 ml-2 focus:outline-none bg-gray-500">
                  <svg xmlns="http://www.w3.org/2000/svg" class="h-6 w-6" fill="none" viewBox="0 0 24 24" stroke="currentColor">
                     <path stroke-linecap="round" stroke-linejoin="round" stroke-width="2" d="M19 9l-7 7-7-7" />
                  </svg>
               </button>
            </div>
         </div>
      </div>
      <!-- end -->
      <!-- start  -->
      <div class="bg-gray-100 mx-auto border-gray-500 border rounded-sm  text-gray-700 mb-0.5">
         <div class="flex p-3  border-l-8 border-red-600">
            <div class="space-y-1 border-r-2 pr-3">
               <div class="text-sm leading-5 font-semibold"><span class="text-xs leading-4 font-normal text-gray-500"> Release #</span> LTC08762304</div>
               <div class="text-sm leading-5 font-semibold"><span class="text-xs leading-4 font-normal text-gray-500 pr"> BOL #</span> 10937</div>
               <div class="text-sm leading-5 font-semibold">JUN 14. 9:30 PM</div>
            </div>
            <div class="flex-1">
               <div class="ml-3 space-y-1 border-r-2 pr-3">
                  <div class="text-base leading-6 font-normal">KROGER MEMPHIS</div>
                  <div class="text-sm leading-4 font-normal"><span class="text-xs leading-4 font-normal text-gray-500"> Carrier</span> PAPER TRANSPORT INC.</div>
                  <div class="text-sm leading-4 font-normal"><span class="text-xs leading-4 font-normal text-gray-500"> Destination</span> WestRock Jacksonville - 9469 Eastport Rd, Jacksonville, FL 32218</div>
               </div>
            </div>
            <div class="border-r-2 pr-3">
               <div >
                  <div class="ml-3 my-3 border-gray-200 border-2 bg-gray-300 p-1">
                     <div class="uppercase text-xs leading-4 font-medium">Trailer</div>
                     <div class="text-center text-sm leading-4 font-semibold text-gray-800">89732</div>
                  </div>
               </div>
            </div>
            <div>
               <div class="ml-3 my-5 bg-red-600 p-1 w-20">
                  <div class="uppercase text-xs leading-4 font-semibold text-center text-red-100">Canceled</div>
               </div>
            </div>
            <div>
               <button class="text-gray-100 rounded-sm my-5 ml-2 focus:outline-none bg-gray-500" ">
                  <svg xmlns="http://www.w3.org/2000/svg" class="h-6 w-6" fill="none" viewBox="0 0 24 24" stroke="currentColor">
                     <path stroke-linecap="round" stroke-linejoin="round" stroke-width="2" d="M19 9l-7 7-7-7" />
                  </svg>
               </button>
            </div>
         </div>
      </div>
      <!-- end -->
   </div>
</div>
How to create a Dispatch Listing with Tailwind CSS?
To create a Dispatch Listing UI component with Tailwind CSS, we will follow these steps:
Step 1: Set up the HTML structure
We will start by setting up the HTML structure for the Dispatch Listing UI component. We will use a simple unordered list to display the dispatches.
<ul class="bg-white shadow overflow-hidden sm:rounded-md">
  <li>
    <a href="#" class="block hover:bg-gray-50 focus:outline-none focus:bg-gray-50 transition duration-150 ease-in-out">
      <div class="px-4 py-4 sm:px-6">
        <div class="flex items-center justify-between">
          <p class="text-sm leading-5 font-medium text-indigo-600 truncate">Dispatch 1</p>
          <div class="ml-2 flex-shrink-0 flex">
            <span class="px-2 inline-flex text-xs leading-5 font-semibold rounded-full bg-green-100 text-green-800">
              Assigned
            </span>
          </div>
        </div>
        <div class="mt-2 sm:flex sm:justify-between">
          <div class="sm:flex">
            <p class="flex items-center text-sm leading-5 text-gray-500">
              <svg class="flex-shrink-0 mr-1.5 h-5 w-5 text-gray-400" viewBox="0 0 20 20" fill="currentColor">
                <path fill-rule="evenodd" d="M10 2a8 8 0 100 16 8 8 0 000-16zm0 14a6 6 0 110-12 6 6 0 010 12zm-1.5-5a1.5 1.5 0 113 0v3a1.5 1.5 0 11-3 0v-3z" clip-rule="evenodd"/>
              </svg>
              Assigned to John Doe
            </p>
            <p class="mt-2 flex items-center text-sm leading-5 text-gray-500 sm:mt-0 sm:ml-6">
              <svg class="flex-shrink-0 mr-1.5 h-5 w-5 text-gray-400" viewBox="0 0 20 20" fill="currentColor">
                <path fill-rule="evenodd" d="M10 2a8 8 0 100 16 8 8 0 000-16zm0 14a6 6 0 110-12 6 6 0 010 12zm-1.5-5a1.5 1.5 0 113 0v3a1.5 1.5 0 11-3 0v-3z" clip-rule="evenodd"/>
              </svg>
              Due on <time datetime="2020-01-07">January 7, 2020</time>
            </p>
          </div>
          <div class="mt-2 flex items-center text-sm leading-5 sm:mt-0">
            <svg class="flex-shrink-0 mr-1.5 h-5 w-5 text-gray-400" viewBox="0 0 20 20" fill="currentColor">
              <path fill-rule="evenodd" d="M10 2a8 8 0 100 16 8 8 0 000-16zm0 14a6 6 0 110-12 6 6 0 010 12zm-1.5-5a1.5 1.5 0 113 0v3a1.5 1.5 0 11-3 0v-3z" clip-rule="evenodd"/>
            </svg>
            <span class="text-gray-500">Status:</span>
            <span class="ml-1.5 px-2 inline-flex text-xs leading-5 font-semibold rounded-full bg-green-100 text-green-800">
              Assigned
            </span>
          </div>
        </div>
      </div>
    </a>
  </li>
</ul>
Step 2: Add Tailwind CSS classes
Next, we will add Tailwind CSS classes to the HTML elements to style the Dispatch Listing UI component. We will use classes such as bg-white, shadow, overflow-hidden, sm:rounded-md, block, hover:bg-gray-50, focus:outline-none, focus:bg-gray-50, transition, duration-150, ease-in-out, px-4, py-4, sm:px-6, flex, items-center, justify-between, text-sm, leading-5, font-medium, text-indigo-600, truncate, ml-2, flex-shrink-0, text-xs, font-semibold, rounded-full, bg-green-100, text-green-800, mt-2, sm:flex, sm:justify-between, sm:mt-0, sm:ml-6, time, text-gray-500, ml-1.5, inline-flex, px-2, font-semibold, rounded-full, text-green-800.
Step 3: Customize the styles
Finally, we will customize the styles of the Dispatch Listing UI component to match our application's branding. We can modify the colors, fonts, and spacing to create a unique look and feel.
Conclusion
In this article, we have explored how to create a Dispatch Listing UI component with Tailwind CSS and make it better. We have learned about the benefits of using Tailwind CSS, and how it can save developers time and effort. We have also seen how to customize the styles of the Dispatch Listing UI component to match our application's branding. With Tailwind CSS, developers can quickly build and customize UI components, allowing them to focus on building great applications.