- Published on
6 Easy Ways To Build A Stripe Partner Form With Tailwind CSS

- What is Tailwind CSS?
- The description of Stripe Partner Form ui component
- Why use Tailwind CSS to create a Stripe Partner Form ui component?
- The preview of Stripe Partner Form ui component
- The source code of Stripe Partner Form ui component
- How to create a Stripe Partner Form with Tailwind CSS?
- Step 1: Set up your HTML
- Step 2: Add the necessary input fields
- Step 3: Style the form using Tailwind CSS
- Step 4: Add custom styles
- Conclusion
Are you looking to build a Stripe Partner Form for your website? If so, you're in luck! In this article, we'll show you how to create a Stripe Partner Form using Tailwind CSS.
What is Tailwind CSS?
Tailwind CSS is a utility-first CSS framework that allows you to quickly build custom user interfaces. With Tailwind CSS, you can create complex designs without writing any custom CSS.
The description of Stripe Partner Form ui component
The Stripe Partner Form is a UI component that allows users to sign up as a partner with Stripe. The form consists of several input fields, including name, email, company name, and website URL.
Why use Tailwind CSS to create a Stripe Partner Form ui component?
Tailwind CSS makes it easy to create custom UI components without writing any custom CSS. With Tailwind CSS, you can quickly create responsive designs that look great on any device.
The preview of Stripe Partner Form ui component
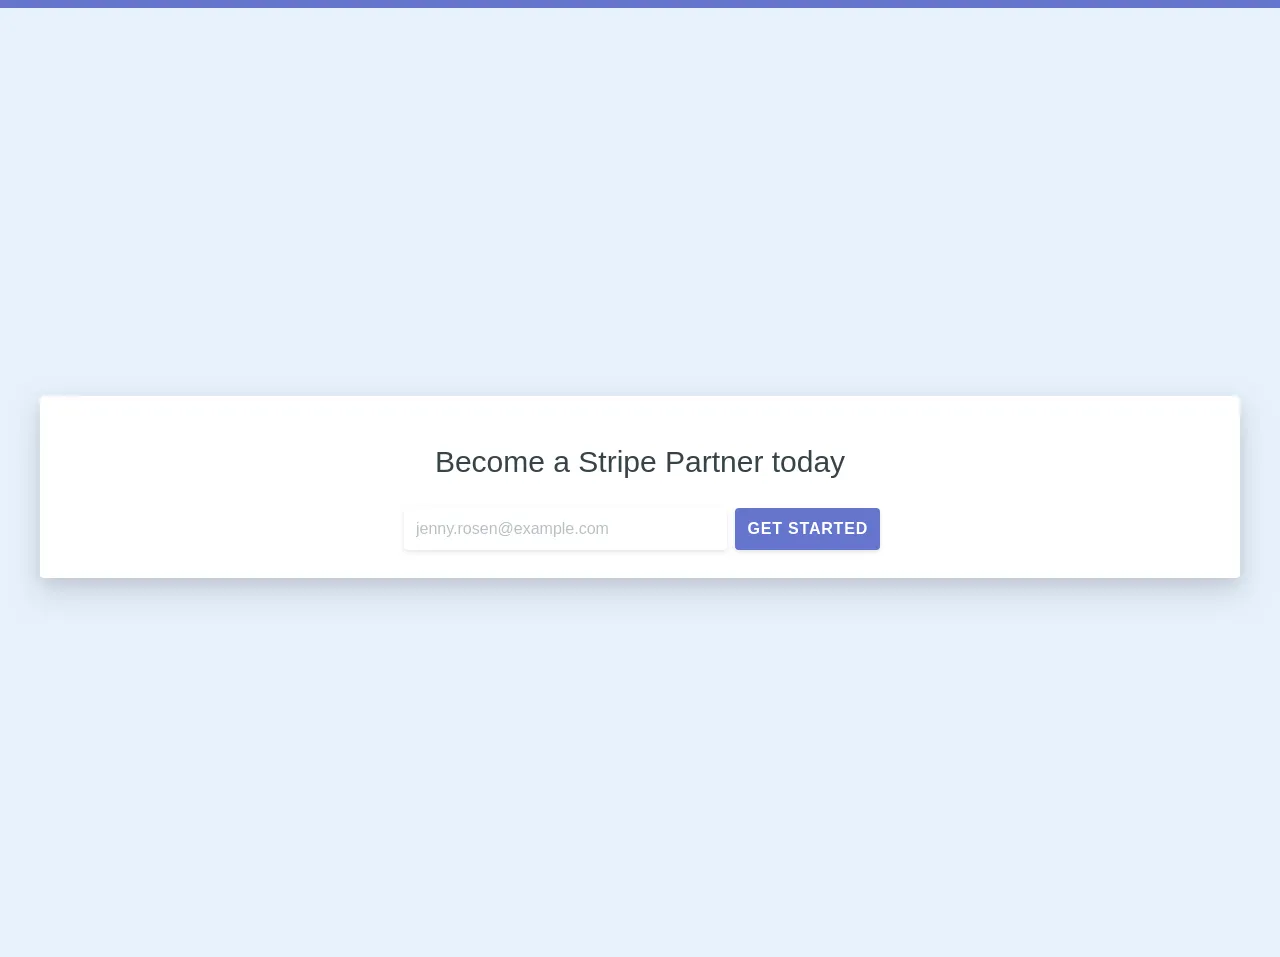
To create a Stripe Partner Form, you'll need to use HTML and CSS. Here's a preview of what the form will look like:
Free download of the Stripe Partner Form's source code
The source code of Stripe Partner Form ui component
To create the Stripe Partner Form, you'll need to use HTML and CSS. Here's the source code for the form:
<div class="w-full">
  <div class="h-2 bg-indigo"></div>
    <div class="flex items-center justify-center h-screen">
      <div class="container mx-24 bg-white rounded shadow-lg">
        <div class="px-12 py-6">
          <div class="text-center">
            <h1 class="font-normal text-3xl text-grey-darkest leading-loose my-3 w-full">Become a Stripe Partner today</h1>
            <div class="w-full text-center">
              <form action="#">
                <div class="max-w-sm mx-auto p-1 pr-0 flex items-center">
                  <input type="email" placeholder="[email protected]" class="flex-1 appearance-none rounded shadow p-3 text-grey-dark mr-2 focus:outline-none">
                  <button type="submit" class="appearance-none bg-indigo text-white text-base font-semibold tracking-wide uppercase p-3 rounded shadow hover:bg-indigo-light">Get started</button>
                </div>
              </form>
            </div>
          </div>
        </div>
      </div>
    </div>
</div>
How to create a Stripe Partner Form with Tailwind CSS?
Now that you know why Tailwind CSS is a great choice for creating a Stripe Partner Form, let's take a look at how to create the form step-by-step.
Step 1: Set up your HTML
To get started, create a new HTML file and add the necessary HTML tags. Here's an example:
<!DOCTYPE html>
<html lang="en">
<head>
  <meta charset="UTF-8">
  <meta name="viewport" content="width=device-width, initial-scale=1.0">
  <title>Stripe Partner Form</title>
</head>
<body>
  <form>
    <!-- Input fields go here -->
  </form>
</body>
</html>
Step 2: Add the necessary input fields
Next, add the necessary input fields to the form. Here's an example:
<form>
  <label for="name">Name</label>
  <input type="text" id="name" name="name" required>

  <label for="email">Email</label>
  <input type="email" id="email" name="email" required>

  <label for="company">Company Name</label>
  <input type="text" id="company" name="company" required>

  <label for="website">Website URL</label>
  <input type="url" id="website" name="website" required>

  <button type="submit">Submit</button>
</form>
Step 3: Style the form using Tailwind CSS
Now that you've added the necessary input fields, it's time to style the form using Tailwind CSS. Here's an example:
<form class="max-w-md mx-auto">
  <div class="mb-4">
    <label class="block text-gray-700 font-bold mb-2" for="name">
      Name
    </label>
    <input class="shadow appearance-none border rounded w-full py-2 px-3 text-gray-700 leading-tight focus:outline-none focus:shadow-outline" id="name" type="text" placeholder="John Doe">
  </div>
  <div class="mb-4">
    <label class="block text-gray-700 font-bold mb-2" for="email">
      Email
    </label>
    <input class="shadow appearance-none border rounded w-full py-2 px-3 text-gray-700 leading-tight focus:outline-none focus:shadow-outline" id="email" type="email" placeholder="[email protected]">
  </div>
  <div class="mb-4">
    <label class="block text-gray-700 font-bold mb-2" for="company">
      Company Name
    </label>
    <input class="shadow appearance-none border rounded w-full py-2 px-3 text-gray-700 leading-tight focus:outline-none focus:shadow-outline" id="company" type="text" placeholder="Acme Inc.">
  </div>
  <div class="mb-4">
    <label class="block text-gray-700 font-bold mb-2" for="website">
      Website URL
    </label>
    <input class="shadow appearance-none border rounded w-full py-2 px-3 text-gray-700 leading-tight focus:outline-none focus:shadow-outline" id="website" type="url" placeholder="https://www.example.com">
  </div>
  <div class="flex items-center justify-between">
    <button class="bg-blue-500 hover:bg-blue-700 text-white font-bold py-2 px-4 rounded focus:outline-none focus:shadow-outline" type="submit">
      Submit
    </button>
  </div>
</form>
Step 4: Add custom styles
If you want to add custom styles to your Stripe Partner Form, you can do so using Tailwind CSS. Here's an example:
<form class="max-w-md mx-auto">
  <div class="mb-4">
    <label class="block text-gray-700 font-bold mb-2" for="name">
      Name
    </label>
    <input class="shadow appearance-none border rounded w-full py-2 px-3 text-gray-700 leading-tight focus:outline-none focus:shadow-outline" id="name" type="text" placeholder="John Doe">
  </div>
  <div class="mb-4">
    <label class="block text-gray-700 font-bold mb-2" for="email">
      Email
    </label>
    <input class="shadow appearance-none border rounded w-full py-2 px-3 text-gray-700 leading-tight focus:outline-none focus:shadow-outline" id="email" type="email" placeholder="[email protected]">
  </div>
  <div class="mb-4">
    <label class="block text-gray-700 font-bold mb-2" for="company">
      Company Name
    </label>
    <input class="shadow appearance-none border rounded w-full py-2 px-3 text-gray-700 leading-tight focus:outline-none focus:shadow-outline" id="company" type="text" placeholder="Acme Inc.">
  </div>
  <div class="mb-4">
    <label class="block text-gray-700 font-bold mb-2" for="website">
      Website URL
    </label>
    <input class="shadow appearance-none border rounded w-full py-2 px-3 text-gray-700 leading-tight focus:outline-none focus:shadow-outline" id="website" type="url" placeholder="https://www.example.com">
  </div>
  <div class="flex items-center justify-between">
    <button class="bg-blue-500 hover:bg-blue-700 text-white font-bold py-2 px-4 rounded focus:outline-none focus:shadow-outline" type="submit">
      Submit
    </button>
  </div>
</form>

<style>
  label {
    font-weight: bold;
  }

  input[type="text"],
  input[type="email"],
  input[type="url"] {
    border-color: #e2e8f0;
  }

  input[type="text"]:focus,
  input[type="email"]:focus,
  input[type="url"]:focus {
    border-color: #4299e1;
    box-shadow: 0 0 0 3px rgba(66, 153, 225, 0.5);
  }

  button {
    margin-top: 1rem;
  }
</style>
Conclusion
In this article, we showed you how to create a Stripe Partner Form using Tailwind CSS. By following these steps, you can quickly create a custom UI component that looks great on any device. With Tailwind CSS, you can easily customize the design of your form to match your website's branding. So what are you waiting for? Start building your own Stripe Partner Form today!