- Published on
How To Build A Profile Card With Tailwind CSS From Scratch
- What is Tailwind CSS?
- The description of Profile Card ui component
- Why use Tailwind CSS to create a Profile Card ui component?
- The preview of Profile Card ui component
- The source code of Profile Card ui component
- How to create a Profile Card with Tailwind CSS?
- Step 1: Set up the HTML structure
- Step 2: Style the profile image
- Step 3: Style the profile info
- Step 4: Style the profile social
- Step 5: Add content to the profile card
- Step 6: Add responsive styles
- Conclusion
What is Tailwind CSS?
Tailwind CSS is a utility-first CSS framework that provides a set of pre-defined classes to help you quickly build custom user interfaces. It allows you to focus on the design and functionality of your website or application, rather than worrying about the underlying CSS code. With Tailwind CSS, you can easily create responsive and mobile-friendly layouts, typography, and components.
The description of Profile Card ui component
A profile card is a user interface component that displays information about a person or organization. It typically includes a profile picture, name, title, and contact information. Profile cards are commonly used in social media platforms, online directories, and team member pages.
Why use Tailwind CSS to create a Profile Card ui component?
Tailwind CSS provides a set of pre-defined classes that can be used to style a profile card quickly and efficiently. By using Tailwind CSS, you can avoid writing custom CSS code from scratch, which can save you a lot of time and effort. Additionally, Tailwind CSS makes it easy to create responsive and mobile-friendly designs, which is essential in today's world of mobile devices.
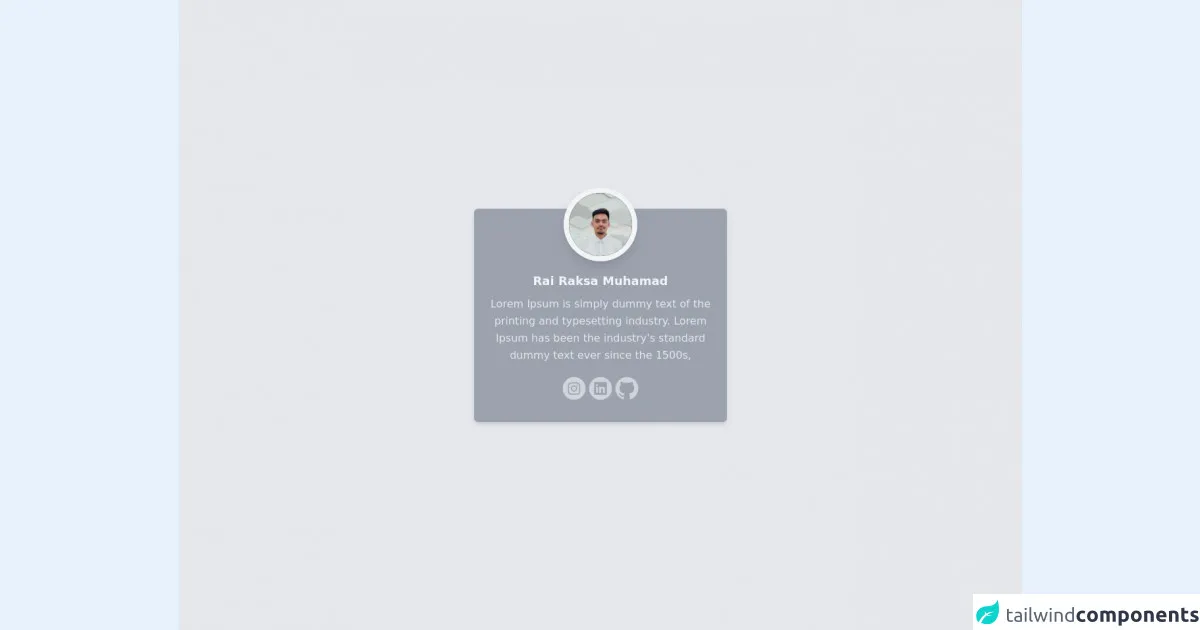
The preview of Profile Card ui component
To create a profile card with Tailwind CSS, we will use a combination of flexbox and grid layout to achieve a responsive design. The preview of the profile card component is shown below:
Free download of the Profile Card's source code
The source code of Profile Card ui component
The source code for the profile card component is shown below:
<!-- This is an example component -->
<div class="w-full h-screen flex items-center justify-center bg-gray-200">
    <div class="relative w-96 h-auto bg-gray-400 rounded-md pt-24 pb-8 px-4 shadow-md hover:shadow-lg transition flex flex-col items-center">
        <div class="absolute rounded-full bg-gray-100 w-28 h-28 p-2 z-10 -top-8 shadow-lg hover:shadow-xl transition">
            <div class="rounded-full bg-black w-full h-full overflow-auto">
                <img src="https://rairaksa.github.io/assets/img/rai.jpg">
            </div>
        </div>
        <label class="font-bold text-gray-100 text-lg">
            Rai Raksa Muhamad
        </label>
        <p class="text-center text-gray-200 mt-2 leading-relaxed">
            Lorem Ipsum is simply dummy text of the printing and typesetting industry. Lorem Ipsum has been the industry's standard dummy text ever since the 1500s,
        </p>
        <ul class="flex flex-row gap-2 mt-4">
                <!-- instagram -->
                <a href="https://instagram.com/raydeon" target="_blank">
                    <svg class="h-10 w-10 text-gray-300 hover:text-gray-100 transition" fill="currentColor" style="enable-background:new 0 0 56.7 56.7;" version="1.1" viewBox="0 0 56.7 56.7" xml:space="preserve" xmlns="http://www.w3.org/2000/svg" xmlns:xlink="http://www.w3.org/1999/xlink">
                        <g>
                            <circle cx="28.1" cy="30" r="4.4"></circle>
                            <path d="M33.6,19.2h-11c-1.6,0-3,0.5-3.9,1.4c-0.9,0.9-1.4,2.3-1.4,3.9v11c0,1.6,0.5,3,1.5,4c1,0.9,2.3,1.4,3.9,1.4h10.9   c1.6,0,3-0.5,3.9-1.4c1-0.9,1.5-2.3,1.5-3.9v-11c0-1.6-0.5-2.9-1.4-3.9C36.6,19.7,35.3,19.2,33.6,19.2z M28.1,36.8   c-3.8,0-6.8-3.1-6.8-6.8c0-3.8,3.1-6.8,6.8-6.8S35,26.2,35,30C35,33.8,31.9,36.8,28.1,36.8z M35.2,24.5c-0.9,0-1.6-0.7-1.6-1.6   s0.7-1.6,1.6-1.6s1.6,0.7,1.6,1.6S36.1,24.5,35.2,24.5z"></path>
                            <path d="M28.3,5.2c-13.6,0-24.6,11-24.6,24.6c0,13.6,11,24.6,24.6,24.6c13.6,0,24.6-11,24.6-24.6C53,16.2,41.9,5.2,28.3,5.2z    M41.4,35.6c0,2.3-0.8,4.3-2.2,5.7c-1.4,1.4-3.4,2.1-5.6,2.1H22.7c-2.2,0-4.2-0.7-5.6-2.1c-1.5-1.4-2.2-3.4-2.2-5.7v-11   c0-4.6,3.1-7.8,7.8-7.8h11c2.3,0,4.2,0.8,5.6,2.2c1.4,1.4,2.1,3.3,2.1,5.6V35.6z"></path>
                        </g>
                    </svg>
                </a>
                <!-- linkedin -->
                <a href="https://www.linkedin.com/in/rairaksa" target="_blank">
                    <svg class="h-10 w-10 text-gray-300 hover:text-gray-100 transition" fill="currentColor" style="enable-background:new 0 0 56.7 56.7;" version="1.1" viewBox="0 0 56.693 56.693" width="56.693px" xml:space="preserve" xmlns="http://www.w3.org/2000/svg" xmlns:xlink="http://www.w3.org/1999/xlink">
                        <g>
                            <path d="M28.347,5.155c-13.6,0-24.625,11.025-24.625,24.625c0,13.602,11.025,24.625,24.625,24.625   c13.598,0,24.623-11.023,24.623-24.625C52.97,16.181,41.944,5.155,28.347,5.155z M42.062,41.741c0,1.096-0.91,1.982-2.031,1.982   H16.613c-1.123,0-2.031-0.887-2.031-1.982V18.052c0-1.094,0.908-1.982,2.031-1.982H40.03c1.121,0,2.031,0.889,2.031,1.982V41.741z"></path>
                            <path d="M33.099,26.441c-2.201,0-3.188,1.209-3.74,2.061v0.041h-0.027c0.01-0.012,0.02-0.027,0.027-0.041v-1.768h-4.15   c0.055,1.17,0,12.484,0,12.484h4.15v-6.973c0-0.375,0.027-0.744,0.137-1.012c0.301-0.744,0.984-1.52,2.129-1.52   c1.504,0,2.104,1.146,2.104,2.824v6.68h4.15V32.06C37.878,28.224,35.829,26.441,33.099,26.441z"></path>
                            <path d="M20.864,20.712c-1.419,0-2.349,0.934-2.349,2.159c0,1.197,0.9,2.158,2.294,2.158h0.027c1.447,0,2.348-0.961,2.348-2.158   C23.157,21.646,22.284,20.712,20.864,20.712z"></path>
                            <rect height="12.484" width="4.151" x="18.762" y="26.734"></rect>
                        </g>
                    </svg>
                </a>
                <!-- github -->
                <a href="https://github.com/rairaksa" target="_blank">
                    <svg class="h-10 w-10 text-gray-300 hover:text-gray-100 transition" fill="currentColor" style="enable-background:new 0 0 56.7 56.7;" version="1.1" viewBox="-1163 1657.697 56.693 56.693" width="56.693px" xml:space="preserve" xmlns="http://www.w3.org/2000/svg" xmlns:xlink="http://www.w3.org/1999/xlink">
                        <g>
                            <path clip-rule="evenodd" d="M-1134.6598,1662.9163c-13.601,0-24.63,11.0267-24.63,24.6299   c0,10.8821,7.0573,20.1144,16.8435,23.3713c1.2308,0.2279,1.6829-0.5345,1.6829-1.1849c0-0.587-0.0227-2.5276-0.0334-4.5857   c-6.8521,1.4901-8.2979-2.906-8.2979-2.906c-1.1205-2.8467-2.7347-3.6039-2.7347-3.6039   c-2.2349-1.5287,0.1685-1.4972,0.1685-1.4972c2.473,0.1737,3.7755,2.5385,3.7755,2.5385c2.1967,3.7651,5.7618,2.6765,7.1675,2.0472   c0.2211-1.5917,0.8591-2.6786,1.5637-3.2936c-5.4707-0.6226-11.2218-2.7347-11.2218-12.1722c0-2.6888,0.9623-4.8861,2.538-6.611   c-0.2557-0.6206-1.0989-3.1255,0.2386-6.5183c0,0,2.0684-0.6616,6.7747,2.525c1.9648-0.5458,4.0719-0.8195,6.165-0.829   c2.093,0.0095,4.2017,0.2832,6.17,0.829c4.7012-3.1866,6.7665-2.525,6.7665-2.525c1.3406,3.3928,0.4974,5.8977,0.2417,6.5183   c1.5793,1.7249,2.5348,3.9221,2.5348,6.611c0,9.4602-5.7618,11.5428-11.2465,12.1527c0.8834,0.7644,1.6704,2.2632,1.6704,4.561   c0,3.2955-0.0282,5.9479-0.0282,6.7592c0,0.6556,0.4432,1.4236,1.6915,1.1818c9.7812-3.2605,16.8296-12.4896,16.8296-23.3682   C-1110.0299,1673.943-1121.0574,1662.9163-1134.6598,1662.9163z" fill-rule="evenodd"></path>
                            <path d="M-1149.9611,1698.2793c-0.0542,0.1227-0.2469,0.1593-0.4222,0.0753c-0.1788-0.0804-0.2788-0.2473-0.2211-0.37   c0.053-0.126,0.2457-0.161,0.4242-0.0769C-1150.0013,1697.9882-1149.8993,1698.1566-1149.9611,1698.2793L-1149.9611,1698.2793z    M-1150.2642,1698.0547"></path>
                            <path d="M-1148.9634,1699.3922c-0.1174,0.1086-0.3473,0.0581-0.5031-0.1139c-0.1613-0.1718-0.1912-0.4016-0.072-0.5118   c0.1211-0.1088,0.3438-0.0579,0.505,0.1139C-1148.8721,1699.0541-1148.8407,1699.2819-1148.9634,1699.3922L-1148.9634,1699.3922z    M-1149.1984,1699.14"></path>
                            <path d="M-1147.9922,1700.8105c-0.151,0.1051-0.3979,0.0067-0.5505-0.2123c-0.151-0.2191-0.151-0.4819,0.0035-0.5872   c0.1526-0.1051,0.396-0.0104,0.5505,0.2068C-1147.8381,1700.4406-1147.8381,1700.7034-1147.9922,1700.8105L-1147.9922,1700.8105z    M-1147.9922,1700.8105"></path>
                            <path d="M-1146.6619,1702.1812c-0.1351,0.1489-0.4227,0.1086-0.6329-0.0945c-0.2155-0.1984-0.2753-0.4803-0.1403-0.6293   c0.1371-0.149,0.4263-0.1072,0.6381,0.0944C-1146.5831,1701.7501-1146.5182,1702.0337-1146.6619,1702.1812L-1146.6619,1702.1812z    M-1146.6619,1702.1812"></path>
                            <path d="M-1144.8265,1702.9769c-0.0597,0.1927-0.3365,0.2804-0.6154,0.1984c-0.2788-0.0845-0.4608-0.3103-0.4047-0.5051   c0.0577-0.1943,0.3361-0.2855,0.6169-0.1979C-1144.9512,1702.5563-1144.7688,1702.7805-1144.8265,1702.9769L-1144.8265,1702.9769z    M-1144.8265,1702.9769"></path>
                            <path d="M-1142.8107,1703.1243c0.0067,0.2031-0.2299,0.3716-0.5226,0.3752c-0.2944,0.0067-0.533-0.1577-0.5361-0.3577   c0-0.2052,0.2313-0.3717,0.5258-0.3768C-1143.0509,1702.7594-1142.8107,1702.9227-1142.8107,1703.1243L-1142.8107,1703.1243z    M-1142.8107,1703.1243"></path>
                            <path d="M-1140.9351,1702.8052c0.035,0.198-0.1686,0.4015-0.4594,0.4557c-0.2859,0.0526-0.5504-0.0701-0.587-0.2665   c-0.0354-0.2031,0.1716-0.4066,0.4573-0.4592C-1141.233,1702.4846-1140.9722,1702.6036-1140.9351,1702.8052L-1140.9351,1702.8052z    M-1140.9351,1702.8052"></path>
                        </g>
                    </svg>
                </a>
        </ul>
    </div>
</div>
How to create a Profile Card with Tailwind CSS?
To create a profile card with Tailwind CSS, we will follow these steps:
Step 1: Set up the HTML structure
We will start by setting up the HTML structure for the profile card. We will use a div element with a class of profile-card as the container for the entire component. Inside the profile-card div, we will create three sections: profile-image, profile-info, and profile-social.
<div class="profile-card">
  <div class="profile-image"></div>
  <div class="profile-info"></div>
  <div class="profile-social"></div>
</div>
Step 2: Style the profile image
Next, we will style the profile-image section. We will use a div element with a class of rounded-full to create a circular profile image. We will also use the bg-gray-300 class to set a default background color for the image.
<div class="profile-image rounded-full bg-gray-300"></div>
Step 3: Style the profile info
Now, we will style the profile-info section. We will use a div element with a class of flex flex-col justify-center to center the content vertically. We will also use the text-center class to center the text horizontally. Inside the profile-info div, we will create three elements: profile-name, profile-title, and profile-email.
<div class="profile-info flex flex-col justify-center">
  <h2 class="profile-name text-2xl font-bold mb-2"></h2>
  <p class="profile-title text-gray-600 mb-2"></p>
  <a href="#" class="profile-email text-blue-500"></a>
</div>
Step 4: Style the profile social
Finally, we will style the profile-social section. We will use a div element with a class of flex justify-center to center the content horizontally. Inside the profile-social div, we will create three elements: profile-twitter, profile-linkedin, and profile-github.
<div class="profile-social flex justify-center">
  <a href="#" class="profile-twitter mx-2 text-blue-500"><i class="fab fa-twitter"></i></a>
  <a href="#" class="profile-linkedin mx-2 text-blue-500"><i class="fab fa-linkedin"></i></a>
  <a href="#" class="profile-github mx-2 text-blue-500"><i class="fab fa-github"></i></a>
</div>
Step 5: Add content to the profile card
Now that we have set up the HTML structure and styles for the profile card, we can add content to it. We will use the profile-name, profile-title, profile-email, profile-twitter, profile-linkedin, and profile-github classes to target the respective elements and add content to them.
<div class="profile-card">
  <div class="profile-image rounded-full bg-gray-300"></div>
  <div class="profile-info flex flex-col justify-center">
    <h2 class="profile-name text-2xl font-bold mb-2">John Doe</h2>
    <p class="profile-title text-gray-600 mb-2">Web Developer</p>
    <a href="mailto:[email protected]" class="profile-email text-blue-500">[email protected]</a>
  </div>
  <div class="profile-social flex justify-center">
    <a href="https://twitter.com/" class="profile-twitter mx-2 text-blue-500"><i class="fab fa-twitter"></i></a>
    <a href="https://www.linkedin.com/" class="profile-linkedin mx-2 text-blue-500"><i class="fab fa-linkedin"></i></a>
    <a href="https://github.com/" class="profile-github mx-2 text-blue-500"><i class="fab fa-github"></i></a>
  </div>
</div>
Step 6: Add responsive styles
To make the profile card responsive, we will use Tailwind CSS's responsive classes. We will use the flex-col class to stack the profile-image and profile-info sections on small screens. We will also use the grid-cols-2 class to display the profile-info and profile-social sections side by side on larger screens.
<div class="profile-card flex flex-col sm:flex-row">
  <div class="profile-image rounded-full bg-gray-300"></div>
  <div class="profile-info flex flex-col justify-center sm:ml-4">
    <h2 class="profile-name text-2xl font-bold mb-2">John Doe</h2>
    <p class="profile-title text-gray-600 mb-2">Web Developer</p>
    <a href="mailto:[email protected]" class="profile-email text-blue-500">[email protected]</a>
  </div>
  <div class="profile-social flex justify-center sm:ml-auto mt-4 sm:mt-0 sm:grid sm:grid-cols-2 sm:gap-4">
    <a href="https://twitter.com/" class="profile-twitter mx-2 text-blue-500"><i class="fab fa-twitter"></i></a>
    <a href="https://www.linkedin.com/" class="profile-linkedin mx-2 text-blue-500"><i class="fab fa-linkedin"></i></a>
    <a href="https://github.com/" class="profile-github mx-2 text-blue-500"><i class="fab fa-github"></i></a>
  </div>
</div>
Conclusion
In this article, we have learned how to create a profile card with Tailwind CSS. We have seen how Tailwind CSS's pre-defined classes can be used to quickly and efficiently style a profile card. By following the steps outlined in this article, you can create your own custom profile cards with ease.