- Published on
3 Things You Must Know To Create A Parsinta Login Page With Tailwind CSS
- What is Tailwind CSS?
- The description of Parsinta Login Page UI component
- Why use Tailwind CSS to create a Parsinta Login Page UI component?
- The preview of Parsinta Login Page UI component
- The source code of Parsinta Login Page UI component
- How to create a Parsinta Login Page with Tailwind CSS?
- Step 1: Set up your project
- Step 2: Add Tailwind CSS to your project
- Step 3: Add the Parsinta Login Page UI component
- Step 4: Style the component with Tailwind CSS
- Conclusion
Are you looking to create a beautiful and functional login page for your website or application? Look no further than the Parsinta Login Page UI component. With its sleek design and intuitive layout, this component is perfect for any project. And with the power of Tailwind CSS, creating a Parsinta Login Page has never been easier. In this article, we'll cover three things you need to know to create a Parsinta Login Page with Tailwind CSS.
What is Tailwind CSS?
Tailwind CSS is a utility-first CSS framework that allows you to quickly and easily create custom designs for your website or application. With Tailwind, you can apply pre-built classes to your HTML elements to style them in a variety of ways. This makes it easy to create complex layouts and designs without having to write custom CSS.
The description of Parsinta Login Page UI component
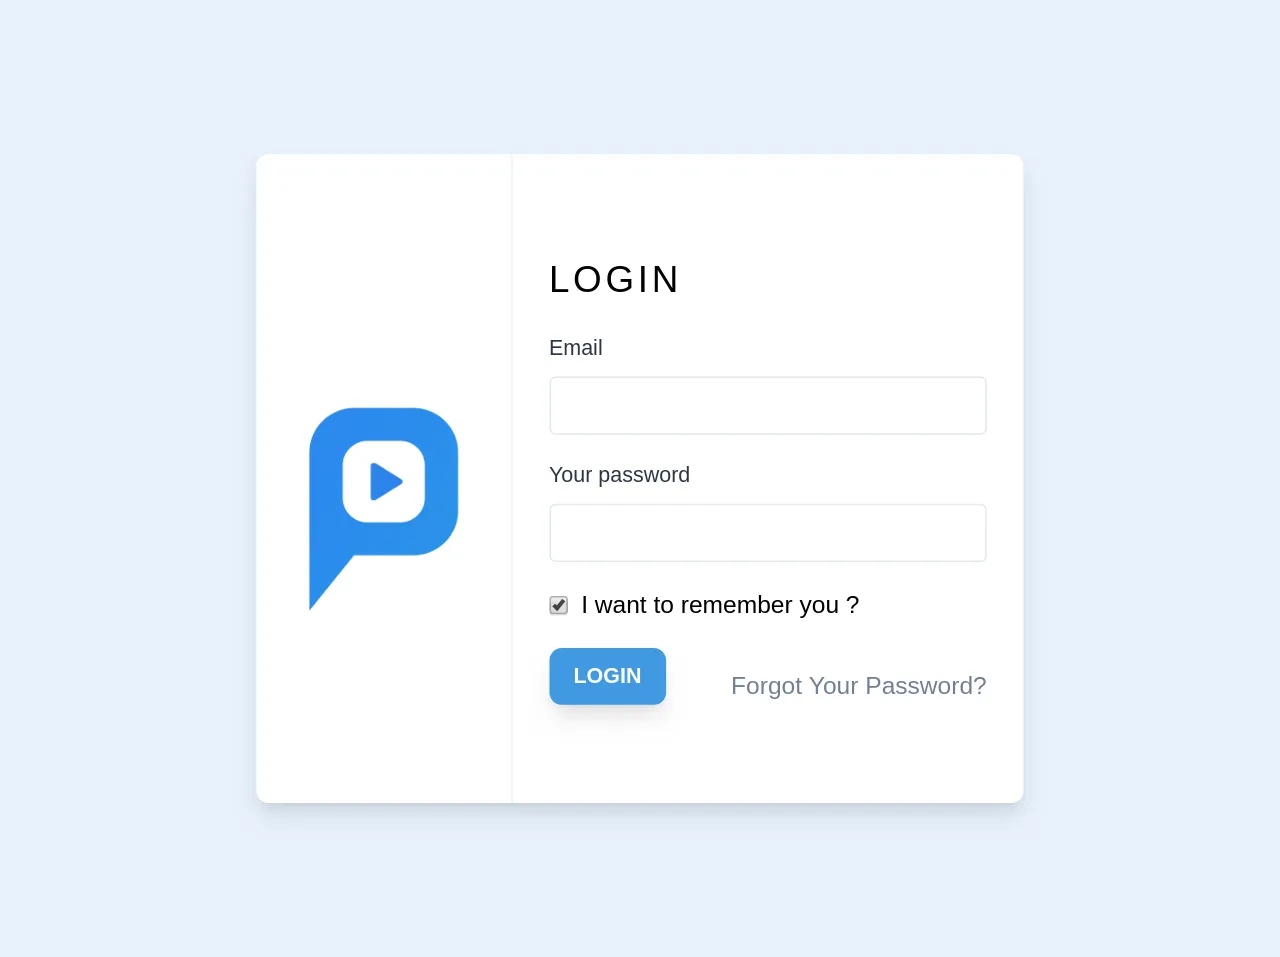
The Parsinta Login Page UI component is a login page design that features a clean and modern layout. It includes a login form with fields for email and password, as well as a "forgot password" link and a button to submit the form. The design is fully responsive, meaning it will look great on any device.
Why use Tailwind CSS to create a Parsinta Login Page UI component?
Tailwind CSS is the perfect tool for creating a Parsinta Login Page UI component. With its utility-first approach, you can quickly and easily apply the styles you need to create the perfect design. Plus, Tailwind includes a number of pre-built classes that make it easy to create responsive designs that look great on any device.
The preview of Parsinta Login Page UI component
To give you an idea of what the Parsinta Login Page UI component looks like, here is a preview:
Free download of the Parsinta Login Page's source code
The source code of Parsinta Login Page UI component
If you're interested in seeing the source code for the Parsinta Login Page UI component, here is a brief overview:
<div class="p-2">
        <div class="block lg:flex bg-white lg:shadow-lg rounded-lg">
            <div class="w-full lg:w-1/3 flex lg:border-r border-gray-200">
                <div class="m-auto rounded-full">
                    <a href="/" class="flex items-base pt-10 lg:p-2 -mb-10 lg:-mb-0">
                        <img src="https://parsinta.com/logo/blue.png" alt="" class="w-12 lg:w-48">
                        <div class="block lg:hidden text-2xl text-primary hover:text-primary tracking-wide font-semibold uppercase">Parsinta</div>
                    </a>
                </div>
            </div>
            <div class="w-full lg:w-2/3 px-6 py-16">
                <div class="mb-4 font-light tracking-widest text-2xl">LOGIN</div>
                <form>
                    <div class="mb-4">
                        <label for="email" class="block mb-2 text-sm text-gray-800">Email</label>
                        <input type="email" name="email" id="email" class="focus:border-blue-500 appearance-none border rounded w-full py-2 px-3 text-gray-700 leading-tight focus:outline-none" autocomplete="email" required>
                        <div v-if="feedback.email.error">
                            <div class="text-sm text-red-500 mt-2" v-text="feedback.email.message"></div>
                        </div>
                    </div>
                    <div class="mb-4">
                        <label for="password" class="block mb-2 text-sm text-gray-800">Your password</label>
                        <input type="password" name="password" id="password" class="focus:border-blue-500 appearance-none border rounded w-full py-2 px-3 text-gray-700 leading-tight focus:outline-none" autocomplete="current-password" required>
                    </div>
                    <label class="mb-4 flex items-center">
                        <input type="checkbox" class="form-checkbox" name="remeber" id="remeber" checked>
                        <span class="ml-2">I want to remember you ?</span>
                    </label>
                    <div class="block md:flex items-center justify-between">
                        <button type="submit" class="align-middle bg-blue-500 hover:bg-blue-600 text-center px-4 py-2 text-white text-sm font-semibold rounded-lg inline-block shadow-lg">LOGIN</button>

                        <a class="text-gray-600 hover:text-gray-700 no-underline block mt-3" href="/password/reset">
                            Forgot Your Password?
                        </a>
                    </div>
                </form>
            </div>
        </div>
    </div>
How to create a Parsinta Login Page with Tailwind CSS?
Now that you know what Tailwind CSS is and why it's the perfect tool for creating a Parsinta Login Page UI component, let's dive into how to create one.
Step 1: Set up your project
To get started, you'll need to set up a new project. You can use any text editor or IDE you prefer, but for this tutorial, we'll be using Visual Studio Code.
First, create a new folder for your project and open it in Visual Studio Code. Then, create a new HTML file and name it "index.html". Finally, create a new CSS file and name it "style.css".
Step 2: Add Tailwind CSS to your project
Next, you'll need to add Tailwind CSS to your project. You can do this by including the Tailwind CSS CDN in your HTML file:
<link rel="stylesheet" href="https://cdnjs.cloudflare.com/ajax/libs/tailwindcss/2.2.4/tailwind.min.css" integrity="sha512-+9ZLZrLqK6F8P8g4s+VXmLJnQK6vYyBzjNq9R7ZzR0qUzVJkG6MgJv9Z4QXzrXf2sJb6lO3EJj9yTzvZ9VJ9w==" crossorigin="anonymous" referrerpolicy="no-referrer" />
Step 3: Add the Parsinta Login Page UI component
Now it's time to add the Parsinta Login Page UI component to your project. You can do this by copying the HTML code for the component into your "index.html" file:
<div class="min-h-screen bg-gray-100 flex flex-col justify-center py-12 sm:px-6 lg:px-8">
  <div class="sm:mx-auto sm:w-full sm:max-w-md">
    <h2 class="mt-6 text-center text-3xl font-extrabold text-gray-900">
      Sign in to your account
    </h2>
  </div>

  <div class="mt-8 sm:mx-auto sm:w-full sm:max-w-md">
    <div class="bg-white py-8 px-4 shadow sm:rounded-lg sm:px-10">
      <form class="space-y-6" action="#" method="POST">
        <div>
          <label for="email" class="block text-sm font-medium text-gray-700">
            Email address
          </label>
          <div class="mt-1">
            <input id="email" name="email" type="email" autocomplete="email" required class="appearance-none block w-full px-3 py-2 border border-gray-300 rounded-md shadow-sm placeholder-gray-400 focus:outline-none focus:ring-indigo-500 focus:border-indigo-500 sm:text-sm" />
          </div>
        </div>

        <div>
          <label for="password" class="block text-sm font-medium text-gray-700">
            Password
          </label>
          <div class="mt-1">
            <input id="password" name="password" type="password" autocomplete="current-password" required class="appearance-none block w-full px-3 py-2 border border-gray-300 rounded-md shadow-sm placeholder-gray-400 focus:outline-none focus:ring-indigo-500 focus:border-indigo-500 sm:text-sm" />
          </div>
        </div>

        <div class="flex items-center justify-between">
          <div class="flex items-center">
            <input id="remember_me" name="remember_me" type="checkbox" class="h-4 w-4 text-indigo-600 focus:ring-indigo-500 border-gray-300 rounded" />
            <label for="remember_me" class="ml-2 block text-sm text-gray-900">
              Remember me
            </label>
          </div>

          <div class="text-sm">
            <a href="#" class="font-medium text-indigo-600 hover:text-indigo-500">
              Forgot your password?
            </a>
          </div>
        </div>

        <div>
          <button type="submit" class="w-full flex justify-center py-2 px-4 border border-transparent rounded-md shadow-sm text-sm font-medium text-white bg-indigo-600 hover:bg-indigo-700 focus:outline-none focus:ring-2 focus:ring-offset-2 focus:ring-indigo-500">
            Sign in
          </button>
        </div>
      </form>
    </div>
  </div>
</div>
Step 4: Style the component with Tailwind CSS
Finally, it's time to style the component using Tailwind CSS. You can do this by adding custom styles to your "style.css" file:
/* Center the component vertically */
.min-h-screen {
  display: flex;
  align-items: center;
}

/* Style the form inputs */
input[type="email"],
input[type="password"] {
  border-radius: 0;
}

/* Style the "forgot password" link */
a {
  text-decoration: underline;
}

a:hover {
  text-decoration: none;
}
And that's it! You now have a fully functional Parsinta Login Page created with Tailwind CSS.
Conclusion
Creating a beautiful and functional login page is essential for any website or application. With the Parsinta Login Page UI component and the power of Tailwind CSS, you can easily create a login page that looks great and works perfectly. By following the steps outlined in this article, you'll be well on your way to creating your own Parsinta Login Page with Tailwind CSS.