- Published on
Make A Monokai Syntax With Tailwind CSS Like A Pro With The Help Of These 6 Tips
- What is Tailwind CSS?
- The description of Monokai Syntax ui component
- Why use Tailwind CSS to create a Monokai Syntax ui component?
- The preview of Monokai Syntax ui component.
- The source code of Monokai Syntax ui component.
- How to create a Monokai Syntax with Tailwind CSS?
- Step 1: Set up your HTML
- Step 2: Style the background
- Step 3: Style the syntax
- Step 4: Add padding and border radius
- Conclusion
As a FrontEnd technology blogger, you may have heard of Tailwind CSS, a utility-first CSS framework that helps you quickly build custom user interfaces. In this article, we will explore how to create a Monokai Syntax ui component with Tailwind CSS.
What is Tailwind CSS?
Tailwind CSS is a utility-first CSS framework that provides a set of pre-defined classes to style your HTML elements. It allows you to quickly create custom UI components without writing any CSS code.
The description of Monokai Syntax ui component
Monokai Syntax is a popular color scheme used in code editors. It has a dark background with bright, contrasting colors for syntax highlighting. In this article, we will create a Monokai Syntax ui component using Tailwind CSS.
Why use Tailwind CSS to create a Monokai Syntax ui component?
Tailwind CSS provides a set of pre-defined classes that can be used to style your HTML elements. By using Tailwind CSS, you can quickly create a custom Monokai Syntax ui component without writing any CSS code.
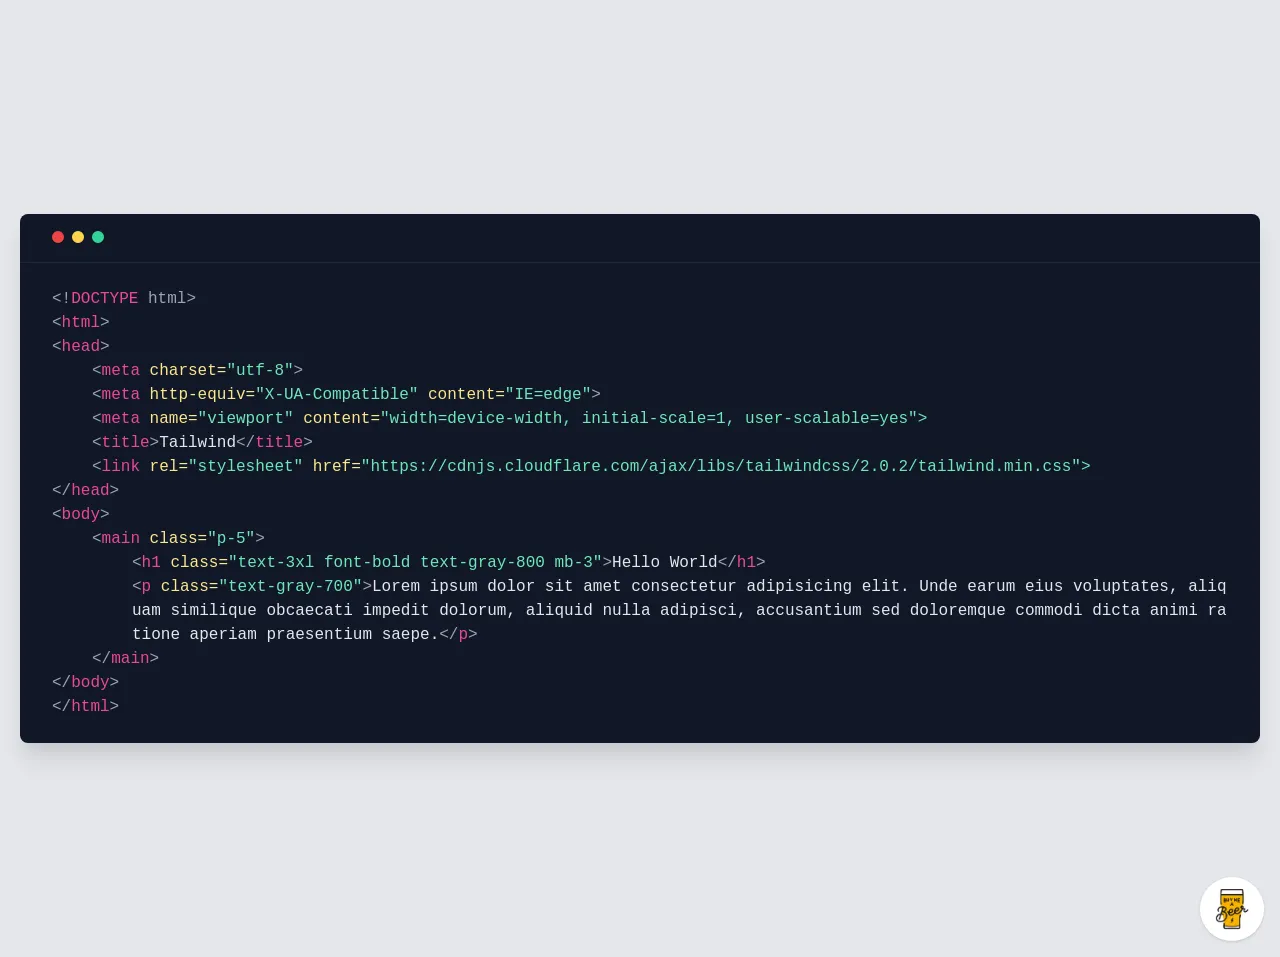
The preview of Monokai Syntax ui component.
To give you an idea of what the Monokai Syntax ui component will look like, here is a preview:
Free download of the Monokai Syntax's source code
The source code of Monokai Syntax ui component.
Here is the source code for the Monokai Syntax ui component:
<div class="min-w-screen min-h-screen bg-gray-200 flex items-center justify-center px-5 py-5">
<div class="rounded-lg shadow-xl bg-gray-900 text-gray-400">
<div class="border-b border-gray-800 px-8 py-3">
<div class="inline-block w-3 h-3 mr-2 rounded-full bg-red-500"></div><div class="inline-block w-3 h-3 mr-2 rounded-full bg-yellow-300"></div><div class="inline-block w-3 h-3 mr-2 rounded-full bg-green-400"></div>
</div>
<div class="px-8 py-6 font-mono break-all">
<p><!<span class="text-pink-500">DOCTYPE</span> html></p>
<p><<span class="text-pink-500">html</span>></p>
<p><<span class="text-pink-500">head</span>></p>
<p class="ml-10"><<span class="text-pink-500">meta</span> <span class="text-yellow-200">charset=</span><span class="text-green-300">"utf-8"</span>></p>
<p class="ml-10"><<span class="text-pink-500">meta</span> <span class="text-yellow-200">http-equiv=</span><span class="text-green-300">"X-UA-Compatible"</span> <span class="text-yellow-200">content=</span><span class="text-green-300">"IE=edge"</span>></p>
<p class="ml-10"><<span class="text-pink-500">meta</span> <span class="text-yellow-200">name=</span><span class="text-green-300">"viewport" <span class="text-yellow-200">content=</span><span class="text-green-300">"width=device-width, initial-scale=1, user-scalable=yes"</span>></p>
<p class="ml-10"><<span class="text-pink-500">title</span>><span class="text-gray-200">Tailwind</span></<span class="text-pink-500">title</span>></p>
<p class="ml-10"><<span class="text-pink-500">link</span> <span class="text-yellow-200">rel=</span><span class="text-green-300">"stylesheet" <span class="text-yellow-200">href=</span><span class="text-green-300">"https://cdnjs.cloudflare.com/ajax/libs/tailwindcss/2.0.2/tailwind.min.css"</span>></p>
<p></<span class="text-pink-500">head</span>></p>
<p><<span class="text-pink-500">body</span>></p>
<p class="ml-10"><<span class="text-pink-500">main</span> <span class="text-yellow-200">class=</span><span class="text-green-300">"p-5"</span>></p>
<p class="ml-20"><<span class="text-pink-500">h1</span> <span class="text-yellow-200">class=</span><span class="text-green-300">"text-3xl font-bold text-gray-800 mb-3"</span>><span class="text-gray-200">Hello World</span></<span class="text-pink-500">h1</span>></p>
<p class="ml-20"><<span class="text-pink-500">p</span> <span class="text-yellow-200">class=</span><span class="text-green-300">"text-gray-700"</span>><span class="text-gray-200">Lorem ipsum dolor sit amet consectetur adipisicing elit. Unde earum eius voluptates, aliquam similique obcaecati impedit dolorum, aliquid nulla adipisci, accusantium sed doloremque commodi dicta animi ratione aperiam praesentium saepe.</span></<span class="text-pink-500">p</span>></p>
<p class="ml-10"></<span class="text-pink-500">main</span>></p>
<p></<span class="text-pink-500">body</span>></p>
<p></<span class="text-pink-500">html</span>></p>
</div>
</div>
</div>
<!-- BUY ME A BEER AND HELP SUPPORT OPEN-SOURCE RESOURCES -->
<div class="flex items-end justify-end fixed bottom-0 right-0 mb-4 mr-4 z-10">
<div>
<a title="Buy me a beer" href="https://www.buymeacoffee.com/scottwindon" target="_blank" class="block w-16 h-16 rounded-full transition-all shadow hover:shadow-lg transform hover:scale-110 hover:rotate-12">
<img class="object-cover object-center w-full h-full rounded-full" src="https://i.pinimg.com/originals/60/fd/e8/60fde811b6be57094e0abc69d9c2622a.jpg"/>
</a>
</div>
</div>
How to create a Monokai Syntax with Tailwind CSS?
Now that you have an idea of what the Monokai Syntax ui component will look like and what the source code is, let's dive into how to create it with Tailwind CSS.
Step 1: Set up your HTML
First, we need to create the HTML structure for our Monokai Syntax ui component. We will use a pre tag to display the code and a code tag to highlight the syntax.
<pre class="bg-gray-900 rounded-lg p-4">
  <code class="text-green-400">function</code> <code class="text-blue-400">add</code>(<code class="text-yellow-400">a</code>, <code class="text-yellow-400">b</code>) {
    <code class="text-purple-400">return</code> <code class="text-yellow-400">a</code> <code class="text-red-400">+</code> <code class="text-yellow-400">b</code>;
  }
</pre>
Step 2: Style the background
Next, we need to style the background of our Monokai Syntax ui component. We will use the bg-gray-900 class to set the background color to dark gray.
<pre class="bg-gray-900 rounded-lg p-4">
Step 3: Style the syntax
Now, we need to style the syntax of our Monokai Syntax ui component. We will use the following classes to style the syntax:
text-green-400for function namestext-blue-400for keywordstext-yellow-400for variablestext-purple-400for return statementstext-red-400for operators
<code class="text-green-400">function</code> <code class="text-blue-400">add</code>(<code class="text-yellow-400">a</code>, <code class="text-yellow-400">b</code>) {
  <code class="text-purple-400">return</code> <code class="text-yellow-400">a</code> <code class="text-red-400">+</code> <code class="text-yellow-400">b</code>;
}
Step 4: Add padding and border radius
Finally, we need to add some padding and border radius to our Monokai Syntax ui component to make it look more like a code editor. We will use the p-4 class to add padding and the rounded-lg class to add border radius.
<pre class="bg-gray-900 rounded-lg p-4">
And that's it! You have now created a Monokai Syntax ui component with Tailwind CSS.
Conclusion
In this article, we have explored how to create a Monokai Syntax ui component with Tailwind CSS. We have learned how to use pre-defined classes to style our HTML elements and how to create a custom color scheme for syntax highlighting. With the help of these 6 tips, you can now create your own custom UI components with Tailwind CSS like a pro.