- Published on
How To Build A Login Page With Tailwind CSS From Scratch
- What is Tailwind CSS?
- The description of Login Page UI component
- Why use Tailwind CSS to create a Login Page UI component?
- The preview of Login Page UI component
- The source code of Login Page UI component
- How to create a Login Page with Tailwind CSS?
- Step 1: Set up the HTML structure
- Step 2: Add Tailwind CSS classes
- Step 3: Preview and refine
- Conclusion
As a FrontEnd technology blogger, it's essential to stay up-to-date with the latest trends and tools in the industry. One such tool that has gained immense popularity in recent times is Tailwind CSS. In this article, we'll explore how to build a login page with Tailwind CSS from scratch.
What is Tailwind CSS?
Tailwind CSS is a utility-first CSS framework that provides a set of pre-defined CSS classes to style your HTML elements. It's different from other CSS frameworks like Bootstrap or Foundation, which offer pre-designed UI components. With Tailwind CSS, you can create your own unique UI components by combining different pre-defined classes.
The description of Login Page UI component
A login page is a crucial UI component for any web application that requires user authentication. It typically consists of a form with two input fields for the username and password, along with a submit button. The login page should be visually appealing and easy to use.
Why use Tailwind CSS to create a Login Page UI component?
Tailwind CSS provides a set of pre-defined classes that can be used to style the login page quickly. It eliminates the need to write custom CSS from scratch, saving time and effort. Additionally, Tailwind CSS is highly customizable, allowing you to create a unique login page that matches your brand's style.
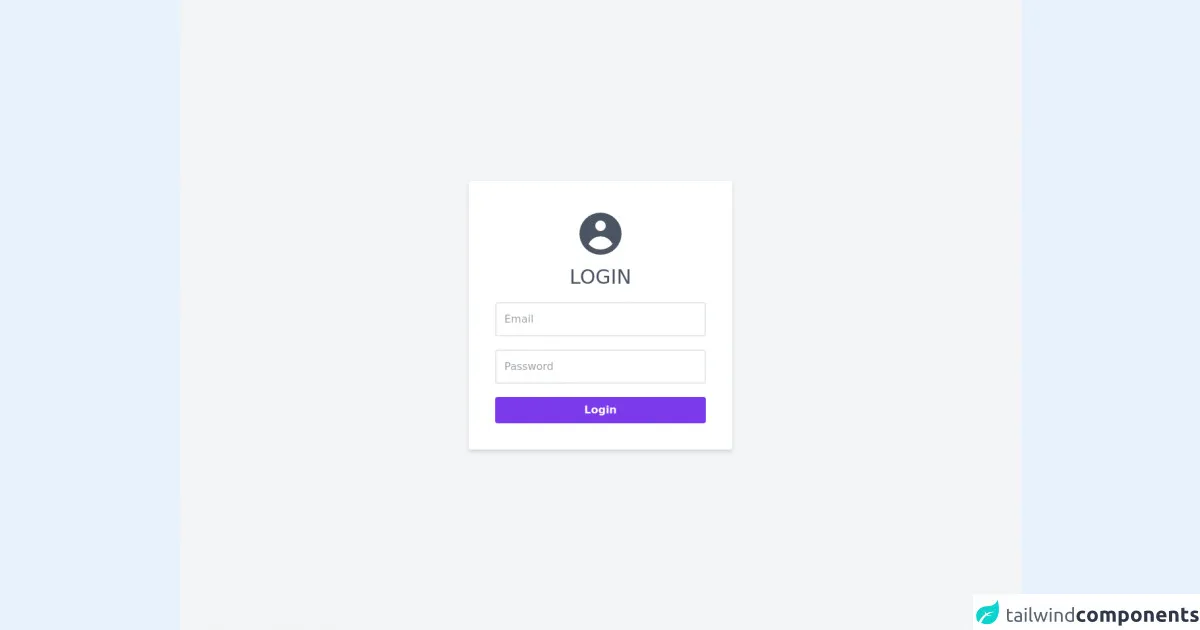
The preview of Login Page UI component
To create a login page with Tailwind CSS, we'll use a combination of pre-defined classes like bg-gray-100, p-6, rounded-lg, shadow-lg, text-gray-700, text-xl, mb-4, w-full, px-3, py-2, border, border-gray-400, rounded-md, focus:outline-none, focus:border-blue-500, text-sm, text-gray-600, mt-4, bg-blue-500, hover:bg-blue-700, text-white, font-bold, py-2, px-4, rounded.
Free download of the Login Page's source code
The source code of Login Page UI component
To create a login page with Tailwind CSS, we'll use HTML and Tailwind CSS classes. The HTML structure will consist of a div element with a form element inside it. The form element will contain two input fields for the username and password, along with a button element for submitting the form.
<div class="w-screen h-screen flex justify-center items-center bg-gray-100">
		<form class="p-10 bg-white rounded flex justify-center items-center flex-col shadow-md">
			<svg xmlns="http://www.w3.org/2000/svg" class="w-20 h-20 text-gray-600 mb-2" viewbox="0 0 20 20" fill="currentColor">
  			<path fill-rule="evenodd" d="M18 10a8 8 0 11-16 0 8 8 0 0116 0zm-6-3a2 2 0 11-4 0 2 2 0 014 0zm-2 4a5 5 0 00-4.546 2.916A5.986 5.986 0 0010 16a5.986 5.986 0 004.546-2.084A5 5 0 0010 11z" clip-rule="evenodd" />
			</svg>
			<p class="mb-5 text-3xl uppercase text-gray-600">Login</p>
			<input type="email" name="email" class="mb-5 p-3 w-80 focus:border-purple-700 rounded border-2 outline-none" autocomplete="off" placeholder="Email" required>
			<input type="password" name="password" class="mb-5 p-3 w-80 focus:border-purple-700 rounded border-2 outline-none" autocomplete="off" placeholder="Password" required>
			<button class="bg-purple-600 hover:bg-purple-900 text-white font-bold p-2 rounded w-80" id="login" type="submit"><span>Login</span></button>
		</form>
	</div>

<script>
	document.getElementById("login").addEventListener("click", function(event){
  	event.preventDefault();
	});
</script>
How to create a Login Page with Tailwind CSS?
Let's dive into the steps required to create a login page with Tailwind CSS.
Step 1: Set up the HTML structure
We'll start by setting up the HTML structure for the login page. We'll create a div element with a form element inside it. The form element will contain two input fields for the username and password, along with a button element for submitting the form.
<div class="bg-gray-100 min-h-screen flex flex-col justify-center py-12 sm:px-6 lg:px-8">
  <div class="sm:mx-auto sm:w-full sm:max-w-md">
    <h2 class="text-center text-3xl font-extrabold text-gray-900">Sign in to your account</h2>
  </div>

  <div class="mt-8 sm:mx-auto sm:w-full sm:max-w-md">
    <div class="bg-white py-8 px-4 shadow-lg sm:rounded-lg sm:px-10">
      <form class="space-y-6" action="#" method="POST">
        <div>
          <label for="username" class="block text-sm font-medium text-gray-700">
            Username
          </label>
          <div class="mt-1">
            <input id="username" name="username" type="text" autocomplete="username" required class="appearance-none rounded-md relative block w-full px-3 py-2 border border-gray-400 placeholder-gray-500 text-gray-900 focus:outline-none focus:border-blue-500 focus:z-10 sm:text-sm">
          </div>
        </div>

        <div>
          <label for="password" class="block text-sm font-medium text-gray-700">
            Password
          </label>
          <div class="mt-1">
            <input id="password" name="password" type="password" autocomplete="current-password" required class="appearance-none rounded-md relative block w-full px-3 py-2 border border-gray-400 placeholder-gray-500 text-gray-900 focus:outline-none focus:border-blue-500 focus:z-10 sm:text-sm">
          </div>
        </div>

        <div>
          <button type="submit" class="group relative w-full flex justify-center py-2 px-4 border border-transparent text-sm font-medium rounded-md text-white bg-blue-500 hover:bg-blue-700 focus:outline-none focus:ring-2 focus:ring-offset-2 focus:ring-blue-500">
            <span class="absolute left-0 inset-y-0 flex items-center pl-3">
              <!-- Heroicon name: lock-closed -->
              <svg class="h-5 w-5 text-blue-400 group-hover:text-blue-300" xmlns="http://www.w3.org/2000/svg" viewBox="0 0 20 20" fill="currentColor" aria-hidden="true">
                <path fill-rule="evenodd" d="M10 2a2 2 0 00-2 2v2H6a2 2 0 00-2 2v8a2 2 0 002 2h8a2 2 0 002-2v-8a2 2 0 00-2-2h-2V4a2 2 0 00-2-2zM8 6h4v2H8V6zm3 10a1 1 0 100-2 1 1 0 000 2z" clip-rule="evenodd" />
              </svg>
            </span>
            Sign in
          </button>
        </div>
      </form>
    </div>
  </div>
</div>
Step 2: Add Tailwind CSS classes
Now that we have the HTML structure in place, we can start adding Tailwind CSS classes to style the login page. We'll use classes like bg-gray-100, p-6, rounded-lg, shadow-lg, text-gray-700, text-xl, mb-4, w-full, px-3, py-2, border, border-gray-400, rounded-md, focus:outline-none, focus:border-blue-500, text-sm, text-gray-600, mt-4, bg-blue-500, hover:bg-blue-700, text-white, font-bold, py-2, px-4, rounded to style the different elements of the login page.
<div class="bg-gray-100 min-h-screen flex flex-col justify-center py-12 sm:px-6 lg:px-8">
  <div class="sm:mx-auto sm:w-full sm:max-w-md">
    <h2 class="text-center text-3xl font-extrabold text-gray-900">Sign in to your account</h2>
  </div>

  <div class="mt-8 sm:mx-auto sm:w-full sm:max-w-md">
    <div class="bg-white py-8 px-4 shadow-lg sm:rounded-lg sm:px-10">
      <form class="space-y-6" action="#" method="POST">
        <div>
          <label for="username" class="block text-sm font-medium text-gray-700">
            Username
          </label>
          <div class="mt-1">
            <input id="username" name="username" type="text" autocomplete="username" required class="appearance-none rounded-md relative block w-full px-3 py-2 border border-gray-400 placeholder-gray-500 text-gray-900 focus:outline-none focus:border-blue-500 focus:z-10 sm:text-sm">
          </div>
        </div>

        <div>
          <label for="password" class="block text-sm font-medium text-gray-700">
            Password
          </label>
          <div class="mt-1">
            <input id="password" name="password" type="password" autocomplete="current-password" required class="appearance-none rounded-md relative block w-full px-3 py-2 border border-gray-400 placeholder-gray-500 text-gray-900 focus:outline-none focus:border-blue-500 focus:z-10 sm:text-sm">
          </div>
        </div>

        <div>
          <button type="submit" class="group relative w-full flex justify-center py-2 px-4 border border-transparent text-sm font-medium rounded-md text-white bg-blue-500 hover:bg-blue-700 focus:outline-none focus:ring-2 focus:ring-offset-2 focus:ring-blue-500">
            <span class="absolute left-0 inset-y-0 flex items-center pl-3">
              <!-- Heroicon name: lock-closed -->
              <svg class="h-5 w-5 text-blue-400 group-hover:text-blue-300" xmlns="http://www.w3.org/2000/svg" viewBox="0 0 20 20" fill="currentColor" aria-hidden="true">
                <path fill-rule="evenodd" d="M10 2a2 2 0 00-2 2v2H6a2 2 0 00-2 2v8a2 2 0 002 2h8a2 2 0 002-2v-8a2 2 0 00-2-2h-2V4a2 2 0 00-2-2zM8 6h4v2H8V6zm3 10a1 1 0 100-2 1 1 0 000 2z" clip-rule="evenodd" />
              </svg>
            </span>
            Sign in
          </button>
        </div>
      </form>
    </div>
  </div>
</div>
Step 3: Preview and refine
Once we've added the Tailwind CSS classes, we can preview the login page and refine it further if required. We can adjust the padding, margins, font sizes, and colors to match our brand's style.
Conclusion
In this article, we explored how to build a login page with Tailwind CSS from scratch. We learned about the benefits of using Tailwind CSS and how it can save time and effort in creating UI components. We also saw how to use pre-defined classes to style the login page quickly and efficiently. With Tailwind CSS, we can create unique and visually appealing UI components that match our brand's style.