- Published on
Practical Guide: Build A Login Form With Tailwind CSS
- What is Tailwind CSS?
- The description of Login Form ui component
- Why use Tailwind CSS to create a Login Form ui component?
- The preview of Login Form ui component.
- The source code of Login Form ui component.
- How to create a Login Form with Tailwind CSS?
- Step 1: Set up your HTML
- Step 2: Add Tailwind CSS classes
- Step 3: Customize the styling
- Conclusion
As a FrontEnd technology blogger, it's important to stay up-to-date with the latest trends and tools. Tailwind CSS is a popular utility-first CSS framework that allows developers to quickly and easily create beautiful user interfaces. In this article, we'll walk through how to build a login form using Tailwind CSS.
What is Tailwind CSS?
Tailwind CSS is a utility-first CSS framework that provides a set of pre-defined classes that can be used to style HTML elements. It's designed to be highly customizable and flexible, allowing developers to create unique designs without having to write custom CSS.
The description of Login Form ui component
A login form is a common user interface component that allows users to enter their credentials in order to access a website or application. It typically consists of two input fields for the username and password, as well as a button to submit the form.
Why use Tailwind CSS to create a Login Form ui component?
Tailwind CSS provides a number of benefits when it comes to creating a login form. First and foremost, it allows developers to quickly and easily style the form using pre-defined classes. This can save a significant amount of time compared to writing custom CSS.
Additionally, Tailwind CSS is highly customizable, so developers can easily adjust the styling of the form to match their specific needs. This can be especially useful when working with a design that has unique requirements or branding guidelines.
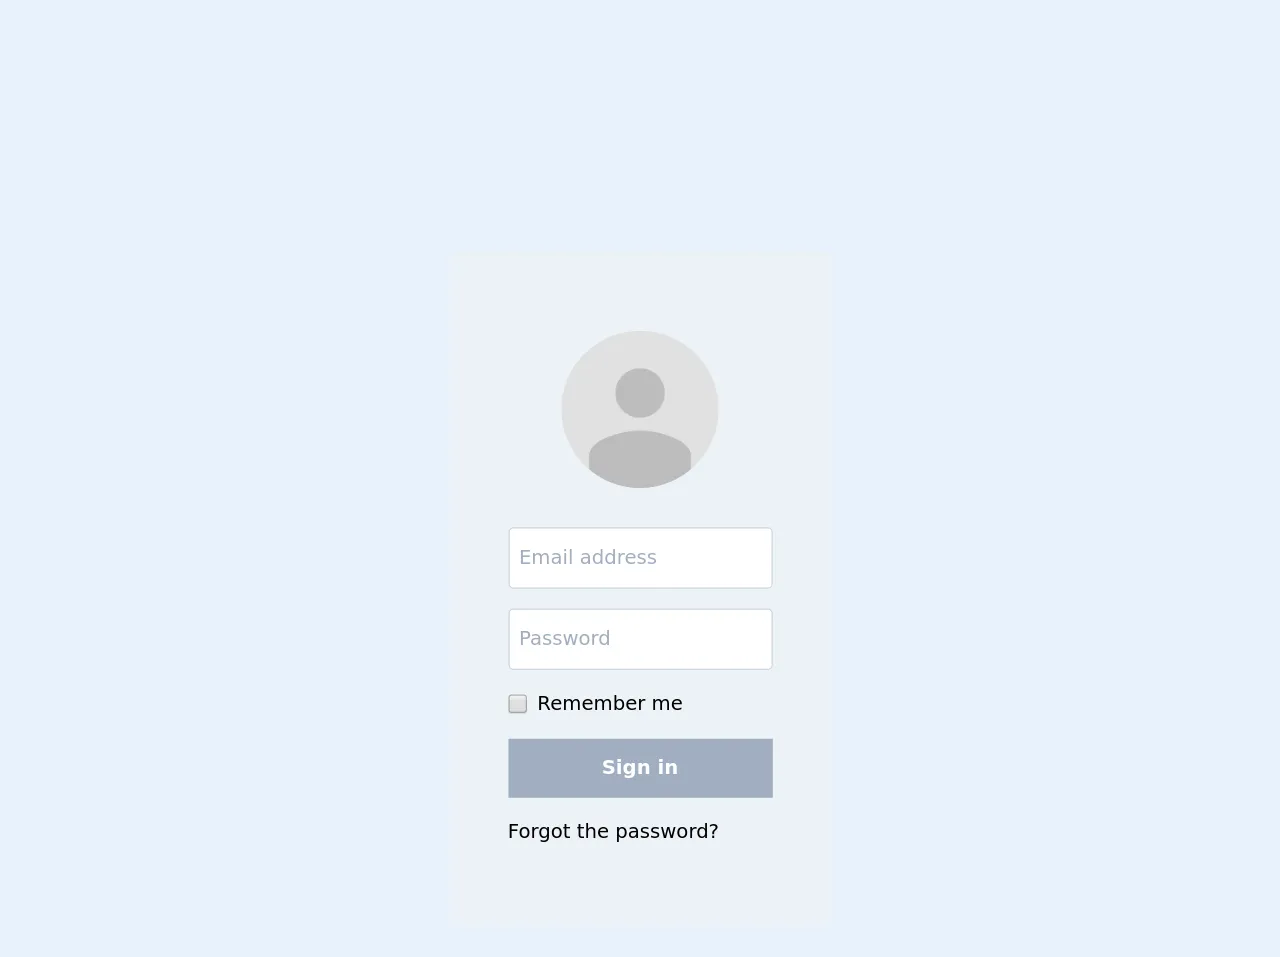
The preview of Login Form ui component.
To give you an idea of what the final login form will look like, here's a preview:
Free download of the Login Form's source code
The source code of Login Form ui component.
Here's the source code for the login form:
<div class="bg-gray-200 rounded py-16 px-12 m-16 flex flex-col items-center justify-center">
  <!-- User profile image -->
  <img class="rounded-full h-32 w-32" src="https://ssl.gstatic.com/accounts/ui/avatar_2x.png" alt="user avatar" />
  <form method="post" class="mt-8 mb-4">
    <div class="mb-4">
      <label for="userEmail" class="sr-only">Email address</label>
      <input class="border-solid border border-gray-400 rounded px-2 py-3" type="email" id="userEmail" placeholder="Email address" required />
    </div>
    <div>
      <label for="userEmail" class="sr-only">Password</label>
      <input class="border-solid border border-gray-400 rounded px-2 py-3" type="password" id="userPass" placeholder="Password" required />
    </div>
    <div class="my-4 flex items-center">
      <input class="h-4 w-4 mr-2" type="checkbox" id="userRemember" />
      <label for="userRemember">Remember me</label>
    </div>
    <button class="bg-gray-500 hover:bg-gray-600 text-white font-bold w-full py-3" type="submit">Sign in</button>
  </form>
  <a href="#" class="self-start">Forgot the password?</a>
</div>
How to create a Login Form with Tailwind CSS?
Now that we've covered the basics of Tailwind CSS and the benefits of using it to create a login form, let's walk through the steps to actually create the form.
Step 1: Set up your HTML
The first step is to set up the HTML for the form. This will typically include two input fields for the username and password, as well as a button to submit the form.
<form class="bg-white shadow-md rounded px-8 pt-6 pb-8 mb-4">
  <div class="mb-4">
    <label class="block text-gray-700 font-bold mb-2" for="username">
      Username
    </label>
    <input
      class="shadow appearance-none border rounded w-full py-2 px-3 text-gray-700 leading-tight focus:outline-none focus:shadow-outline"
      id="username"
      type="text"
      placeholder="Username"
    />
  </div>
  <div class="mb-6">
    <label class="block text-gray-700 font-bold mb-2" for="password">
      Password
    </label>
    <input
      class="shadow appearance-none border rounded w-full py-2 px-3 text-gray-700 leading-tight focus:outline-none focus:shadow-outline"
      id="password"
      type="password"
      placeholder="******************"
    />
  </div>
  <div class="flex items-center justify-between">
    <button
      class="bg-blue-500 hover:bg-blue-700 text-white font-bold py-2 px-4 rounded focus:outline-none focus:shadow-outline"
      type="button"
    >
      Sign In
    </button>
  </div>
</form>
Step 2: Add Tailwind CSS classes
Next, we'll add Tailwind CSS classes to style the form. We'll use classes like bg-white and shadow-md to give the form a clean, modern look.
<form class="bg-white shadow-md rounded px-8 pt-6 pb-8 mb-4">
  <div class="mb-4">
    <label class="block text-gray-700 font-bold mb-2" for="username">
      Username
    </label>
    <input
      class="shadow appearance-none border rounded w-full py-2 px-3 text-gray-700 leading-tight focus:outline-none focus:shadow-outline"
      id="username"
      type="text"
      placeholder="Username"
    />
  </div>
  <div class="mb-6">
    <label class="block text-gray-700 font-bold mb-2" for="password">
      Password
    </label>
    <input
      class="shadow appearance-none border rounded w-full py-2 px-3 text-gray-700 leading-tight focus:outline-none focus:shadow-outline"
      id="password"
      type="password"
      placeholder="******************"
    />
  </div>
  <div class="flex items-center justify-between">
    <button
      class="bg-blue-500 hover:bg-blue-700 text-white font-bold py-2 px-4 rounded focus:outline-none focus:shadow-outline"
      type="button"
    >
      Sign In
    </button>
  </div>
</form>
Step 3: Customize the styling
Finally, we can customize the styling of the form to match our specific needs. We can adjust the colors, font sizes, and other properties to create a unique look and feel.
<form class="bg-white shadow-md rounded px-8 pt-6 pb-8 mb-4">
  <div class="mb-4">
    <label class="block text-gray-700 font-bold mb-2" for="username">
      Username
    </label>
    <input
      class="shadow appearance-none border rounded w-full py-2 px-3 text-gray-700 leading-tight focus:outline-none focus:shadow-outline"
      id="username"
      type="text"
      placeholder="Username"
    />
  </div>
  <div class="mb-6">
    <label class="block text-gray-700 font-bold mb-2" for="password">
      Password
    </label>
    <input
      class="shadow appearance-none border rounded w-full py-2 px-3 text-gray-700 leading-tight focus:outline-none focus:shadow-outline"
      id="password"
      type="password"
      placeholder="******************"
    />
  </div>
  <div class="flex items-center justify-between">
    <button
      class="bg-blue-500 hover:bg-blue-700 text-white font-bold py-2 px-4 rounded focus:outline-none focus:shadow-outline"
      type="button"
    >
      Sign In
    </button>
  </div>
</form>
Conclusion
In this article, we've covered how to build a login form using Tailwind CSS. We've walked through the benefits of using Tailwind CSS, as well as the steps to actually create the form. By following this practical guide, you can easily create a beautiful and functional login form for your website or application.