- Published on
A Complete Guide To Create A Facebook UI_Design With Tailwind CSS
- What is Tailwind CSS?
- The description of Facebook UI_Design ui component
- Why use Tailwind CSS to create a Facebook UI_Design ui component?
- The preview of Facebook UI_Design ui component.
- The source code of Facebook UI_Design ui component.
- How to create a Facebook UI_Design with Tailwind CSS?
- Step 1: Set up your HTML
- Step 2: Add Tailwind CSS
- Step 3: Style the UI_Design
- Step 4: Customize the UI_Design
- Conclusion
Are you looking to create a Facebook UI_Design with Tailwind CSS? Look no further! In this guide, we'll walk you through the process of creating a Facebook UI_Design using Tailwind CSS.
What is Tailwind CSS?
Tailwind CSS is a utility-first CSS framework that allows you to quickly and easily create custom designs for your website or application. With Tailwind CSS, you can create complex designs without having to write custom CSS.
The description of Facebook UI_Design ui component
The Facebook UI_Design ui component is a popular design used by Facebook to display user profiles. It features a profile picture, cover photo, and various other details about the user.
Why use Tailwind CSS to create a Facebook UI_Design ui component?
Tailwind CSS is perfect for creating complex designs like the Facebook UI_Design ui component. With Tailwind CSS, you can easily create custom styles for each element of the UI_Design, without having to write custom CSS.
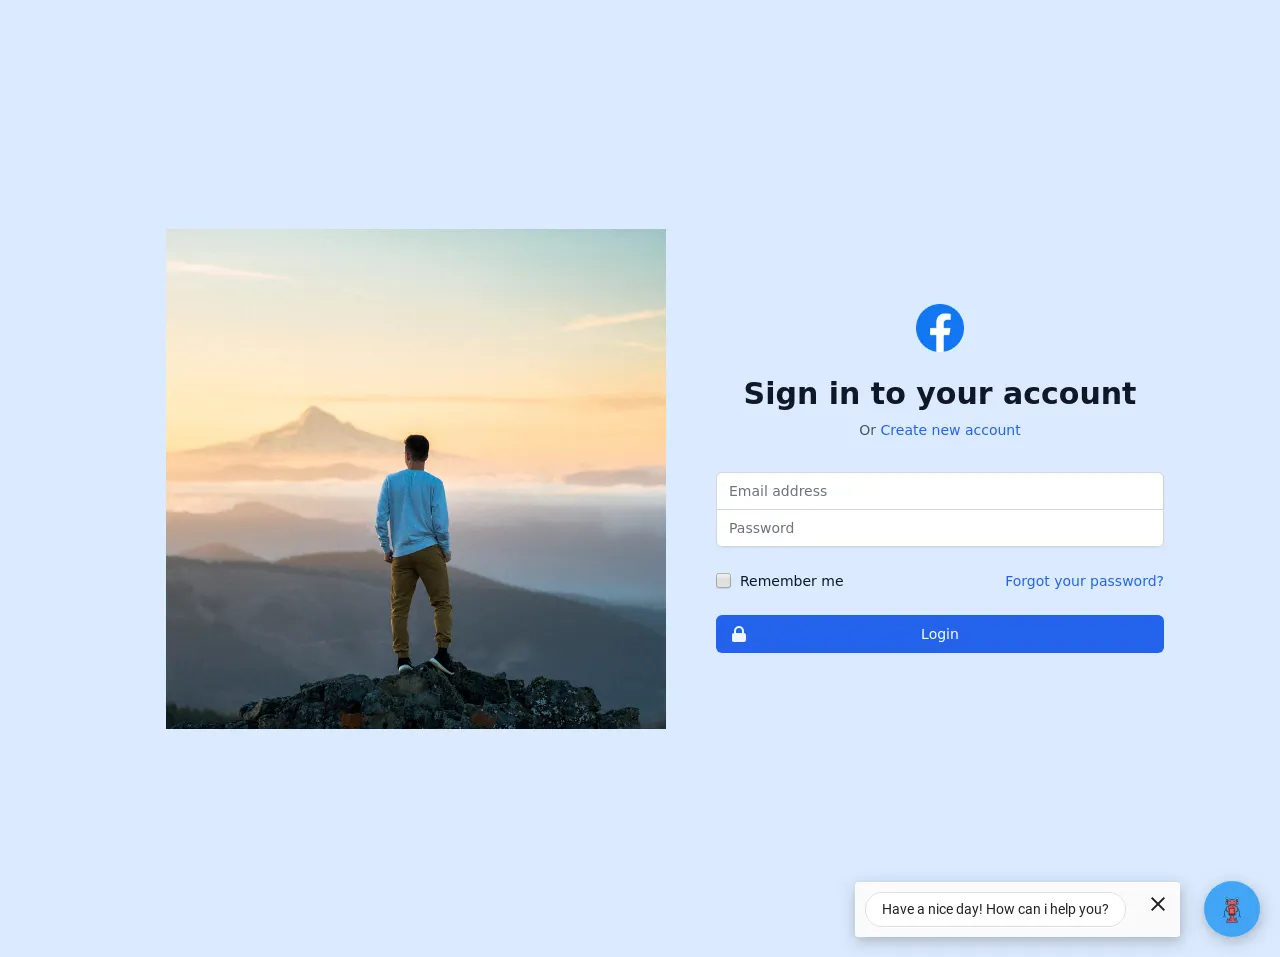
The preview of Facebook UI_Design ui component.
To create the Facebook UI_Design ui component, we'll be using Tailwind CSS. Here's a preview of what the final design will look like:
Free download of the Facebook UI_Design's source code
The source code of Facebook UI_Design ui component.
To create the Facebook UI_Design ui component, we'll be using HTML and Tailwind CSS. Here's the source code:
<!-- Dark mode not enabled -->
<html>
    <head>
      <title>Facebook Login/Signup</title>
      <link rel='icon' href='https://upload.wikimedia.org/wikipedia/commons/thumb/5/51/Facebook_f_logo_%282019%29.svg/1200px-Facebook_f_logo_%282019%29.svg.png' />
        <link href="https://unpkg.com/tailwindcss@^2/dist/tailwind.min.css" rel="stylesheet">
        <body>
            <!--
  This example requires Tailwind CSS v2.0+
-->

<!-- <div class="fb-login-button" >Login with Facebook</div> -->
<div class="min-h-screen flex items-center justify-center bg-blue-100 py-12 px-4 sm:px-6 lg:px-8">


    <img  style="border:20px;margin:50px;float:left;width:500px;height: 500px;" class="object-cover" src="https://images.unsplash.com/photo-1464746133101-a2c3f88e0dd9?ixid=MXwxMjA3fDB8MHxwaG90by1wYWdlfHx8fGVufDB8fHw%3D&ixlib=rb-1.2.1&auto=format&fit=crop&w=1327&q=80">
     <hr>

    <div class="max-w-md w-full space-y-8">

      <div>

        <img class="mx-auto h-12 w-auto" src="https://upload.wikimedia.org/wikipedia/commons/thumb/5/51/Facebook_f_logo_%282019%29.svg/1200px-Facebook_f_logo_%282019%29.svg.png" alt="Workflow">
        <h2 class="mt-6 text-center text-3xl font-bold text-gray-900">
          Sign in to your account
        </h2>
        <p class="mt-2 text-center text-sm text-gray-600">
          Or
          <a href="create.html" class="font-medium text-blue-600 hover:text-blue-500">
          Create new account
          </a>
        </p>
      </div>
      <form class="mt-8 space-y-6" action="#" method="POST">
        <input type="hidden" name="remember" value="true">
        <div class="rounded-md shadow-sm -space-y-px">
          <div>
            <label for="email-address" class="sr-only">Email address</label>
            <input id="email-address" name="email" type="email" autocomplete="email" required class="appearance-none rounded-none relative block w-full px-3 py-2 border border-gray-300 placeholder-gray-500 text-gray-900 rounded-t-md focus:outline-none focus:ring-blue-500 focus:border-blue-500 focus:z-10 sm:text-sm" placeholder="Email address" required>
          </div>
          <div>
            <label for="password" class="sr-only">Password</label>
            <input id="password" name="password" type="password" autocomplete="current-password" required class="appearance-none rounded-none relative block w-full px-3 py-2 border border-gray-300 placeholder-gray-500 text-gray-900 rounded-b-md focus:outline-none focus:ring-blue-500 focus:border-blue-500 focus:z-10 sm:text-sm" placeholder="Password" required>
          </div>
        </div>

        <div class="flex items-center justify-between">
          <div class="flex items-center">
            <input id="remember_me" name="remember_me" type="checkbox" class="h-4 w-4 text-indigo-600 focus:ring-blue-500 border-gray-300 rounded">
            <label for="remember_me" class="ml-2 block text-sm text-gray-900">
              Remember me
            </label>
          </div>

          <div class="text-sm">
            <a href="boxing.html" class="font-medium text-blue-600 hover:text-blue-500">
              Forgot your password?
            </a>
          </div>
        </div>

        <div>
          <button id="signin" type="submit" class="group relative w-full flex justify-center py-2 px-4 border border-transparent text-sm font-medium rounded-md text-white bg-blue-600 hover:bg-lightblue-700 focus:outline-none focus:ring-2 focus:ring-offset-2 focus:ring-indigo-50" aria-required="true">
            <span class="absolute left-0 inset-y-0 flex items-center pl-3">
              <!-- Heroicon name: lock-closed -->
              <svg class="h-5 w-5 text-blue-50 group-hover:text-blue-400" xmlns="http://www.w3.org/2000/svg" viewBox="0 0 20 20" fill="currentColor" aria-hidden="true">
                <path fill-rule="evenodd" d="M5 9V7a5 5 0 0110 0v2a2 2 0 012 2v5a2 2 0 01-2 2H5a2 2 0 01-2-2v-5a2 2 0 012-2zm8-2v2H7V7a3 3 0 016 0z" clip-rule="evenodd" />
              </svg>
            </span>
            Login
          </button>
        </div>
      </form>
    </div>
  </div>

  <footer class="text-gray-600 body-font">
    <div class="container px-5 py-8 mx-auto flex items-center sm:flex-row flex-col">
      <a class="flex title-font font-medium items-center md:justify-start justify-center text-gray-900">
        <img src="https://upload.wikimedia.org/wikipedia/commons/thumb/5/51/Facebook_f_logo_%282019%29.svg/1200px-Facebook_f_logo_%282019%29.svg.png" fill="none" stroke="currentColor" stroke-linecap="round" stroke-linejoin="round" stroke-width="2" class="w-10 h-10 text-white p-2 bg-white-500 rounded-full" viewBox="0 0 24 24">
          <path d="M12 2L2 7l10 5 10-5-10-5zM2 17l10 5 10-5M2 12l10 5 10-5"></path>
        </svg>
        <span class="ml-3 text-xl">Facebook</span>
      </a>
      <p class="text-sm text-gray-500 sm:ml-4 sm:pl-4 sm:border-l-2 sm:border-gray-200 sm:py-2 sm:mt-0 mt-4">© 2021 Facebook —
        <a href="https://www.instagram.com/aliraza.ramzan2005/" class="text-gray-600 ml-1" rel="noopener noreferrer" target="_blank">@aliraza.ramzan2005</a>
      </p>
      <span class="inline-flex sm:ml-auto sm:mt-0 mt-4 justify-center sm:justify-start">
        <a class="text-gray-500">
          <svg fill="currentColor" stroke-linecap="round" stroke-linejoin="round" stroke-width="2" class="w-5 h-5" viewBox="0 0 24 24">
            <path d="M18 2h-3a5 5 0 00-5 5v3H7v4h3v8h4v-8h3l1-4h-4V7a1 1 0 011-1h3z"></path>
          </svg>
        </a>
        <a class="ml-3 text-gray-500">
          <svg fill="currentColor" stroke-linecap="round" stroke-linejoin="round" stroke-width="2" class="w-5 h-5" viewBox="0 0 24 24">
            <path d="M23 3a10.9 10.9 0 01-3.14 1.53 4.48 4.48 0 00-7.86 3v1A10.66 10.66 0 013 4s-4 9 5 13a11.64 11.64 0 01-7 2c9 5 20 0 20-11.5a4.5 4.5 0 00-.08-.83A7.72 7.72 0 0023 3z"></path>
          </svg>
        </a>
        <a class="ml-3 text-gray-500">
          <svg fill="none" stroke="currentColor" stroke-linecap="round" stroke-linejoin="round" stroke-width="2" class="w-5 h-5" viewBox="0 0 24 24">
            <rect width="20" height="20" x="2" y="2" rx="5" ry="5"></rect>
            <path d="M16 11.37A4 4 0 1112.63 8 4 4 0 0116 11.37zm1.5-4.87h.01"></path>
          </svg>
        </a>

        </body>
    </head>
</html>
How to create a Facebook UI_Design with Tailwind CSS?
Now that we have a preview and source code of the Facebook UI_Design ui component, let's walk through the steps to create it using Tailwind CSS.
Step 1: Set up your HTML
First, we need to set up our HTML. Here's the basic structure we'll be using:
<div class="profile">
  <div class="cover-photo"></div>
  <div class="profile-picture"></div>
  <div class="profile-details">
    <h1 class="name"></h1>
    <p class="bio"></p>
  </div>
</div>
Step 2: Add Tailwind CSS
Next, we need to add Tailwind CSS to our project. You can do this by either downloading the CSS file or installing it via npm. Once you have Tailwind CSS installed, you can add it to your HTML file like this:
<head>
  <link rel="stylesheet" href="https://cdn.jsdelivr.net/npm/[email protected]/dist/tailwind.min.css">
</head>
Step 3: Style the UI_Design
Now that we have our HTML and Tailwind CSS set up, we can start styling our UI_Design. Here's the CSS we'll be using:
.profile {
  display: flex;
  flex-direction: column;
  align-items: center;
}

.cover-photo {
  height: 200px;
  width: 100%;
  background-color: #1877f2;
}

.profile-picture {
  height: 100px;
  width: 100px;
  border-radius: 50%;
  margin-top: -50px;
  background-color: #fff;
  background-image: url('https://via.placeholder.com/150');
  background-size: cover;
  background-position: center;
  border: 2px solid #fff;
}

.profile-details {
  margin-top: 20px;
  text-align: center;
}

.name {
  font-size: 24px;
  font-weight: bold;
}

.bio {
  font-size: 16px;
}
Step 4: Customize the UI_Design
Finally, we can customize the UI_Design to fit our needs. You can change the colors, fonts, and other styles to match your brand or website.
Conclusion
Creating a Facebook UI_Design with Tailwind CSS is easy and straightforward. With just a few lines of code, you can create a custom design that looks great and functions well. So why not give it a try?