- Published on
How To Make A Example Chat With Tailwind CSS From Scratch
- What is Tailwind CSS?
- The description of Example Chat ui component
- Why use Tailwind CSS to create an Example Chat ui component?
- The preview of Example Chat ui component
- The source code of Example Chat ui component
- How to create an Example Chat with Tailwind CSS?
- Conclusion
What is Tailwind CSS?
Tailwind CSS is a utility-first CSS framework that allows developers to quickly and easily create custom user interfaces. It provides a set of pre-defined CSS classes that can be used to style HTML elements. With Tailwind CSS, developers can create complex layouts and designs without having to write custom CSS.
The description of Example Chat ui component
An example chat UI component is a common feature in many web applications. It allows users to communicate with each other in real-time. The UI component typically consists of a chat window, a message input field, and a list of messages. The chat window displays the messages in a conversation-like format, with the most recent messages appearing at the bottom.
Why use Tailwind CSS to create an Example Chat ui component?
Tailwind CSS makes it easy to create custom UI components without having to write custom CSS. It provides a set of pre-defined CSS classes that can be used to style HTML elements. This makes it easy to create complex layouts and designs without having to write custom CSS.
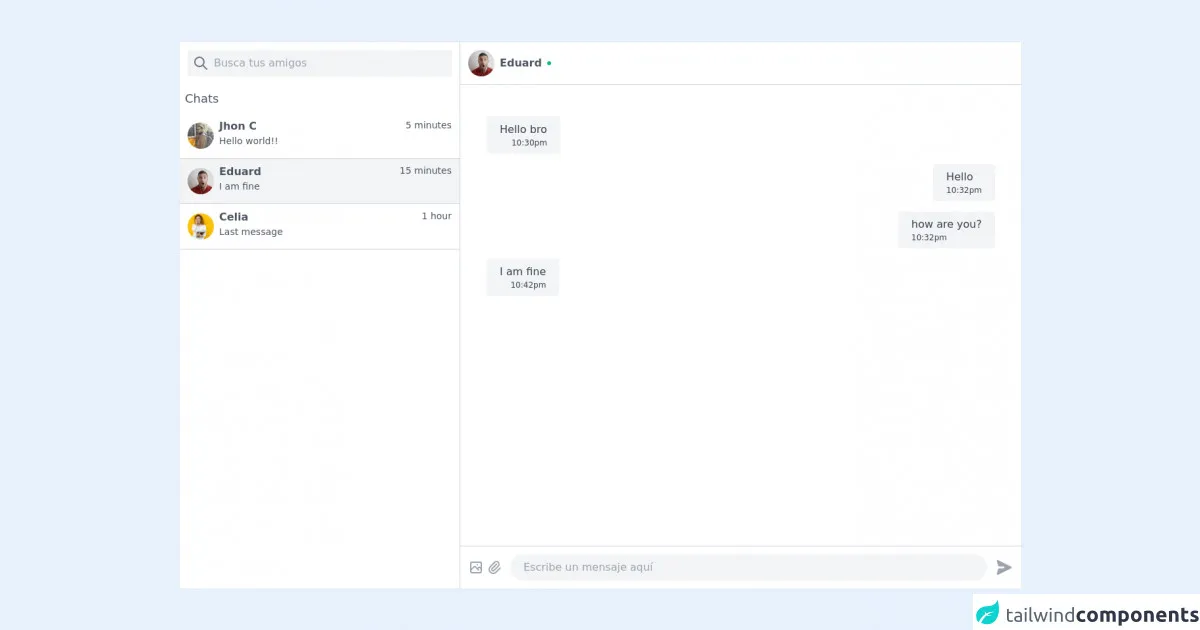
The preview of Example Chat ui component
To create an example chat UI component with Tailwind CSS, we will use a combination of HTML and CSS. The chat window will be styled using the flex and flex-col classes to create a column layout. The message input field will be styled using the border, rounded, and py classes to create a rounded border and padding. The list of messages will be styled using the overflow-y-scroll class to create a scrollable list.
Free download of the Example Chat's source code
The source code of Example Chat ui component
To create the example chat UI component, we will use the following HTML and CSS code:
<!-- This is an example component -->
<div class="w-screen">
    <div class="grid grid-cols-3 min-w-full border rounded" style="min-height: 80vh;">
            <div class="col-span-1 bg-white border-r border-gray-300">
                <div class="my-3 mx-3 ">
                    <div class="relative text-gray-600 focus-within:text-gray-400">
                        <span class="absolute inset-y-0 left-0 flex items-center pl-2">
                            <svg fill="none" stroke="currentColor" stroke-linecap="round" stroke-linejoin="round" stroke-width="2" viewBox="0 0 24 24" class="w-6 h-6 text-gray-500"><path d="M21 21l-6-6m2-5a7 7 0 11-14 0 7 7 0 0114 0z"></path></svg>
                        </span>
                        <input aria-placeholder="Busca tus amigos o contacta nuevos" placeholder="Busca tus amigos"
                        class="py-2 pl-10 block w-full rounded bg-gray-100 outline-none focus:text-gray-700" type="search" name="search" required autocomplete="search" />
                    </div>
                </div>

                <ul class="overflow-auto" style="height: 500px;">
                    <h2 class="ml-2 mb-2 text-gray-600 text-lg my-2">Chats</h2>
                    <li>
                        <a class="hover:bg-gray-100 border-b border-gray-300 px-3 py-2 cursor-pointer flex items-center text-sm focus:outline-none focus:border-gray-300 transition duration-150 ease-in-out">
                            <img class="h-10 w-10 rounded-full object-cover"
                            src="https://images.pexels.com/photos/837358/pexels-photo-837358.jpeg?auto=compress&cs=tinysrgb&h=750&w=1260"
                            alt="username" />
                            <div class="w-full pb-2">
                                <div class="flex justify-between">
                                    <span class="block ml-2 font-semibold text-base text-gray-600 ">Jhon C</span>
                                    <span class="block ml-2 text-sm text-gray-600">5 minutes</span>
                                </div>
                                <span class="block ml-2 text-sm text-gray-600">Hello world!!</span>
                            </div>
                        </a>
                        <a class="bg-gray-100 border-b border-gray-300 px-3 py-2 cursor-pointer flex items-center text-sm focus:outline-none focus:border-gray-300 transition duration-150 ease-in-out">
                            <img class="h-10 w-10 rounded-full object-cover"
                            src="https://images.pexels.com/photos/3777931/pexels-photo-3777931.jpeg?auto=compress&cs=tinysrgb&h=750&w=1260"
                            alt="username" />
                            <div class="w-full pb-2">
                                <div class="flex justify-between">
                                    <span class="block ml-2 font-semibold text-base text-gray-600 ">Eduard</span>
                                    <span class="block ml-2 text-sm text-gray-600">15 minutes</span>
                                </div>
                                <span class="block ml-2 text-sm text-gray-600">I am fine</span>
                            </div>
                        </a>
                        <a class="hover:bg-gray-100 border-b border-gray-300 px-3 py-2 cursor-pointer flex items-center text-sm focus:outline-none focus:border-gray-300 transition duration-150 ease-in-out">
                            <img class="h-10 w-10 rounded-full object-cover"
                            src="https://images.pexels.com/photos/6238133/pexels-photo-6238133.jpeg?auto=compress&cs=tinysrgb&h=750&w=1260"
                            alt="username" />
                            <div class="w-full pb-2">
                                <div class="flex justify-between">
                                    <span class="block ml-2 font-semibold text-base text-gray-600 ">Celia</span>
                                    <span class="block ml-2 text-sm text-gray-600">1 hour</span>
                                </div>
                                <span class="block ml-2 text-sm text-gray-600">Last message</span>
                            </div>
                        </a>
                    </li>
                </ul>
            </div>
            <div class="col-span-2 bg-white">
                <div class="w-full">
                    <div class="flex items-center border-b border-gray-300 pl-3 py-3">
                        <img class="h-10 w-10 rounded-full object-cover"
                        src="https://images.pexels.com/photos/3777931/pexels-photo-3777931.jpeg?auto=compress&cs=tinysrgb&h=750&w=1260"
                        alt="username" />
                        <span class="block ml-2 font-bold text-base text-gray-600">Eduard</span>
                        <span class="connected text-green-500 ml-2" >
                            <svg width="6" height="6">
                                <circle cx="3" cy="3" r="3" fill="currentColor"></circle>
                            </svg>
                        </span>
                    </div>
                    <div id="chat" class="w-full overflow-y-auto p-10 relative" style="height: 700px;" ref="toolbarChat">
                        <ul>
                            <li class="clearfix2">
                                <div class="w-full flex justify-start">
                                    <div class="bg-gray-100 rounded px-5 py-2 my-2 text-gray-700 relative" style="max-width: 300px;">
                                        <span class="block">Hello bro</span>
                                        <span class="block text-xs text-right">10:30pm</span>
                                    </div>
                                </div>
                                <div class="w-full flex justify-end" >
                                    <div class="bg-gray-100 rounded px-5 py-2 my-2 text-gray-700 relative" style="max-width: 300px;">
                                        <span class="block">Hello</span>
                                        <span class="block text-xs text-left">10:32pm</span>
                                    </div>
                                </div>
                                <div class="w-full flex justify-end" >
                                    <div class="bg-gray-100 rounded px-5 py-2 my-2 text-gray-700 relative" style="max-width: 300px;">
                                        <span class="block">how are you?</span>
                                        <span class="block text-xs text-left">10:32pm</span>
                                    </div>
                                </div>
                                <div class="w-full flex justify-start">
                                    <div class="bg-gray-100 rounded px-5 py-2 my-2 text-gray-700 relative" style="max-width: 300px;">
                                        <span class="block">I am fine</span>
                                        <span class="block text-xs text-right">10:42pm</span>
                                    </div>
                                </div>
                            </li>
                        </ul>
                    </div>

                    <div class="w-full py-3 px-3 flex items-center justify-between border-t border-gray-300">
                        <button class="outline-none focus:outline-none">
                            <svg class="text-gray-400 h-6 w-6" xmlns="http://www.w3.org/2000/svg" fill="none" viewBox="0 0 24 24" stroke="currentColor">
                                <path stroke-linecap="round" stroke-linejoin="round" stroke-width="2" d="M4 16l4.586-4.586a2 2 0 012.828 0L16 16m-2-2l1.586-1.586a2 2 0 012.828 0L20 14m-6-6h.01M6 20h12a2 2 0 002-2V6a2 2 0 00-2-2H6a2 2 0 00-2 2v12a2 2 0 002 2z" />
                            </svg>
                        </button>
                        <button class="outline-none focus:outline-none ml-1">
                            <svg class="text-gray-400 h-6 w-6" xmlns="http://www.w3.org/2000/svg" fill="none" viewBox="0 0 24 24" stroke="currentColor">
                                <path stroke-linecap="round" stroke-linejoin="round" stroke-width="2" d="M15.172 7l-6.586 6.586a2 2 0 102.828 2.828l6.414-6.586a4 4 0 00-5.656-5.656l-6.415 6.585a6 6 0 108.486 8.486L20.5 13" />
                            </svg>
                        </button>

                        <input aria-placeholder="Escribe un mensaje aquí" placeholder="Escribe un mensaje aquí"
                            class="py-2 mx-3 pl-5 block w-full rounded-full bg-gray-100 outline-none focus:text-gray-700" type="text" name="message" required/>

                        <button class="outline-none focus:outline-none" type="submit">
                            <svg class="text-gray-400 h-7 w-7 origin-center transform rotate-90" xmlns="http://www.w3.org/2000/svg" viewBox="0 0 20 20" fill="currentColor">
                                <path d="M10.894 2.553a1 1 0 00-1.788 0l-7 14a1 1 0 001.169 1.409l5-1.429A1 1 0 009 15.571V11a1 1 0 112 0v4.571a1 1 0 00.725.962l5 1.428a1 1 0 001.17-1.408l-7-14z" />
                            </svg>
                        </button>
                    </div>
                </div>
            </div>
        </div>
    </div>
</div>
How to create an Example Chat with Tailwind CSS?
To create an example chat UI component with Tailwind CSS, follow these steps:
- Create a new HTML file and add the following code:
<div class="flex flex-col h-screen">
  <div class="flex-1 overflow-y-scroll"></div>
  <div class="py-2">
    <input type="text" class="border rounded py-2 px-3 w-full">
  </div>
</div>
- Add the Tailwind CSS CDN to your HTML file:
<link href="https://cdn.jsdelivr.net/npm/[email protected]/dist/tailwind.min.css" rel="stylesheet">
- Open the HTML file in your web browser to see the example chat UI component.
Conclusion
In conclusion, Tailwind CSS is a powerful utility-first CSS framework that makes it easy to create custom UI components. By using a combination of pre-defined CSS classes, developers can quickly and easily create complex layouts and designs without having to write custom CSS. In this article, we showed you how to create an example chat UI component with Tailwind CSS. With this knowledge, you can now create your own custom UI components using Tailwind CSS.