- Published on
Advanced Guide: Create A Credit Card Form With Tailwind CSS
- What is Tailwind CSS?
- The description of Credit card form UI component
- Why use Tailwind CSS to create a Credit card form UI component?
- The preview of Credit card form UI component
- The source code of Credit card form UI component
- How to create a Credit card form with Tailwind CSS?
- Step 1: Set up your HTML
- Step 2: Add Tailwind CSS classes
- Step 3: Customize the styles
- Conclusion
In this tutorial, we will be creating a credit card form using Tailwind CSS. We will go through the steps of creating a credit card form UI component, why Tailwind CSS is a great tool to use for this project, and how to actually create the form.
What is Tailwind CSS?
Tailwind CSS is a utility-first CSS framework that allows you to easily create custom designs without having to write any custom CSS. It provides a set of pre-defined classes that you can use to style your HTML elements. Tailwind CSS is designed to be highly customizable, so you can easily modify the default styles to fit your needs.
The description of Credit card form UI component
A credit card form UI component is a form that allows users to input their credit card information in a secure and user-friendly way. It typically includes fields for the card number, expiration date, and security code. The form should be easy to use and visually appealing.
Why use Tailwind CSS to create a Credit card form UI component?
Tailwind CSS is a great tool to use for creating a credit card form UI component because it provides a set of pre-defined classes that you can use to style your form. This means that you don't have to write any custom CSS, which saves you time and makes your code more maintainable. Tailwind CSS is also highly customizable, so you can easily modify the default styles to fit your needs.
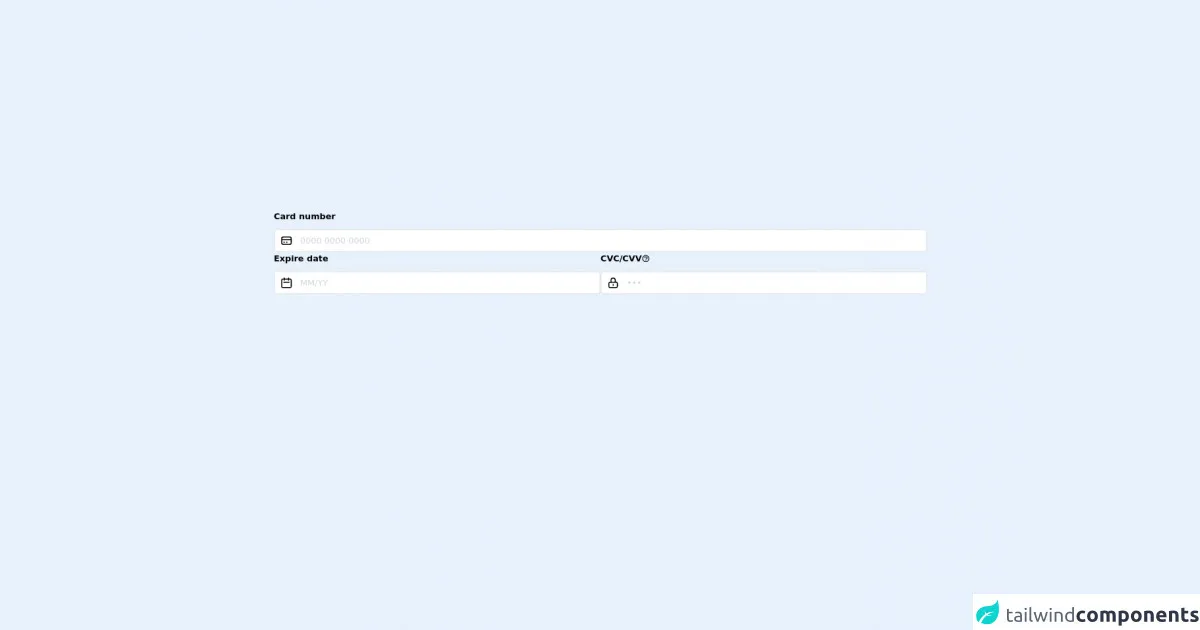
The preview of Credit card form UI component
To give you an idea of what the credit card form UI component will look like, here is a preview:
Free download of the Credit card form's source code
The source code of Credit card form UI component
Here is the source code for the credit card form UI component:
<!-- Tailwind CSS Playground : https://play.tailwindcss.com/KbKtNzkOBy -->
<form class="flex flex-wrap gap-3 w-full p-5">
<label class="relative w-full flex flex-col">
<span class="font-bold mb-3">Card number</span>
<input class="rounded-md peer pl-12 pr-2 py-2 border-2 border-gray-200 placeholder-gray-300" type="text" name="card_number" placeholder="0000 0000 0000" />
<svg xmlns="http://www.w3.org/2000/svg" class="absolute bottom-0 left-0 -mb-0.5 transform translate-x-1/2 -translate-y-1/2 text-black peer-placeholder-shown:text-gray-300 h-6 w-6" fill="none" viewBox="0 0 24 24" stroke="currentColor">
<path stroke-linecap="round" stroke-linejoin="round" stroke-width="2" d="M3 10h18M7 15h1m4 0h1m-7 4h12a3 3 0 003-3V8a3 3 0 00-3-3H6a3 3 0 00-3 3v8a3 3 0 003 3z" />
</svg>
</label>
<label class="relative flex-1 flex flex-col">
<span class="font-bold mb-3">Expire date</span>
<input class="rounded-md peer pl-12 pr-2 py-2 border-2 border-gray-200 placeholder-gray-300" type="text" name="expire_date" placeholder="MM/YY" />
<svg xmlns="http://www.w3.org/2000/svg" class="absolute bottom-0 left-0 -mb-0.5 transform translate-x-1/2 -translate-y-1/2 text-black peer-placeholder-shown:text-gray-300 h-6 w-6" fill="none" viewBox="0 0 24 24" stroke="currentColor">
<path stroke-linecap="round" stroke-linejoin="round" stroke-width="2" d="M8 7V3m8 4V3m-9 8h10M5 21h14a2 2 0 002-2V7a2 2 0 00-2-2H5a2 2 0 00-2 2v12a2 2 0 002 2z" />
</svg>
</label>
<label class="relative flex-1 flex flex-col">
<span class="font-bold flex items-center gap-3 mb-3">
CVC/CVV
<span class="relative group">
<span class="hidden group-hover:flex justify-center items-center px-2 py-1 text-xs absolute -right-2 transform translate-x-full -translate-y-1/2 w-max top-1/2 bg-black text-white"> Hey ceci est une infobulle !</span>
<svg xmlns="http://www.w3.org/2000/svg" class="h-4 w-4" fill="none" viewBox="0 0 24 24" stroke="currentColor">
<path stroke-linecap="round" stroke-linejoin="round" stroke-width="2" d="M8.228 9c.549-1.165 2.03-2 3.772-2 2.21 0 4 1.343 4 3 0 1.4-1.278 2.575-3.006 2.907-.542.104-.994.54-.994 1.093m0 3h.01M21 12a9 9 0 11-18 0 9 9 0 0118 0z" />
</svg>
</span>
</span>
<input class="rounded-md peer pl-12 pr-2 py-2 border-2 border-gray-200 placeholder-gray-300" type="text" name="card_cvc" placeholder="•••" />
<svg xmlns="http://www.w3.org/2000/svg" class="absolute bottom-0 left-0 -mb-0.5 transform translate-x-1/2 -translate-y-1/2 text-black peer-placeholder-shown:text-gray-300 h-6 w-6" fill="none" viewBox="0 0 24 24" stroke="currentColor">
<path stroke-linecap="round" stroke-linejoin="round" stroke-width="2" d="M12 15v2m-6 4h12a2 2 0 002-2v-6a2 2 0 00-2-2H6a2 2 0 00-2 2v6a2 2 0 002 2zm10-10V7a4 4 0 00-8 0v4h8z" />
</svg>
</label>
</form>
How to create a Credit card form with Tailwind CSS?
Now that we've covered the basics, let's dive into how to create a credit card form with Tailwind CSS.
Step 1: Set up your HTML
The first step is to set up your HTML. Here is an example of what your HTML might look like:
<form>
  <div class="mb-4">
    <label class="block text-gray-700 font-bold mb-2" for="card-number">
      Card Number
    </label>
    <input
      class="shadow appearance-none border rounded w-full py-2 px-3 text-gray-700 leading-tight focus:outline-none focus:shadow-outline"
      id="card-number"
      type="text"
      placeholder="**** **** **** ****"
    />
  </div>
  <div class="mb-4">
    <label class="block text-gray-700 font-bold mb-2" for="expiration-date">
      Expiration Date
    </label>
    <input
      class="shadow appearance-none border rounded w-full py-2 px-3 text-gray-700 leading-tight focus:outline-none focus:shadow-outline"
      id="expiration-date"
      type="text"
      placeholder="MM / YY"
    />
  </div>
  <div class="mb-4">
    <label class="block text-gray-700 font-bold mb-2" for="security-code">
      Security Code
    </label>
    <input
      class="shadow appearance-none border rounded w-full py-2 px-3 text-gray-700 leading-tight focus:outline-none focus:shadow-outline"
      id="security-code"
      type="text"
      placeholder="***"
    />
  </div>
  <button
    class="bg-blue-500 hover:bg-blue-700 text-white font-bold py-2 px-4 rounded focus:outline-none focus:shadow-outline"
    type="button"
  >
    Submit
  </button>
</form>
Step 2: Add Tailwind CSS classes
Next, we need to add Tailwind CSS classes to our HTML to style our form. Here is an example of what your HTML might look like with Tailwind CSS classes added:
<form>
  <div class="mb-4">
    <label class="block text-gray-700 font-bold mb-2" for="card-number">
      Card Number
    </label>
    <input
      class="shadow appearance-none border rounded w-full py-2 px-3 text-gray-700 leading-tight focus:outline-none focus:shadow-outline"
      id="card-number"
      type="text"
      placeholder="**** **** **** ****"
    />
  </div>
  <div class="mb-4">
    <label class="block text-gray-700 font-bold mb-2" for="expiration-date">
      Expiration Date
    </label>
    <input
      class="shadow appearance-none border rounded w-full py-2 px-3 text-gray-700 leading-tight focus:outline-none focus:shadow-outline"
      id="expiration-date"
      type="text"
      placeholder="MM / YY"
    />
  </div>
  <div class="mb-4">
    <label class="block text-gray-700 font-bold mb-2" for="security-code">
      Security Code
    </label>
    <input
      class="shadow appearance-none border rounded w-full py-2 px-3 text-gray-700 leading-tight focus:outline-none focus:shadow-outline"
      id="security-code"
      type="text"
      placeholder="***"
    />
  </div>
  <button
    class="bg-blue-500 hover:bg-blue-700 text-white font-bold py-2 px-4 rounded focus:outline-none focus:shadow-outline"
    type="button"
  >
    Submit
  </button>
</form>
Step 3: Customize the styles
Finally, we can customize the styles to fit our needs. Here is an example of what your CSS might look like:
input[type="text"] {
  background-color: #f7fafc;
  border-color: #e2e8f0;
  color: #4a5568;
}

input[type="text"]:focus {
  border-color: #4a5568;
}

button {
  cursor: pointer;
}

button:focus {
  outline: none;
}

button:hover {
  background-color: #2d3748;
}

button:active {
  background-color: #1a202c;
}
Conclusion
In this tutorial, we covered how to create a credit card form UI component using Tailwind CSS. We went through the steps of creating the form, why Tailwind CSS is a great tool to use for this project, and how to actually create the form. We hope that you found this tutorial helpful and that you are now able to create your own credit card form using Tailwind CSS.