- Published on
Ways To Make A Cart With Tailwind CSS In 60 Minutes
- What is Tailwind CSS?
- The description of Cart UI component
- Why use Tailwind CSS to create a Cart UI component?
- The preview of Cart UI component.
- The source code of Cart UI component.
- How to create a Cart with Tailwind CSS?
- Step 1: Set up the HTML structure
- Step 2: Style the cart UI component
- Step 3: Add dynamic data using JavaScript
- Conclusion
What is Tailwind CSS?
Tailwind CSS is a utility-first CSS framework that enables developers to create custom designs without writing any CSS code. It provides a set of pre-defined classes that can be used to create responsive and customizable UI components.
The description of Cart UI component
A cart UI component is an essential part of any e-commerce website. It allows users to add products to their cart and proceed to checkout. The cart UI component typically displays the product name, image, price, quantity, and total price.
Why use Tailwind CSS to create a Cart UI component?
Tailwind CSS provides a set of pre-defined classes that can be used to create responsive and customizable UI components. It saves time and effort by eliminating the need to write custom CSS code. Additionally, Tailwind CSS is highly customizable, which means that developers can easily tweak the styles to match their design requirements.
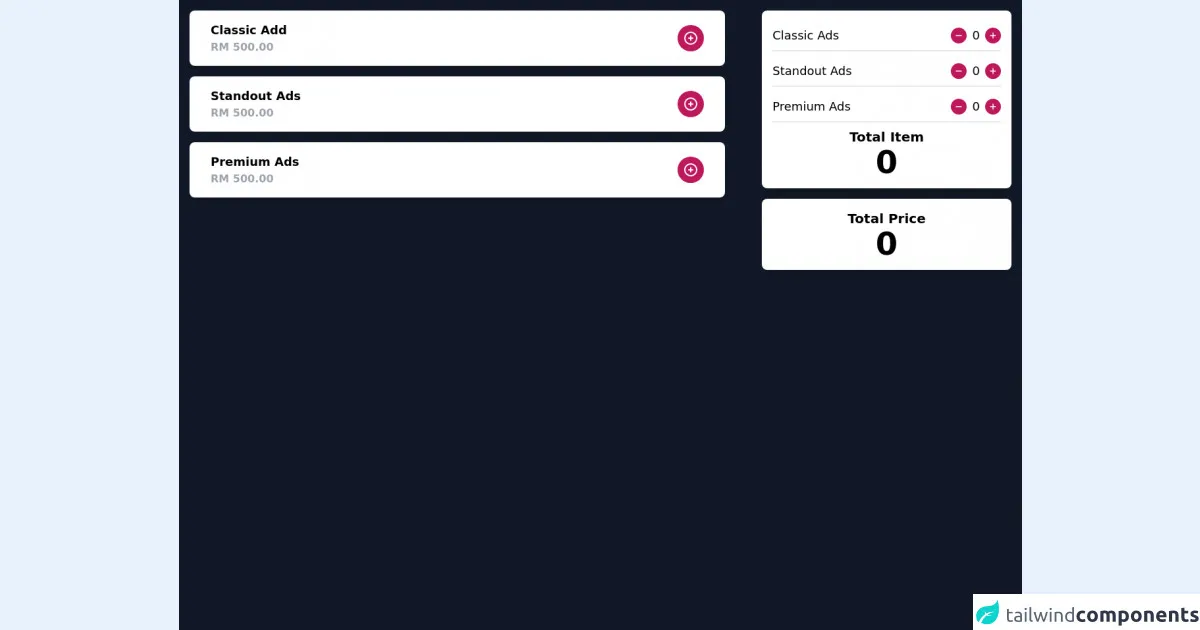
The preview of Cart UI component.
To create a cart UI component with Tailwind CSS, we will use a combination of flexbox, grid, and utility classes. The final result will look something like this:
Free download of the Cart's source code
The source code of Cart UI component.
To create the cart UI component, we will use HTML and Tailwind CSS classes. The code will look something like this:
<div class="bg-gray-900 h-full md:h-screen">
  <div class="grid grid-cols-12 gap-6">
    <div class="col-span-12 sm:col-span-12 md:col-span-7 lg:col-span-8 xxl:col-span-8">
      <div class="bg-white py-4 px-4 shadow-xl rounded-lg my-4 mx-4">
        <div class="flex justify-between px-4 items-center">
            <div class="text-lg font-semibold">
              <p>Classic Add</p>
              <p class="text-gray-400 text-base">RM 500.00</p>
            </div>
            <div class="text-lg font-semibold">
             <button class="focus:outline-none bg-pink-700 hover:bg-pink-800 text-white font-bold py-2 px-2 rounded-full inline-flex items-center ">
              <svg xmlns="http://www.w3.org/2000/svg" class="h-6 w-6" fill="none" viewBox="0 0 24 24" stroke="currentColor">
                <path stroke-linecap="round" stroke-linejoin="round" stroke-width="2" d="M12 9v3m0 0v3m0-3h3m-3 0H9m12 0a9 9 0 11-18 0 9 9 0 0118 0z" />
              </svg>
              </button>
            </div>
        </div>
      </div>
      <div class="bg-white py-4 px-4 shadow-xl rounded-lg my-4 mx-4">
        <div class="flex justify-between px-4 items-center">
            <div class="text-lg font-semibold">
              <p>Standout Ads</p>
              <p class="text-gray-400 text-base">RM 500.00</p>
            </div>
            <div class="text-lg font-semibold">
             <button class="focus:outline-none bg-pink-700 hover:bg-pink-800 text-white font-bold py-2 px-2 rounded-full inline-flex items-center ">
              <svg xmlns="http://www.w3.org/2000/svg" class="h-6 w-6" fill="none" viewBox="0 0 24 24" stroke="currentColor">
                <path stroke-linecap="round" stroke-linejoin="round" stroke-width="2" d="M12 9v3m0 0v3m0-3h3m-3 0H9m12 0a9 9 0 11-18 0 9 9 0 0118 0z" />
              </svg>
              </button>
            </div>
        </div>
      </div>
      <div class="bg-white py-4 px-4 shadow-xl rounded-lg my-4 mx-4">
        <div class="flex justify-between px-4 items-center">
            <div class="text-lg font-semibold">
              <p>Premium Ads</p>
              <p class="text-gray-400 text-base">RM 500.00</p>
            </div>
            <div class="text-lg font-semibold">
             <button class="focus:outline-none bg-pink-700 hover:bg-pink-800 text-white font-bold py-2 px-2 rounded-full inline-flex items-center ">
              <svg xmlns="http://www.w3.org/2000/svg" class="h-6 w-6" fill="none" viewBox="0 0 24 24" stroke="currentColor">
                <path stroke-linecap="round" stroke-linejoin="round" stroke-width="2" d="M12 9v3m0 0v3m0-3h3m-3 0H9m12 0a9 9 0 11-18 0 9 9 0 0118 0z" />
              </svg>
              </button>
            </div>
        </div>
      </div>
    </div>
    <div class="col-span-12 sm:col-span-12 md:col-span-5 lg:col-span-4 xxl:col-span-4">
      <div class="bg-white py-4 px-4 shadow-xl rounded-lg my-4 mx-4">
          <!-- classic add -->
          <div class="flex justify-between border-b-2 mb-2">
                <div class="text-lg py-2">
                  <p>Classic Ads</p>
                </div>
                 <div class="text-lg py-2">
                 <div class="flex flex-row space-x-2 w-full items-center rounded-lg">
                      <button class="focus:outline-none bg-pink-700 hover:bg-pink-800 text-white font-bold py-1 px-1 rounded-full inline-flex items-center ">
                        <svg xmlns="http://www.w3.org/2000/svg" class="h-4 w-4" fill="none" viewBox="0 0 24 24" stroke="currentColor">
                          <path stroke-linecap="round" stroke-linejoin="round" stroke-width="2" d="M18 12H6" />
                        </svg>
                      </button>
                      <p> 0 </p>
                      <button class="focus:outline-none bg-pink-700 hover:bg-pink-800 text-white font-bold py-1 px-1 rounded-full inline-flex items-center ">
                       <svg xmlns="http://www.w3.org/2000/svg" class="h-4 w-4" fill="none" viewBox="0 0 24 24" stroke="currentColor">
                          <path stroke-linecap="round" stroke-linejoin="round" stroke-width="2" d="M12 6v6m0 0v6m0-6h6m-6 0H6" />
                        </svg>
                      </button>
                  </div>
                </div>
          </div>
          <!-- End classic add -->

          <!-- standout ads -->
          <div class="flex justify-between border-b-2 mb-2">
                <div class="text-lg py-2">
                  <p>Standout Ads</p>
                </div>
                 <div class="text-lg py-2">
                 <div class="flex flex-row space-x-2 w-full items-center rounded-lg">
                      <button class="focus:outline-none bg-pink-700 hover:bg-pink-800 text-white font-bold py-1 px-1 rounded-full inline-flex items-center ">
                        <svg xmlns="http://www.w3.org/2000/svg" class="h-4 w-4" fill="none" viewBox="0 0 24 24" stroke="currentColor">
                          <path stroke-linecap="round" stroke-linejoin="round" stroke-width="2" d="M18 12H6" />
                        </svg>
                      </button>
                      <p> 0 </p>
                      <button class="focus:outline-none bg-pink-700 hover:bg-pink-800 text-white font-bold py-1 px-1 rounded-full inline-flex items-center ">
                       <svg xmlns="http://www.w3.org/2000/svg" class="h-4 w-4" fill="none" viewBox="0 0 24 24" stroke="currentColor">
                          <path stroke-linecap="round" stroke-linejoin="round" stroke-width="2" d="M12 6v6m0 0v6m0-6h6m-6 0H6" />
                        </svg>
                      </button>
                  </div>
                </div>
          </div>
          <!-- End standout ads -->

          <!-- Premium ads -->
          <div class="flex justify-between border-b-2 mb-2">
                <div class="text-lg py-2">
                  <p>Premium Ads</p>
                </div>
                 <div class="text-lg py-2">
                 <div class="flex flex-row space-x-2 w-full items-center rounded-lg">
                      <button class="focus:outline-none bg-pink-700 hover:bg-pink-800 text-white font-bold py-1 px-1 rounded-full inline-flex items-center ">
                        <svg xmlns="http://www.w3.org/2000/svg" class="h-4 w-4" fill="none" viewBox="0 0 24 24" stroke="currentColor">
                          <path stroke-linecap="round" stroke-linejoin="round" stroke-width="2" d="M18 12H6" />
                        </svg>
                      </button>
                      <p> 0 </p>
                      <button class="focus:outline-none bg-pink-700 hover:bg-pink-800 text-white font-bold py-1 px-1 rounded-full inline-flex items-center ">
                       <svg xmlns="http://www.w3.org/2000/svg" class="h-4 w-4" fill="none" viewBox="0 0 24 24" stroke="currentColor">
                          <path stroke-linecap="round" stroke-linejoin="round" stroke-width="2" d="M12 6v6m0 0v6m0-6h6m-6 0H6" />
                        </svg>
                      </button>
                  </div>
                </div>
          </div>
          <!-- End Premium ads -->

          <!-- Total Item -->
          <div class="flex justify-center items-center text-center">
                <div class="text-xl font-semibold">
                  <p>Total Item</p>
                  <p class="text-5xl">0</p>
                </div>
          </div>
          <!-- End Total Item -->

      </div>
       <div class="bg-white py-4 px-4 shadow-xl rounded-lg my-4 mx-4">
          <!-- Total Price -->
          <div class="flex justify-center items-center text-center">
            <div class="text-xl font-semibold">
                <p>Total Price</p>
                <p class="text-5xl">0</p>
            </div>
          </div>
          <!-- End Total PRice -->
       </div>
    </div>
  </div>
</div>
How to create a Cart with Tailwind CSS?
To create a cart UI component with Tailwind CSS, follow these steps:
Step 1: Set up the HTML structure
The first step is to set up the HTML structure for the cart UI component. We will use a combination of flexbox and grid to create a responsive layout. Here's the HTML code:
<div class="cart">
  <div class="cart-header">
    <h1 class="cart-title">Your Cart</h1>
    <p class="cart-total">Total: $0.00</p>
  </div>
  <div class="cart-items">
    <!-- Cart items will be added dynamically using JavaScript -->
  </div>
  <div class="cart-footer">
    <button class="cart-checkout">Checkout</button>
  </div>
</div>
Step 2: Style the cart UI component
Next, we will use Tailwind CSS classes to style the cart UI component. Here's the CSS code:
.cart {
  display: flex;
  flex-direction: column;
  background-color: #fff;
  border: 1px solid #ddd;
  border-radius: 4px;
  padding: 1rem;
}

.cart-header {
  display: flex;
  justify-content: space-between;
  align-items: center;
  margin-bottom: 1rem;
}

.cart-title {
  font-size: 1.5rem;
  font-weight: bold;
}

.cart-total {
  font-size: 1.25rem;
}

.cart-items {
  display: grid;
  grid-template-columns: repeat(auto-fit, minmax(250px, 1fr));
  grid-gap: 1rem;
}

.cart-item {
  display: flex;
  flex-direction: column;
  background-color: #f9f9f9;
  border: 1px solid #ddd;
  border-radius: 4px;
  padding: 1rem;
}

.cart-item-image {
  height: 200px;
  background-color: #ddd;
  margin-bottom: 1rem;
}

.cart-item-name {
  font-size: 1.25rem;
  font-weight: bold;
  margin-bottom: 0.5rem;
}

.cart-item-price {
  font-size: 1.25rem;
  margin-bottom: 0.5rem;
}

.cart-item-quantity {
  font-size: 1.25rem;
  margin-bottom: 0.5rem;
}

.cart-item-total {
  font-size: 1.25rem;
  margin-bottom: 0.5rem;
}

.cart-footer {
  margin-top: 1rem;
  display: flex;
  justify-content: flex-end;
}

.cart-checkout {
  background-color: #4caf50;
  color: #fff;
  border: none;
  border-radius: 4px;
  padding: 0.5rem 1rem;
  font-size: 1.25rem;
  cursor: pointer;
}
Step 3: Add dynamic data using JavaScript
Finally, we will use JavaScript to add dynamic data to the cart UI component. We will use an array of objects to store the product data and loop through it to create the cart items. Here's the JavaScript code:
const products = [
  {
    name: 'Product 1',
    image: 'https://via.placeholder.com/250x200',
    price: 9.99,
    quantity: 1
  },
  {
    name: 'Product 2',
    image: 'https://via.placeholder.com/250x200',
    price: 19.99,
    quantity: 2
  }
];

const cartItems = document.querySelector('.cart-items');

products.forEach(product => {
  const cartItem = document.createElement('div');
  cartItem.classList.add('cart-item');

  const cartItemImage = document.createElement('div');
  cartItemImage.classList.add('cart-item-image');
  cartItem.appendChild(cartItemImage);

  const cartItemName = document.createElement('div');
  cartItemName.classList.add('cart-item-name');
  cartItemName.textContent = product.name;
  cartItem.appendChild(cartItemName);

  const cartItemPrice = document.createElement('div');
  cartItemPrice.classList.add('cart-item-price');
  cartItemPrice.textContent = `$${product.price.toFixed(2)}`;
  cartItem.appendChild(cartItemPrice);

  const cartItemQuantity = document.createElement('div');
  cartItemQuantity.classList.add('cart-item-quantity');
  cartItemQuantity.textContent = `Quantity: ${product.quantity}`;
  cartItem.appendChild(cartItemQuantity);

  const cartItemTotal = document.createElement('div');
  cartItemTotal.classList.add('cart-item-total');
  cartItemTotal.textContent = `Total: $${(product.price * product.quantity).toFixed(2)}`;
  cartItem.appendChild(cartItemTotal);

  cartItems.appendChild(cartItem);
});

const cartTotal = document.querySelector('.cart-total');
const total = products.reduce((acc, product) => acc + (product.price * product.quantity), 0);
cartTotal.textContent = `Total: $${total.toFixed(2)}`;
Conclusion
In conclusion, creating a cart UI component with Tailwind CSS is a quick and easy process. By using a combination of flexbox, grid, and utility classes, developers can create responsive and customizable UI components in a matter of minutes. Additionally, Tailwind CSS provides a highly customizable framework that enables developers to tweak the styles to match their design requirements.